Are those little lines making you go cross-eyed? Learn how to read a tape measure correctly so you can complete your project with confidence!
Whatever project you are working on, from hanging a picture frame to building a new deck, you'll probably need to read a tape measure. The concept is pretty simple, but once you get into the eighths and sixteenths, it can get a little confusing!
I'm totally guilty of reading a tape measure as "one tick past the half inch" or "one line before 11." While that works for quickly transferring a measurement with the same tape measure, it could read differently on someone else's!
This tutorial will teach you how to read tape measure markings correctly, plus tips for getting an accurate measurement every time!
This post contains affiliate links for your convenience. Purchases made through these links may earn me a small commission at no additional cost to you. Please visit my disclosures page for more information.
Parts of a tape measure
Every tape measure has a few essential parts, and learning how they work will make it easier to use!

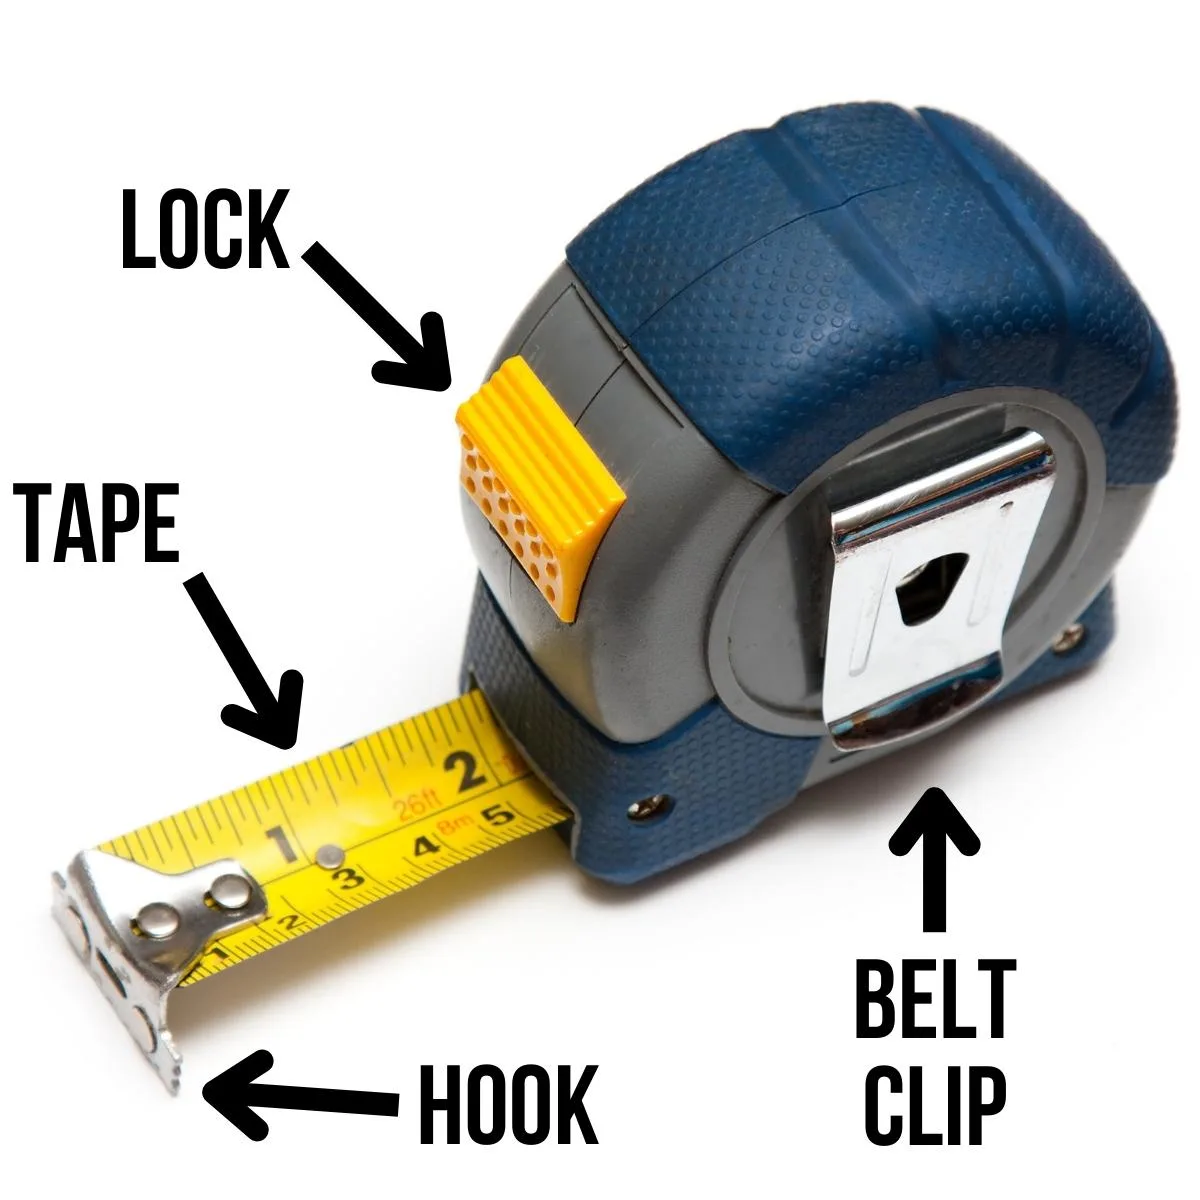
The Tape
The tape is the long metal strip you pull out when taking a measurement. It is curved to make it rigid when it's stretched out.
The standout is the distance the tape can reach without bending. If you've ever measured the length of a room and had the tape flop down after a few feet, you probably had a narrow tape with weak standout.
The Lock
The button or sliding switch on the front of the tape measure is the lock. The tape is coiled around a spring, which pulls it back automatically. But this can get annoying when you're trying to accurately mark your measurement!

This is where the lock comes in handy. Simply flip the switch, and it will clamp the tape so it does not retract. Make sure not to pull on the tape when it's in the locked position, or eventually the lock will stop working. Ask me how I know! 😉
The Belt Clip
On the side of your tape measure, you'll see another handy addition: a springy clip that allows you to hold it on your belt or apron pocket. If you have a tool bag, sometimes there's a little metal tab on the outside which is specifically designed to fit the clip on your tape measure.

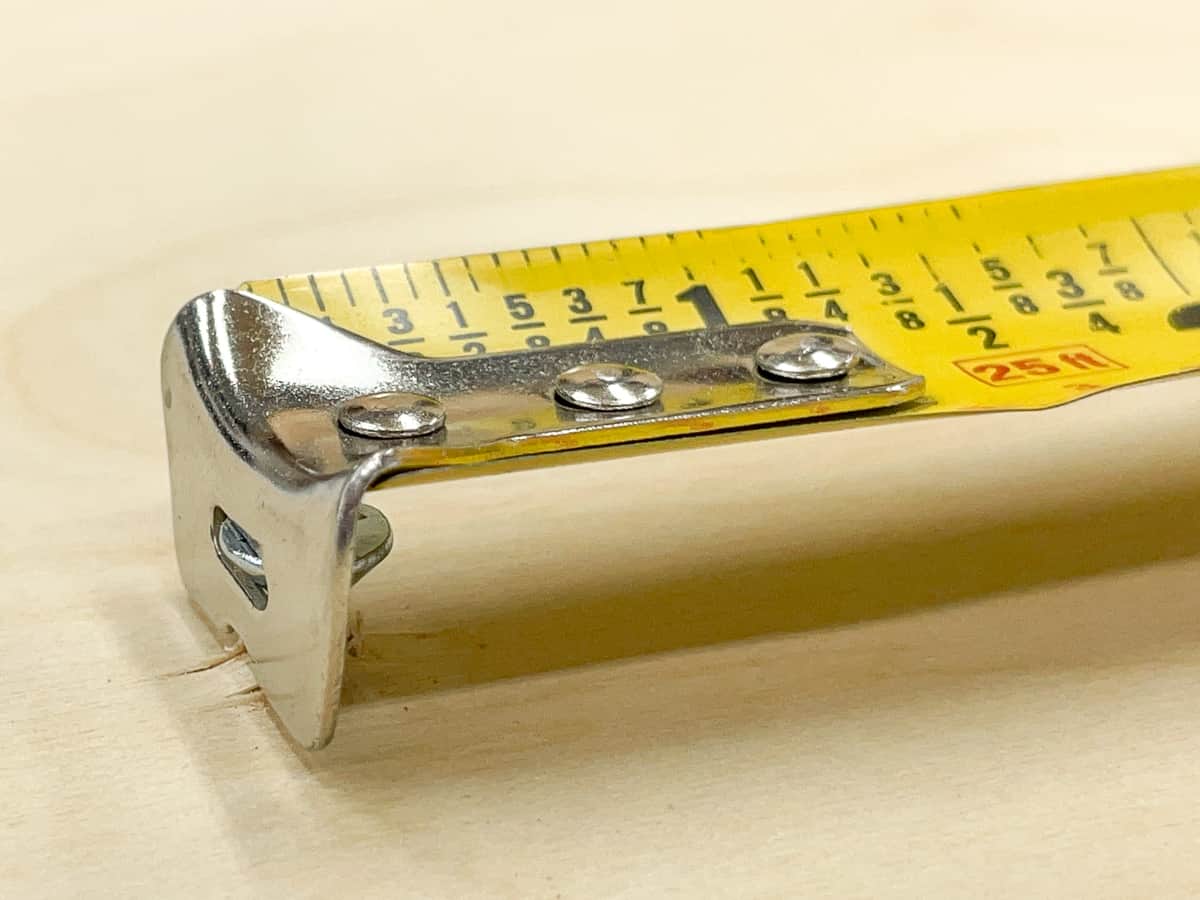
The Tab Hook
On the end of the tape, there is another little metal tab. This has two functions: First, it keeps the tape from retracting all the way into the housing. Second, it gives you something to hook over the end of the piece you are measuring, so you don't have to hold the tape in place at both ends.

When you get your first tape measure, you may think there is something wrong with the metal tab, because it is a little loose. However, this is intentional! This little bit of play compensates for the thickness of the tab, depending on how you're measuring.
The tab slides in when you press the tab up against a surface to do an interior measurement. That way, the thickness of the tab doesn't skew the measurement.
When you hook it over an edge for an outside measurement, the tab is pulled out so the measurement can start from the inside edge of the tab that's actually touching the board.
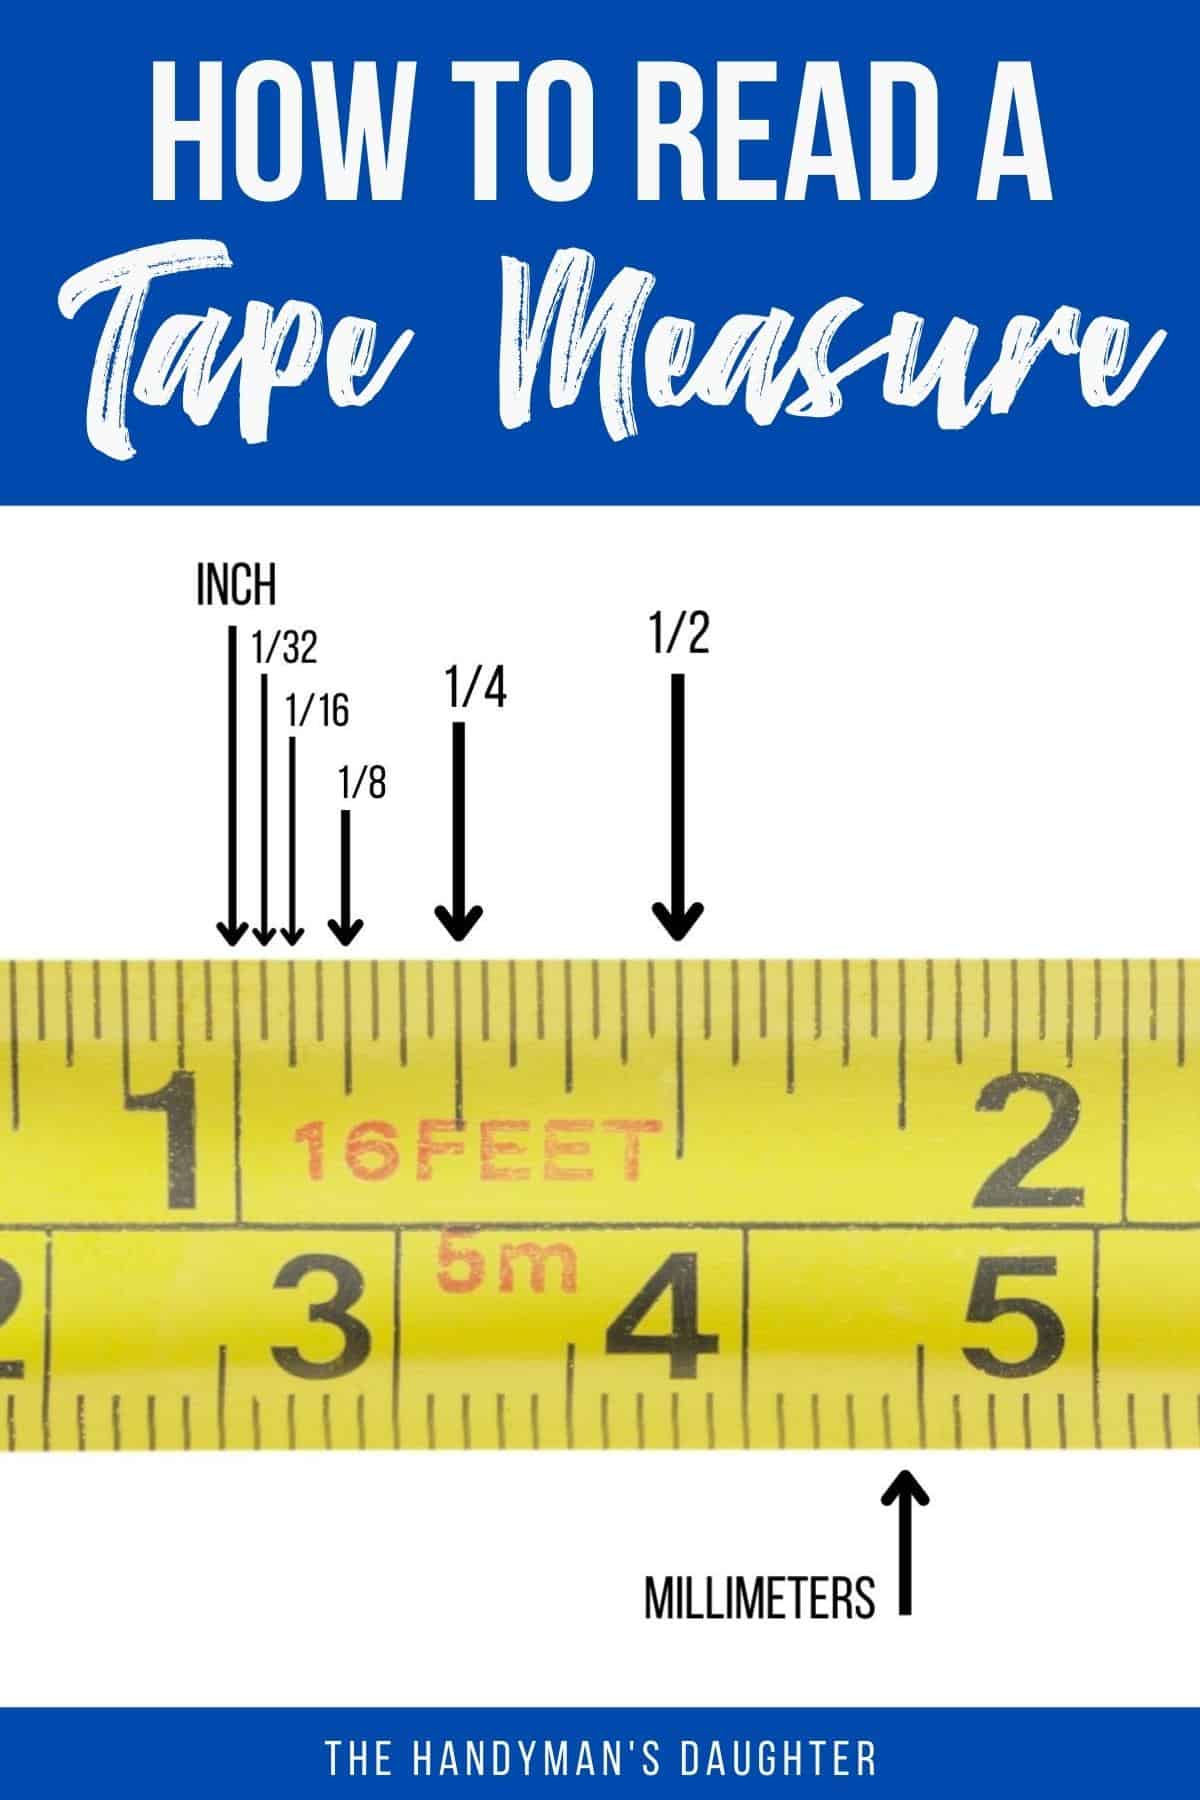
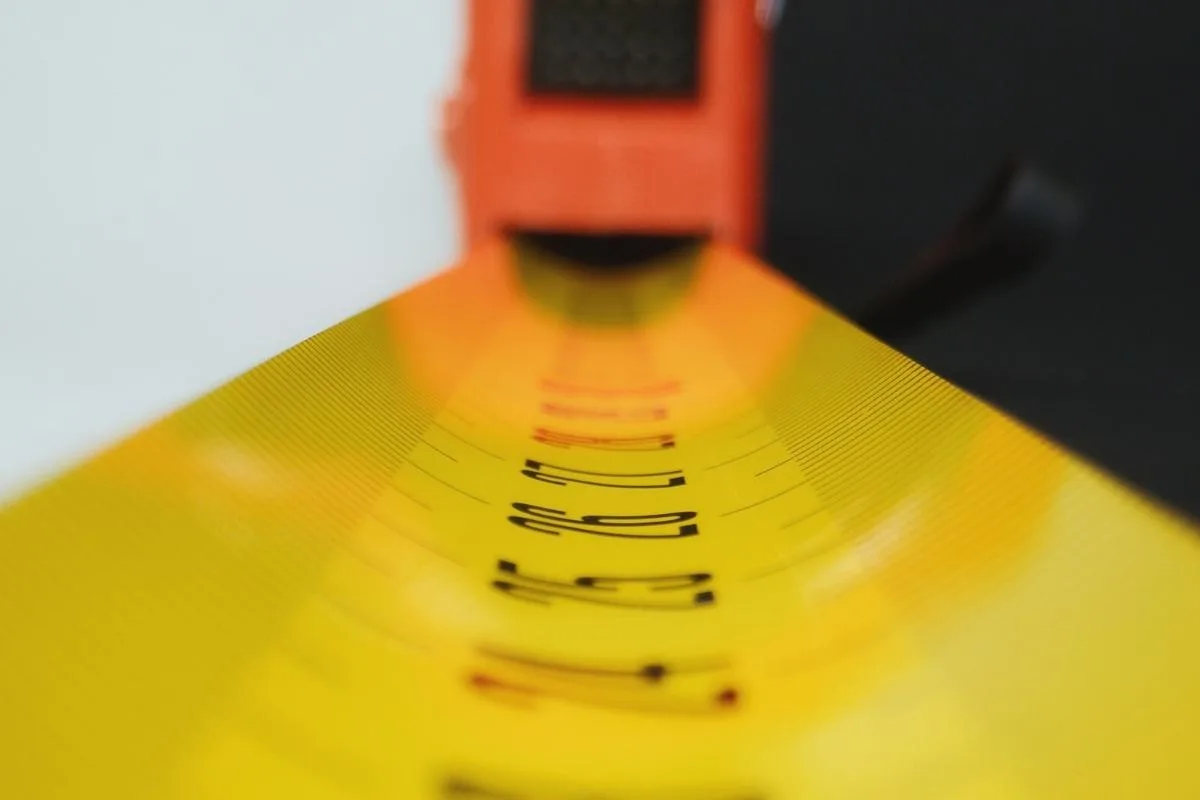
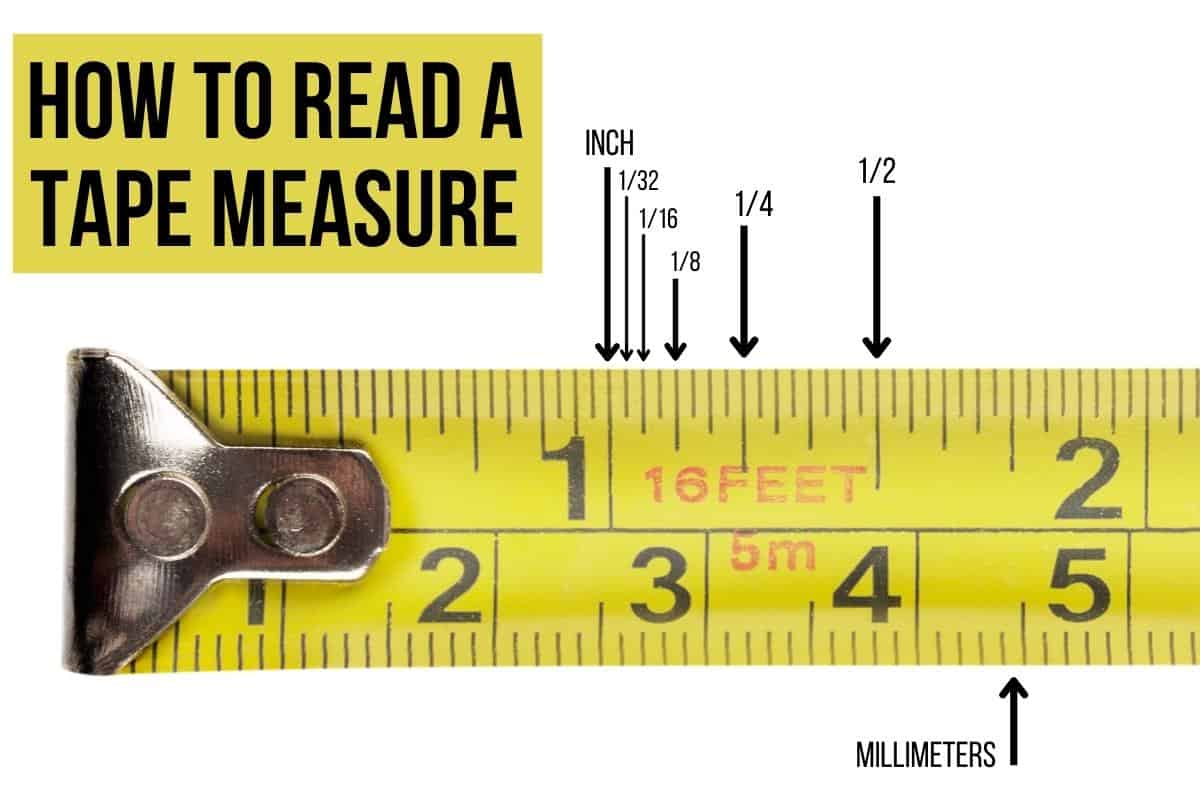
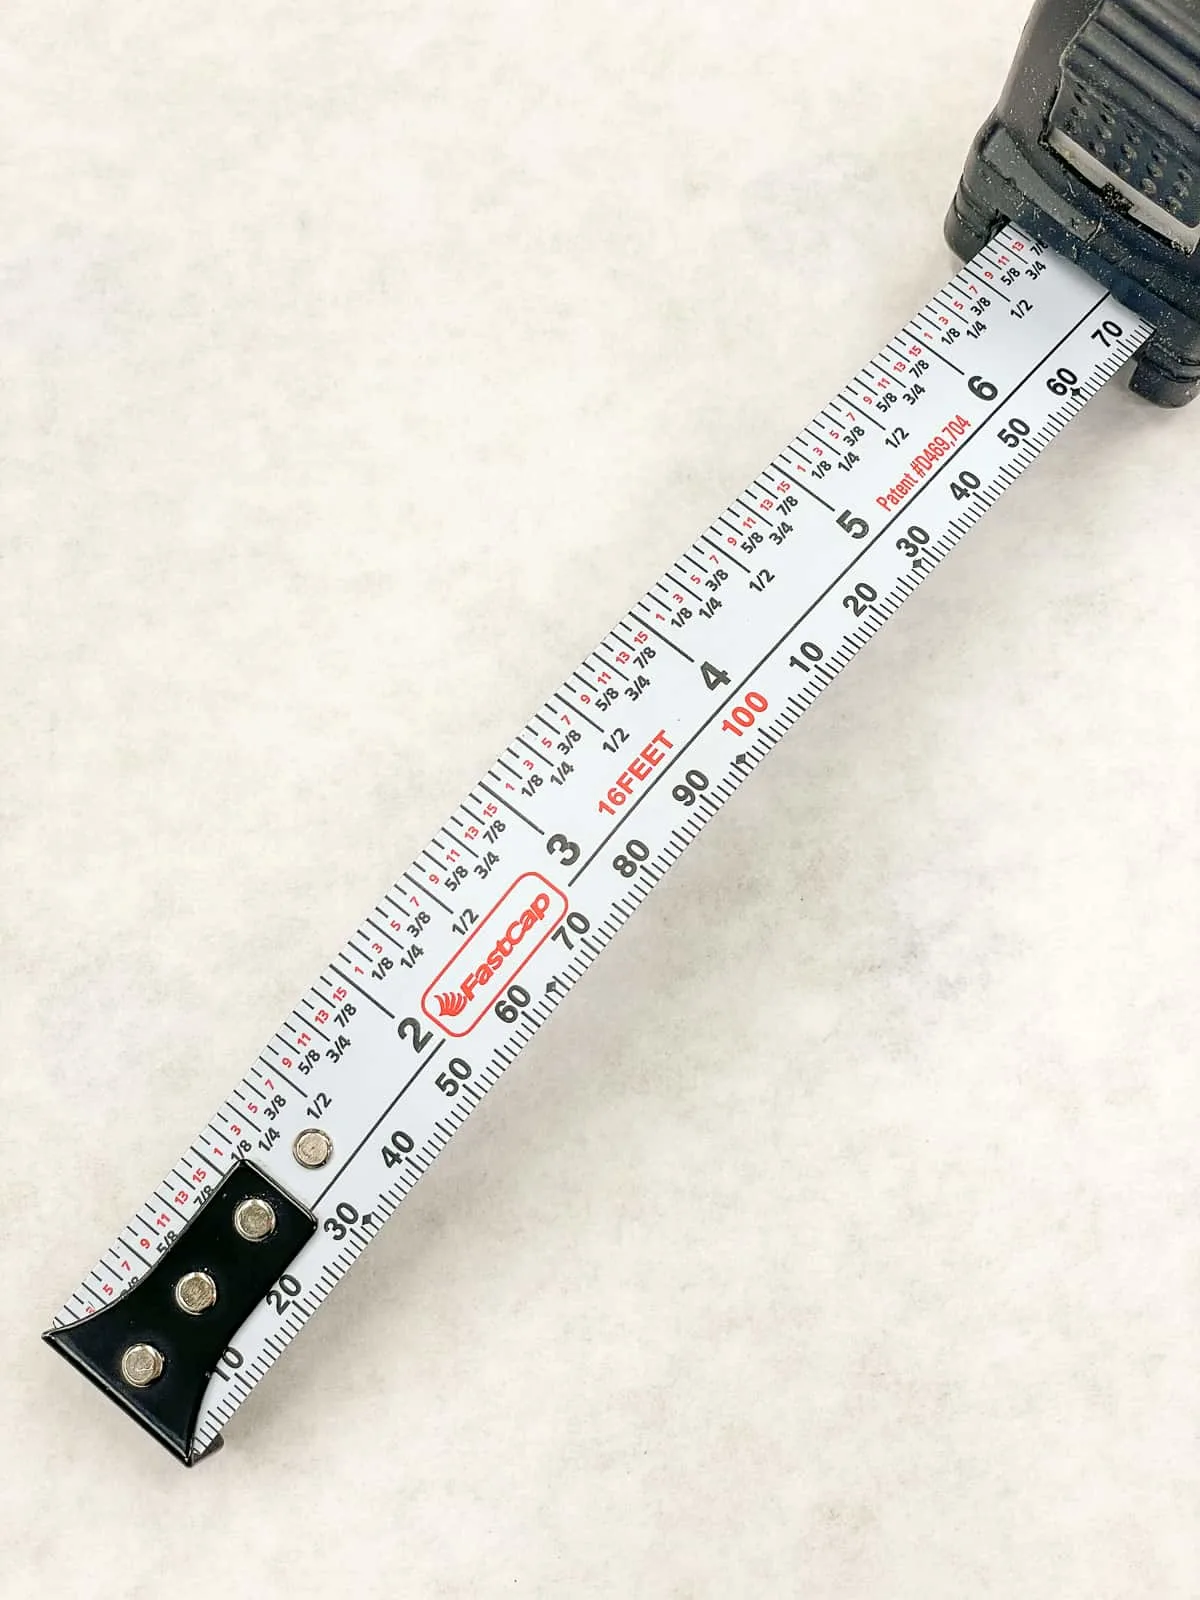
What are the marks on a tape measure?
You can easily read a tape measure by recognizing the whole inches and fractional markings. The middle mark indicates ½ inch, with ¼ and ¾ inches on either side. Smaller marks represent ⅛, 1/16, and 1/32 inch increments for precise measurements.
Lines
The main markings on the tape are the lines. There are all different sizes, and the size of the line corresponds to the size of the measurement it represents. So, the bigger the line, the bigger the section of measurement.
The largest lines are the inches, and halfway between the inches is the ½" line. Halfway between the ½" on either side is the ¼", and you can divide that measurement again to find the ⅛" marks. Even smaller are the 1/16" and 1/32", but I usually just start counting individual lines if I need one of those!
Here's an easy to read diagram that shows the tape measure fractions. You can see that in comparison, millimeters and the metric system are a lot easier to understand!
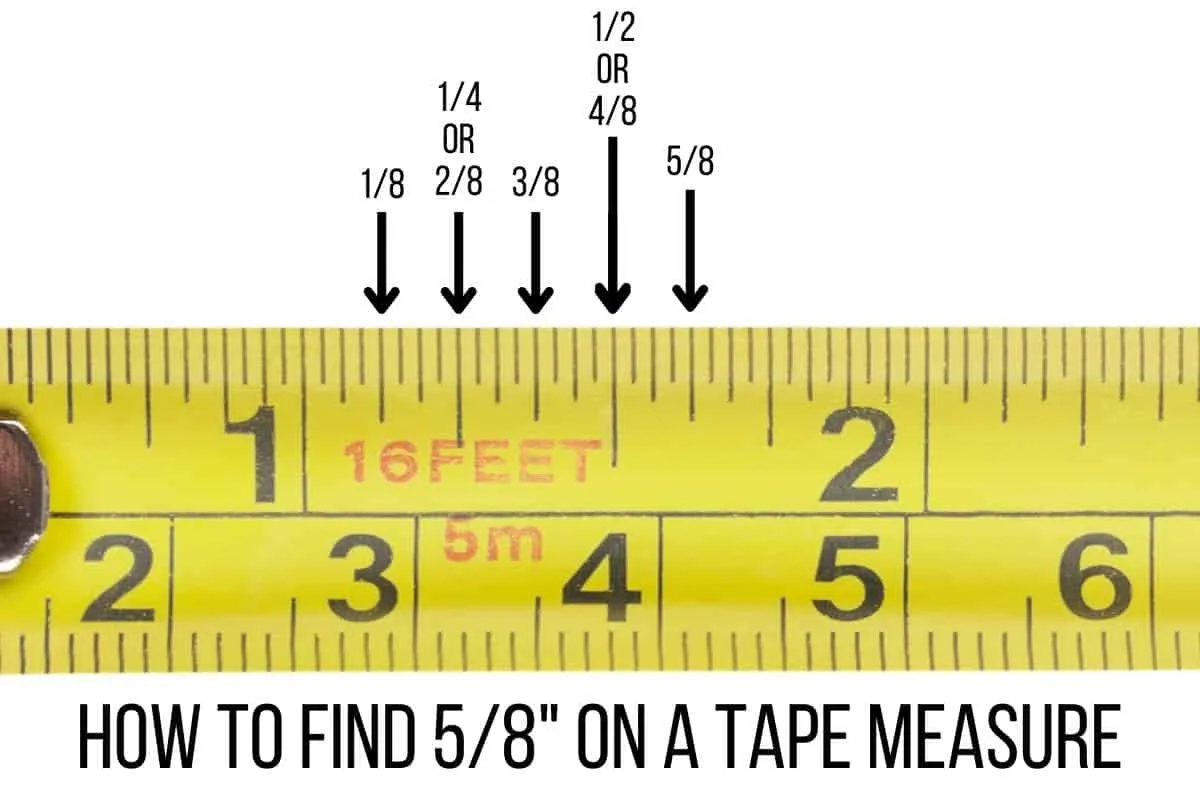
The tape measure shown above goes down to the 1/32nd of an inch, but most only show lines for 1/16th and larger. If you're not sure about yours, count the lines between one and two inches (including the 2" mark). 32 lines = 1/32" spacing. 16 lines = 1/16" spacing. 8 lines = ⅛" spacing.
For example, if you want to find ⅝" on this tape measure, imagine that the inch is divided up into eight equal sections. ½" is 4/8", so look for the next ⅛" mark and you've found ⅝"!

If you really struggle to read the fractions on a tape measure, you can buy one that has them written out for you! I'm always reaching for this one in my workshop!
You can also make a custom patch for the side of your tape measure that you can refer to whenever you're struggling to remember which line is which. These personalized tape measures also make a great gift!

Black Diamonds
You may have wondered what the black diamonds on a tape measure are for. This is mostly used for framing a building, but it is still useful to know!
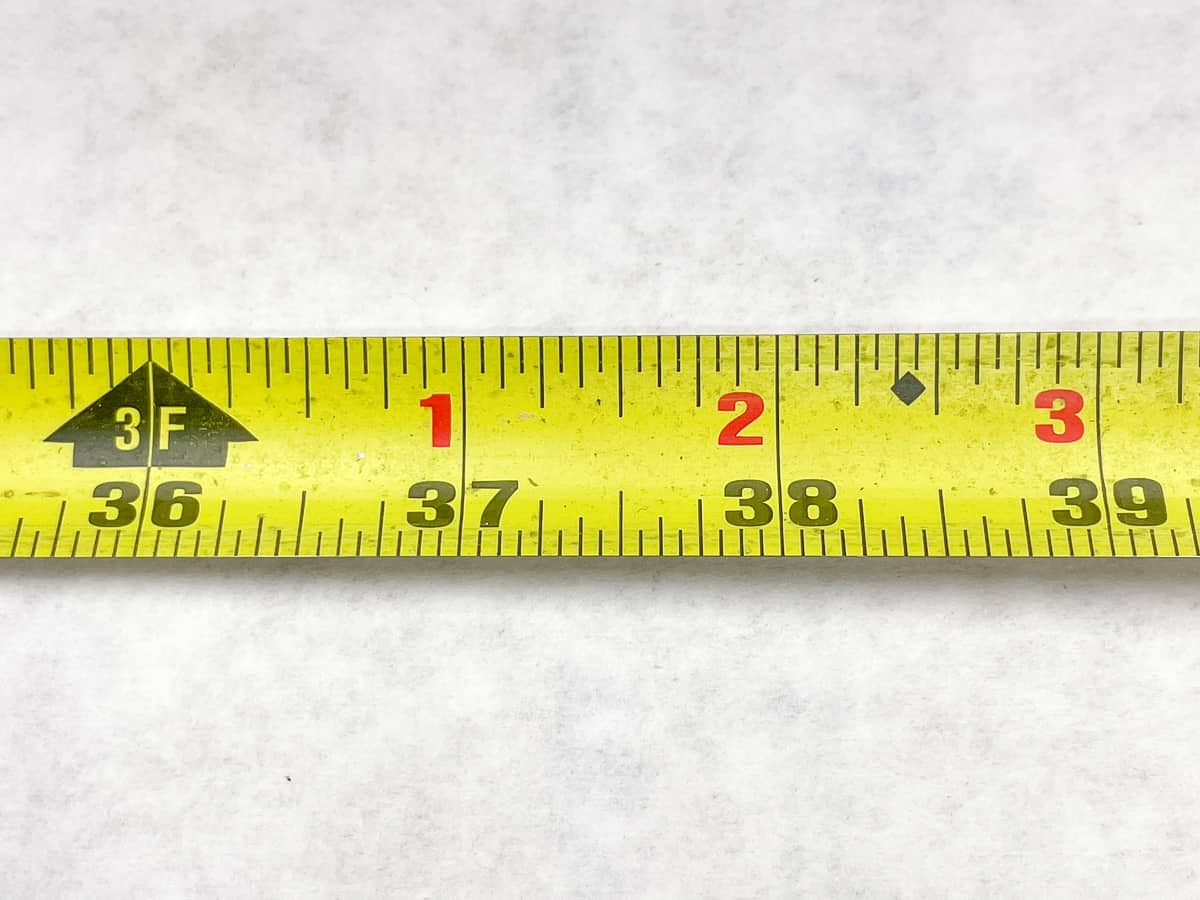
The diamonds are spaced 19 3/16" apart, which is the standard spacing for the trusses in a roof. They have their own marking because roofers are working high in the air, and being able to see the spacing they need easily makes things faster and safer for them.
Note: Some tapes will also have special markings for measuring stud locations, but this may not be accurate in your own home. Studs aren't always installed 16" on center, so instead of relying on a tape measure, use a stud finder or one of these methods for finding a stud without one.
Other Tape Measure Tips
Here are some tips for getting the best results with your tape measure!
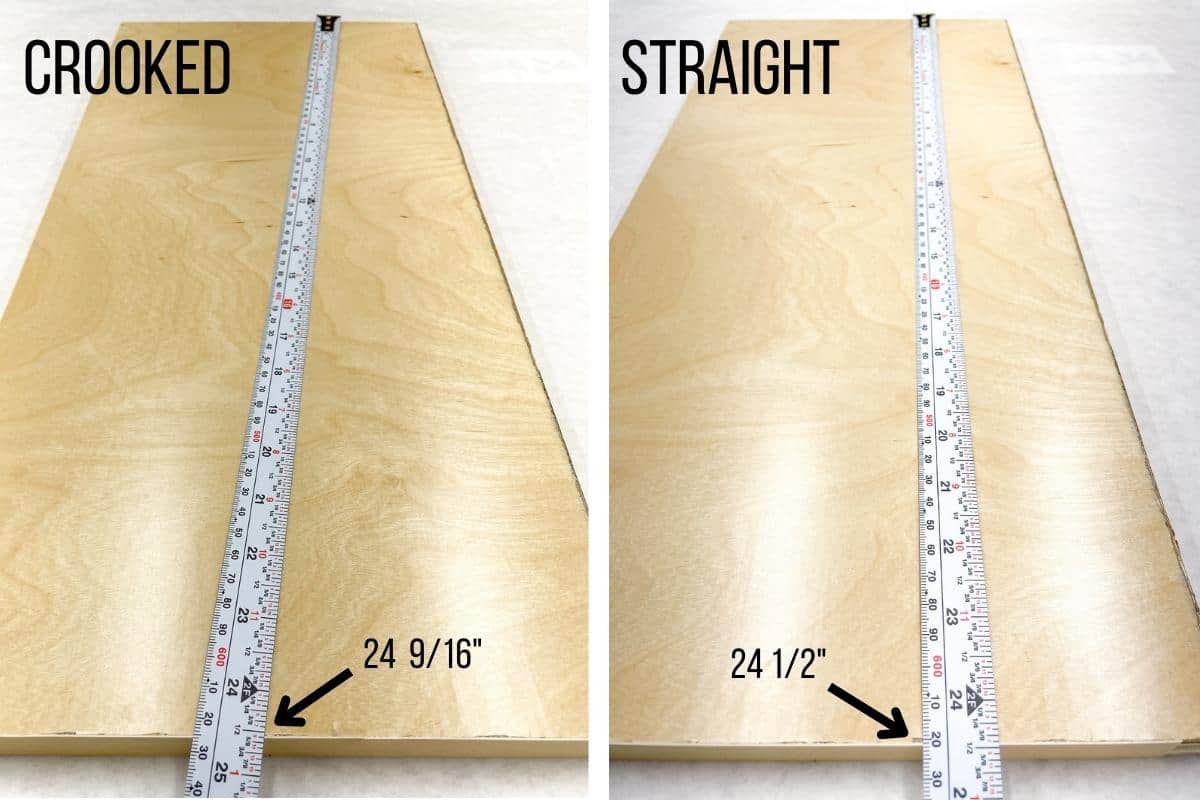
Make sure it's straight
While you are measuring, make sure to keep the tape as straight as possible. As you can see in the comparison below, even a slightly crooked tape measure can result in a different measurement that could throw off your entire project!

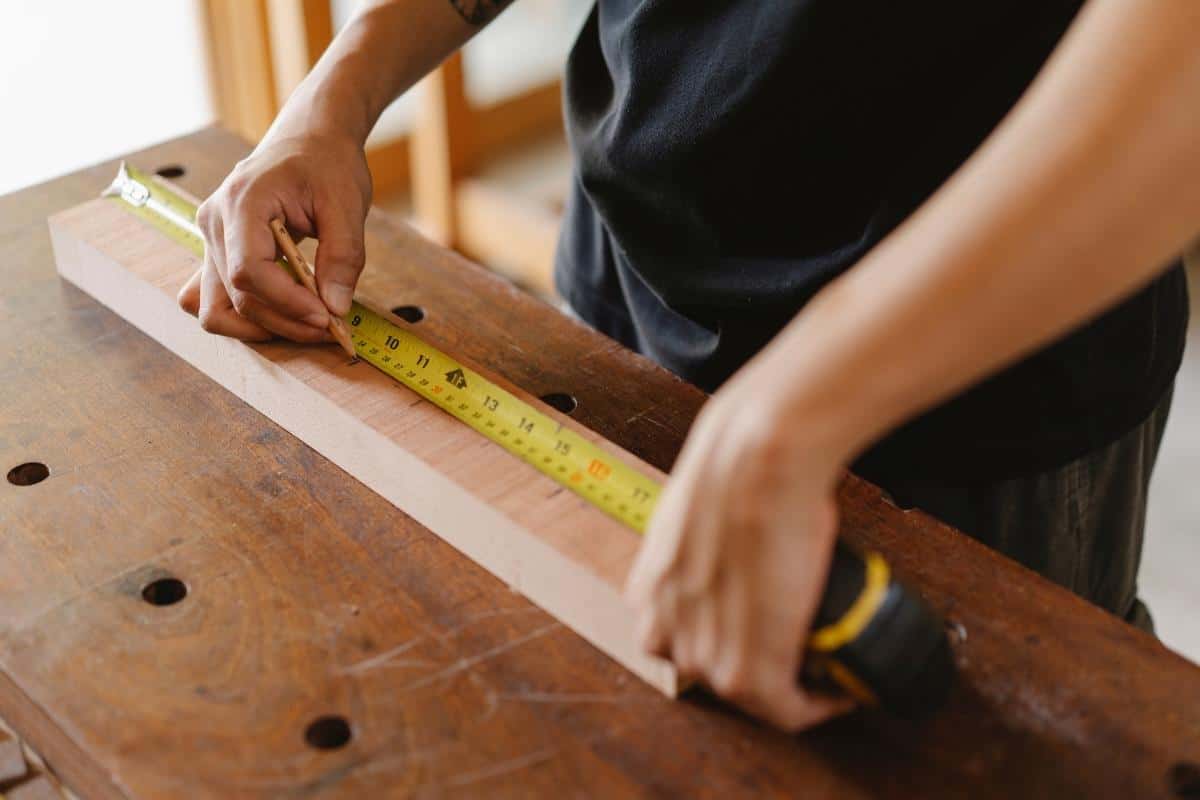
Mark with a V
When you are marking your measurement, mark the place with a V rather than a single line. This way, when you go back to reference your measurement, you know the exact spot where it is the most precise.
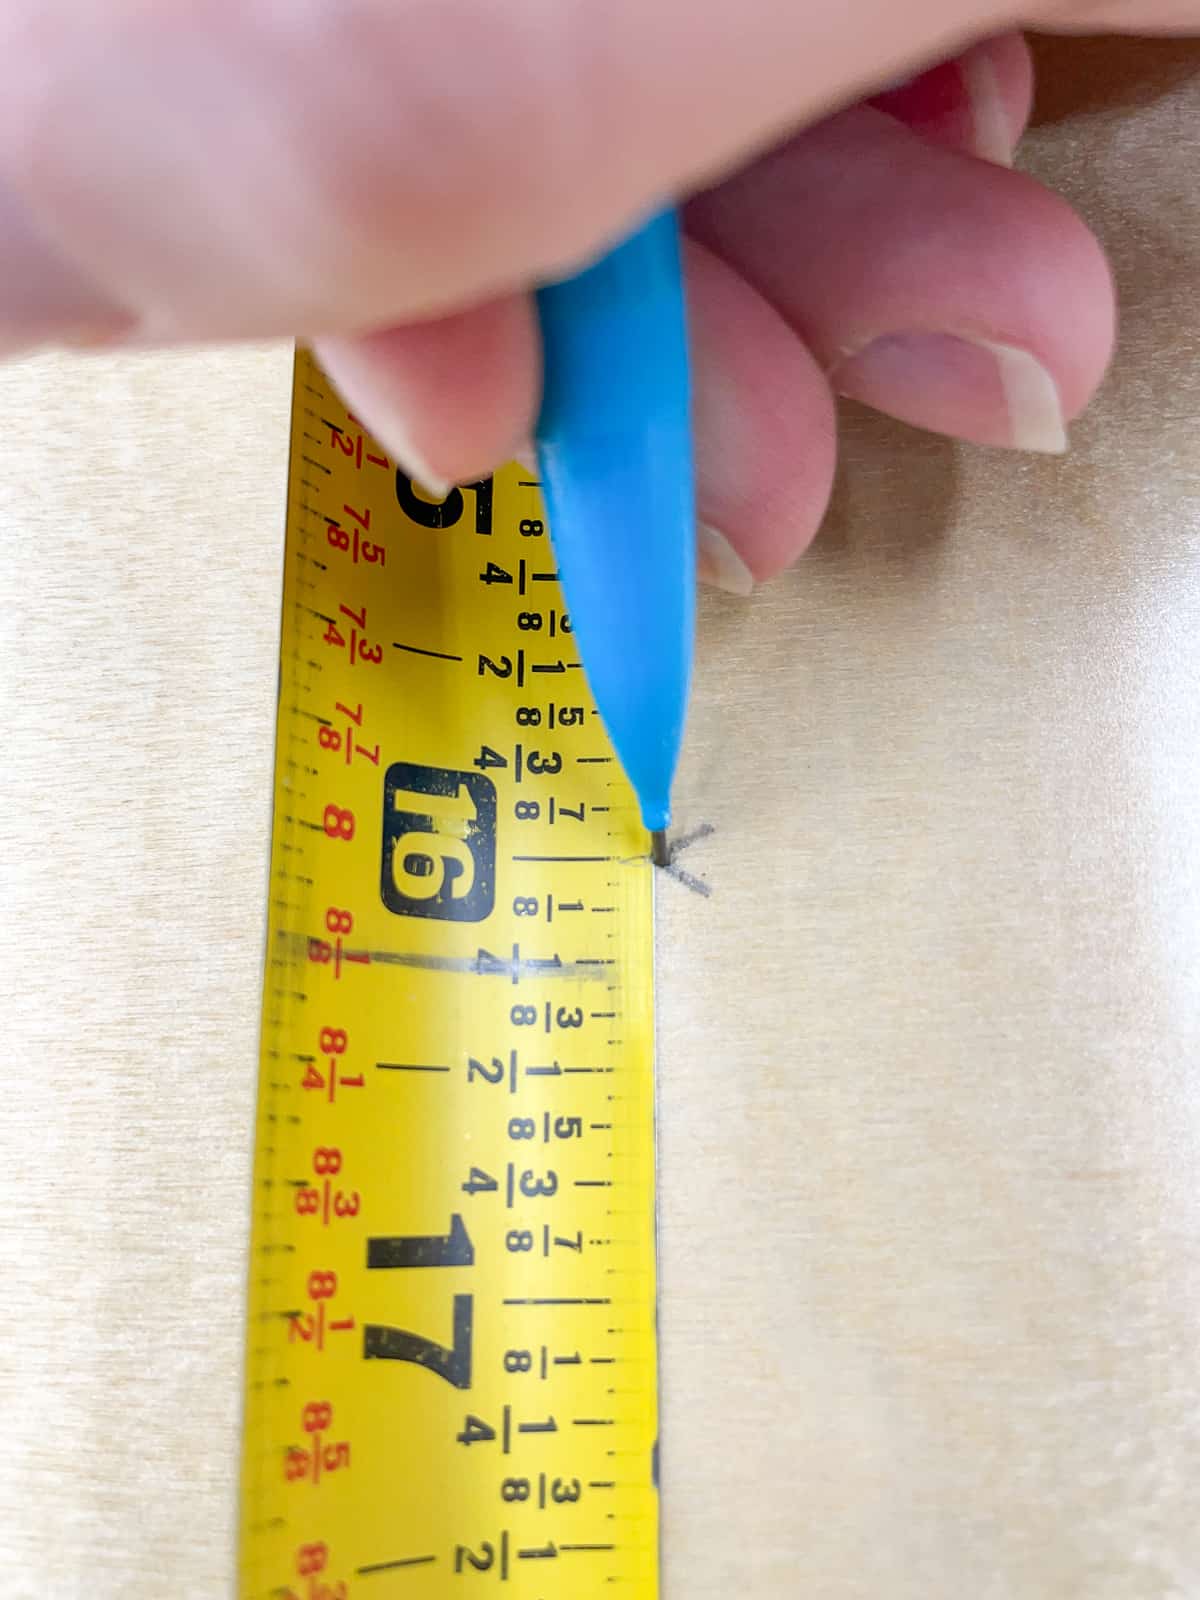

It also helps to roll the tape so that the side you're measuring on is flat against the board. Place the tip of your pencil on the tape at your measurement, then slide it off onto the workpiece for the best results.
Burn an inch
If your tape measure is getting old and beat up (like the one below!), the tab at the end of the tape may give you inaccurate measurements. But you can still use it for some applications.
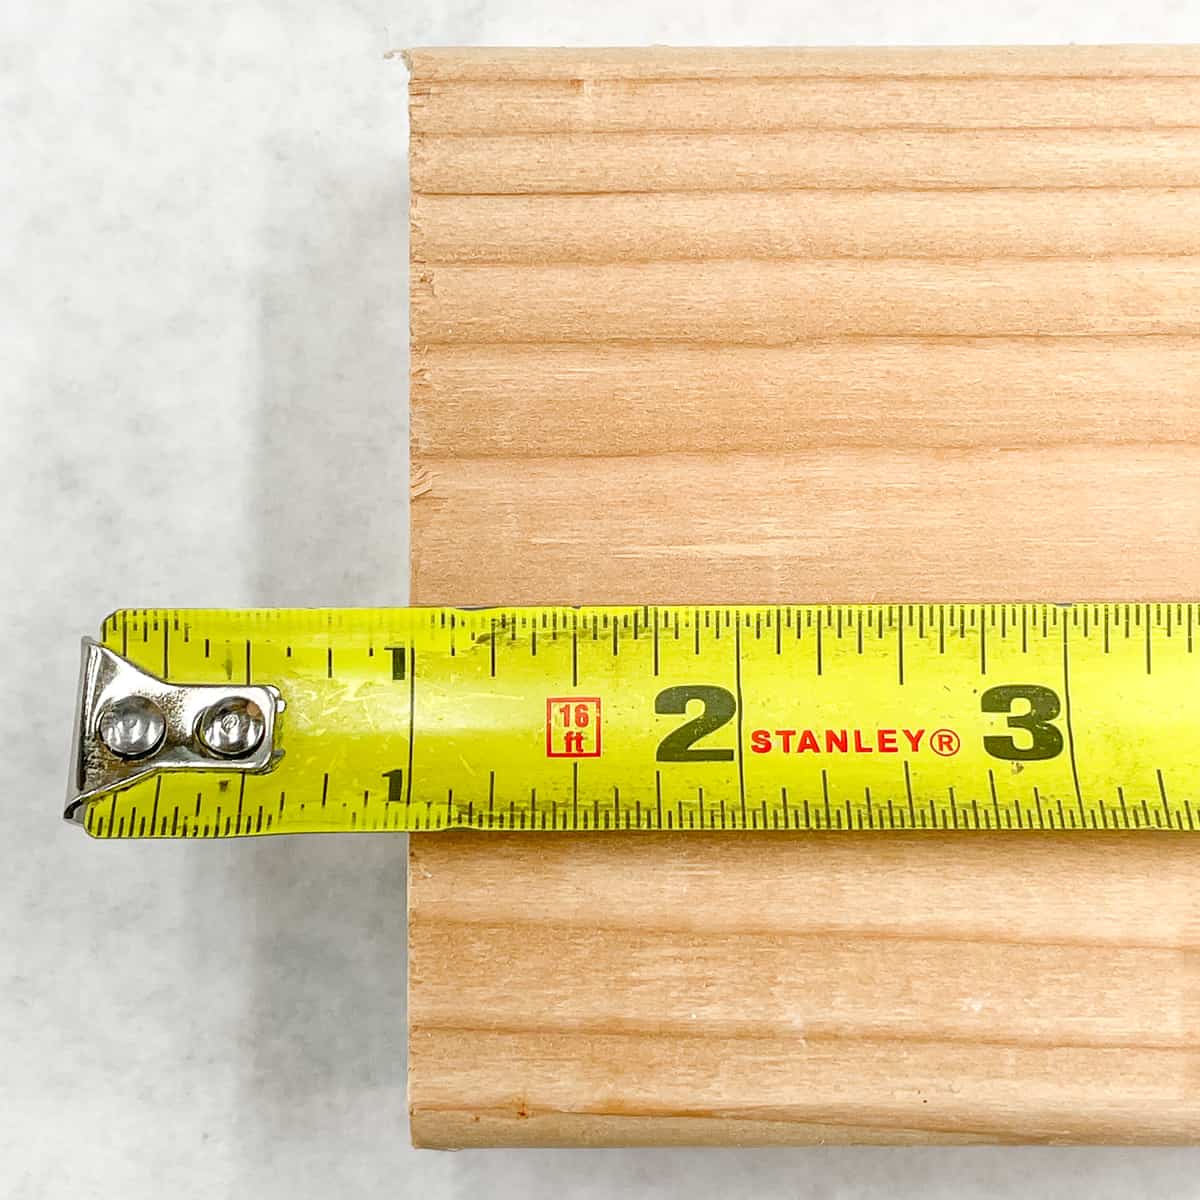

Instead of starting your tape at the tab, hold it in place at the 1" mark. This is called "burning an inch." Just remember to subtract an inch from your final measurement!
Don't snap back the tape
After you finish measuring, be careful not to let the tape slam back into the housing. This can damage the tab and make your measurements less accurate. To avoid this, rest your finger on the underside of the tape as it is retracting to slow it down.
Also, be careful not to let your fingers get close to the edges of the tape as it is retracting. The edges are not super sharp, but enough that they can leave a cut!
How to Use the Nail Notch
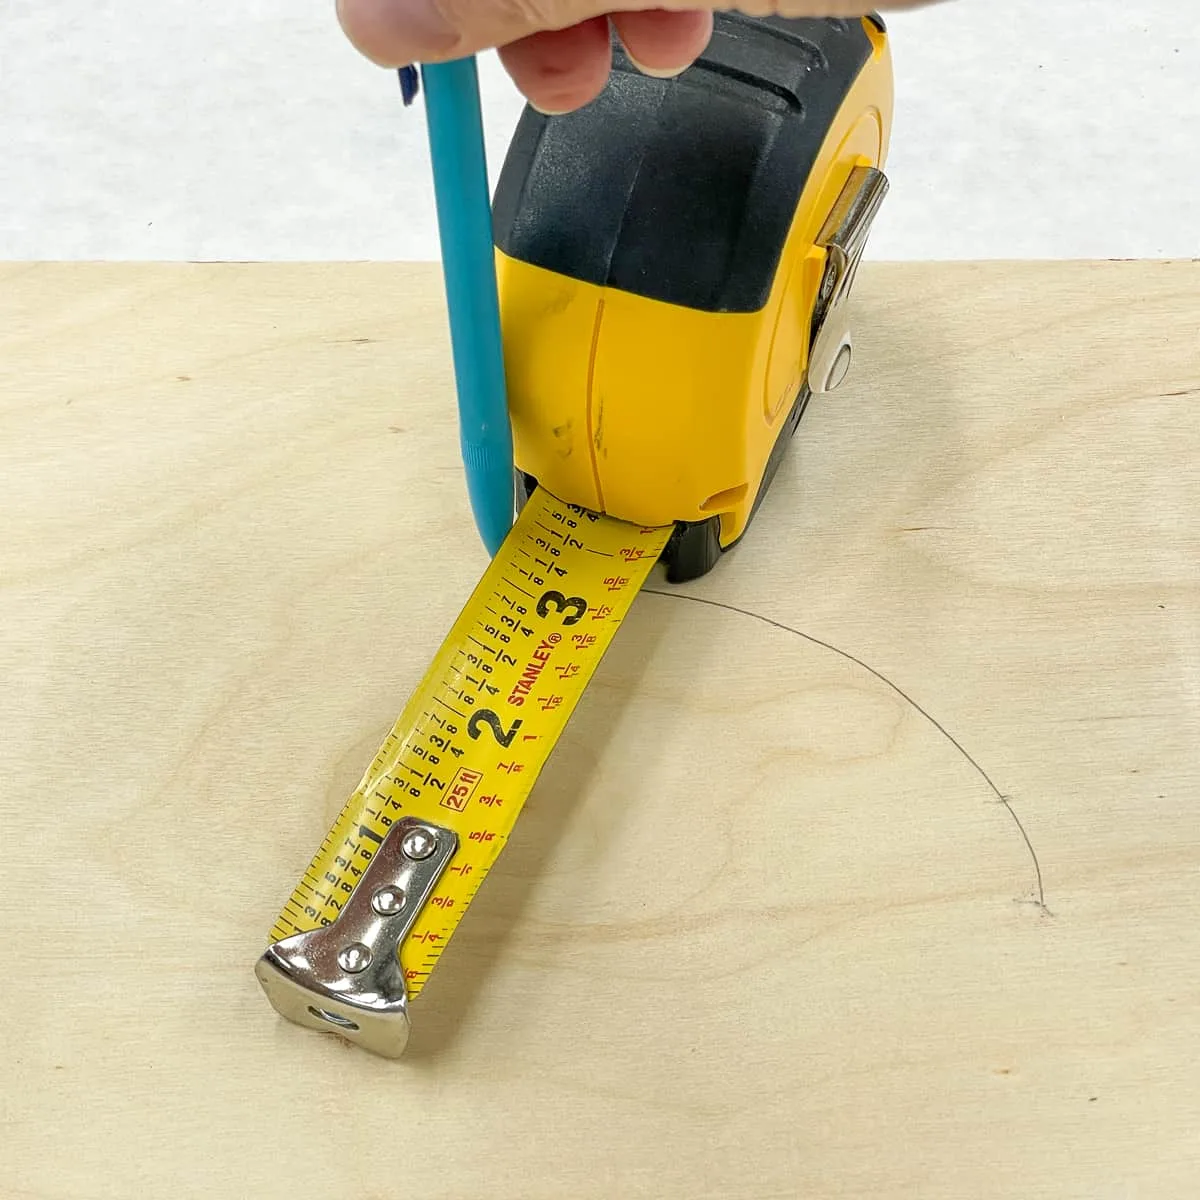
You will notice there is a little slit in the metal tab. This is so you can hook it over the head of a nail or screw to get an accurate measurement from a point in the middle of the board. Just be careful not to put a nail where the hole will be noticed!

You can also use this feature for drawing rough circles. Just place a nail where you want the center of the circle to be, then lock the measuring tape at the desired radius. Hold a pencil in the corner between the tape and the housing and rotate around the nail.

How to Take Interior Measurements
Measuring the insides of things accurately can be tricky. If you only need a rough measurement, then you can put the tab against one side and then simply bend the tape into the other corner. But this will not give you an exact measurement.
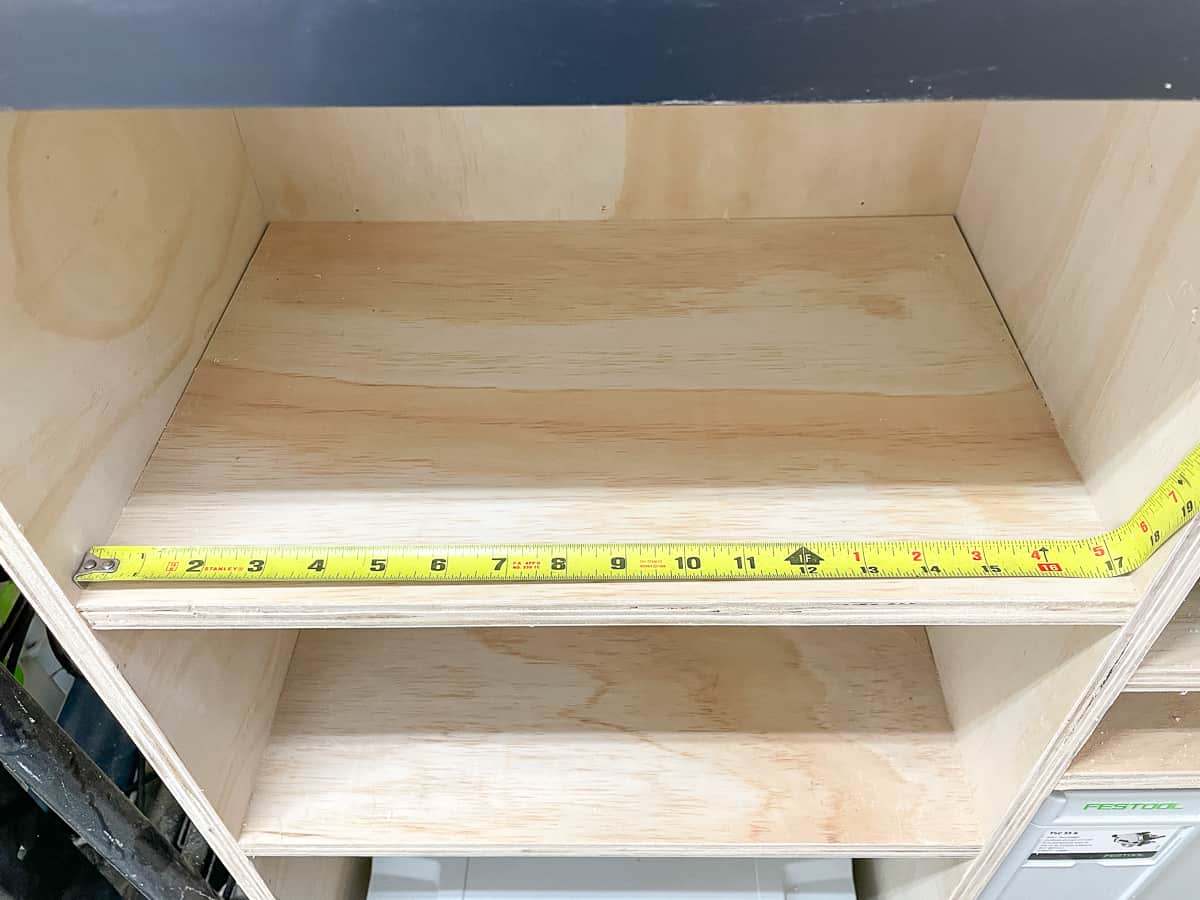

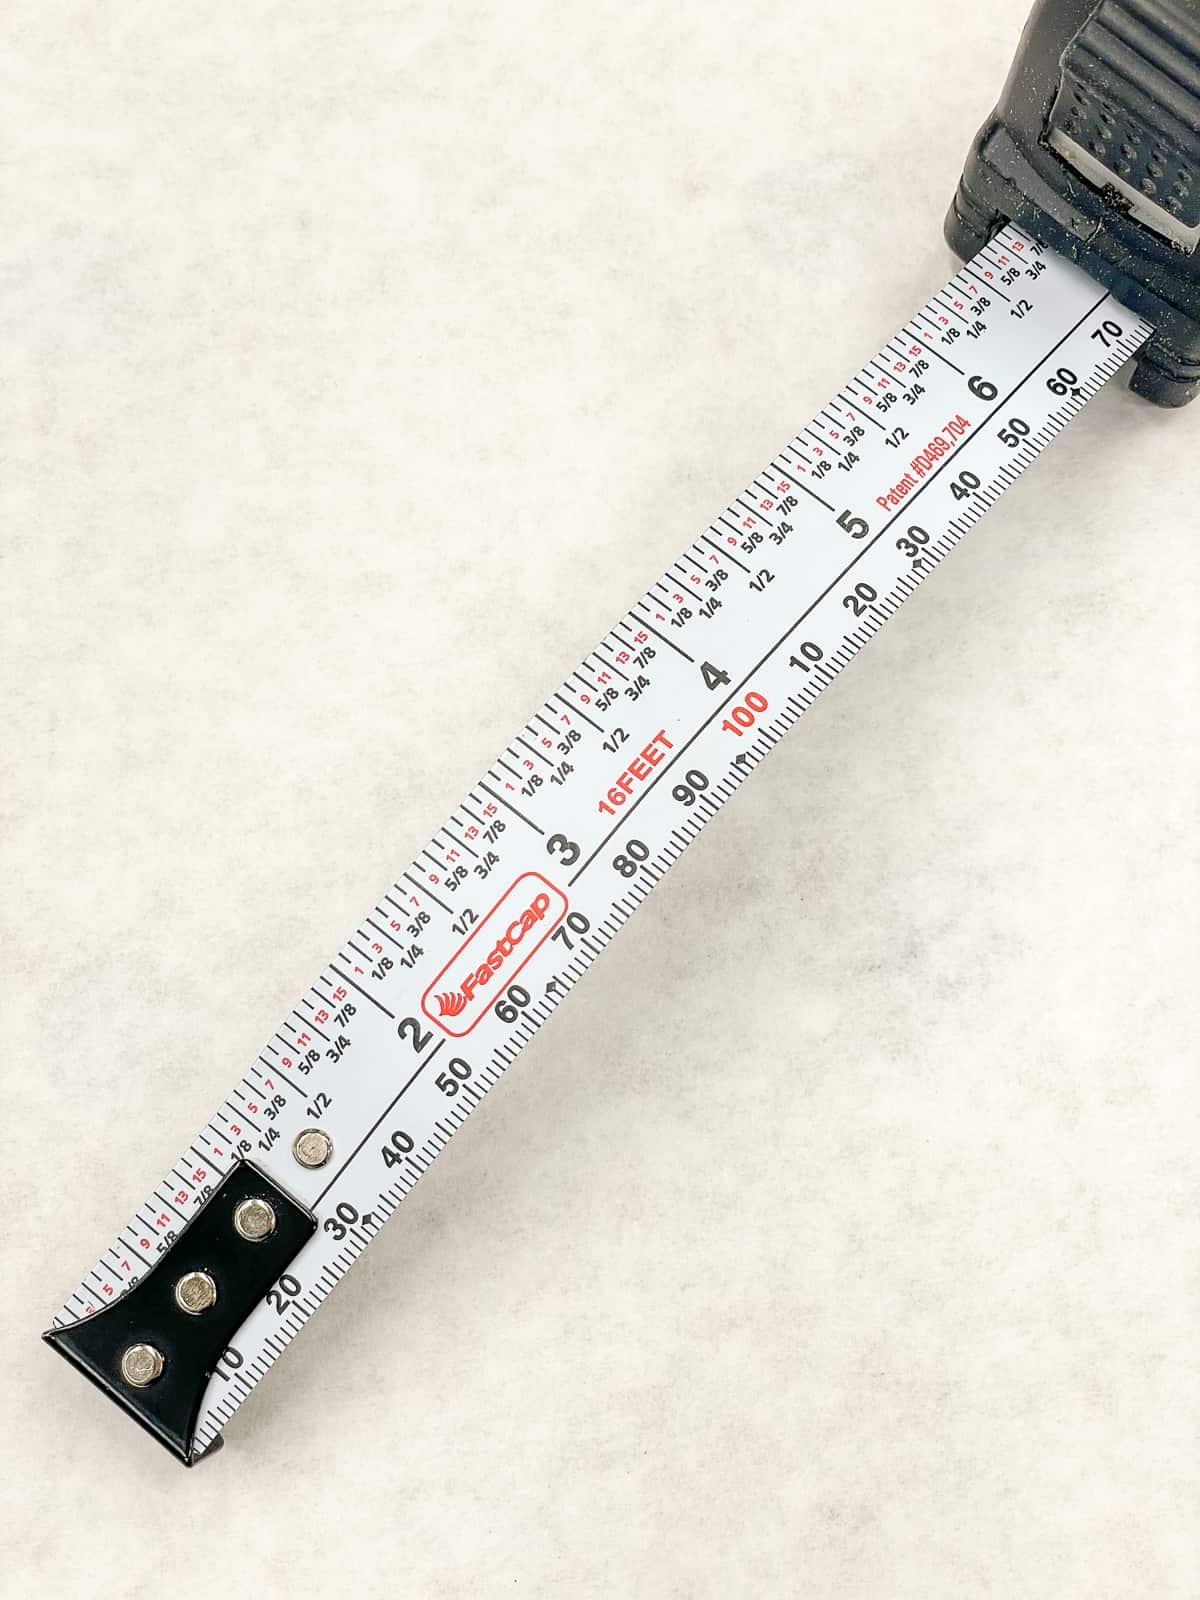
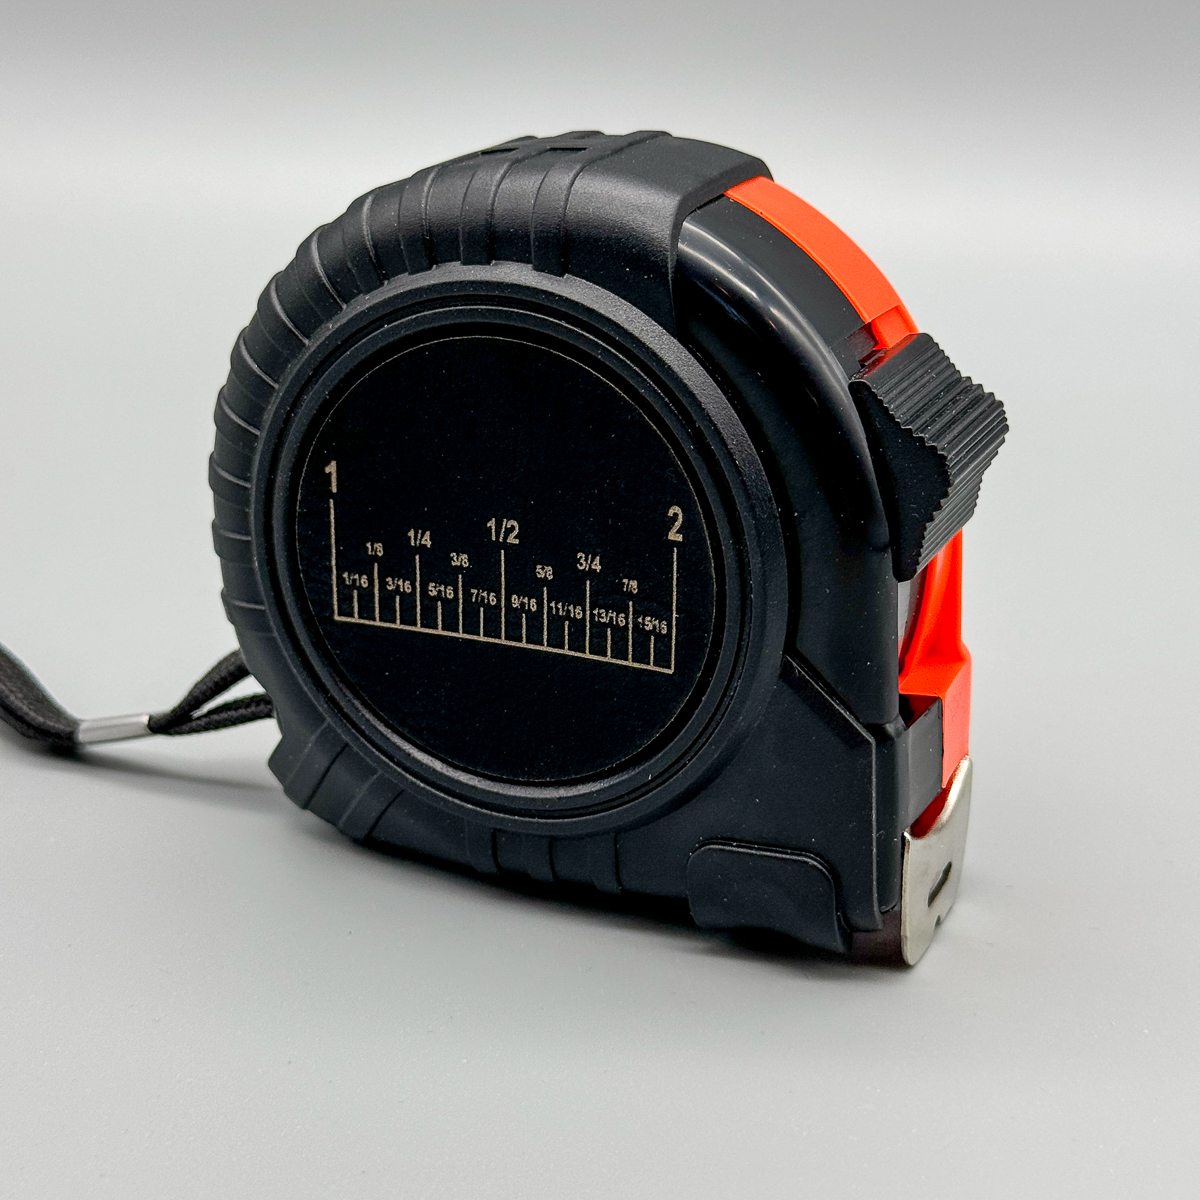
Take a look at the side of your tape measure, near the belt clip. You will find a measurement listed there. This shows you the length of your tape measure's housing.
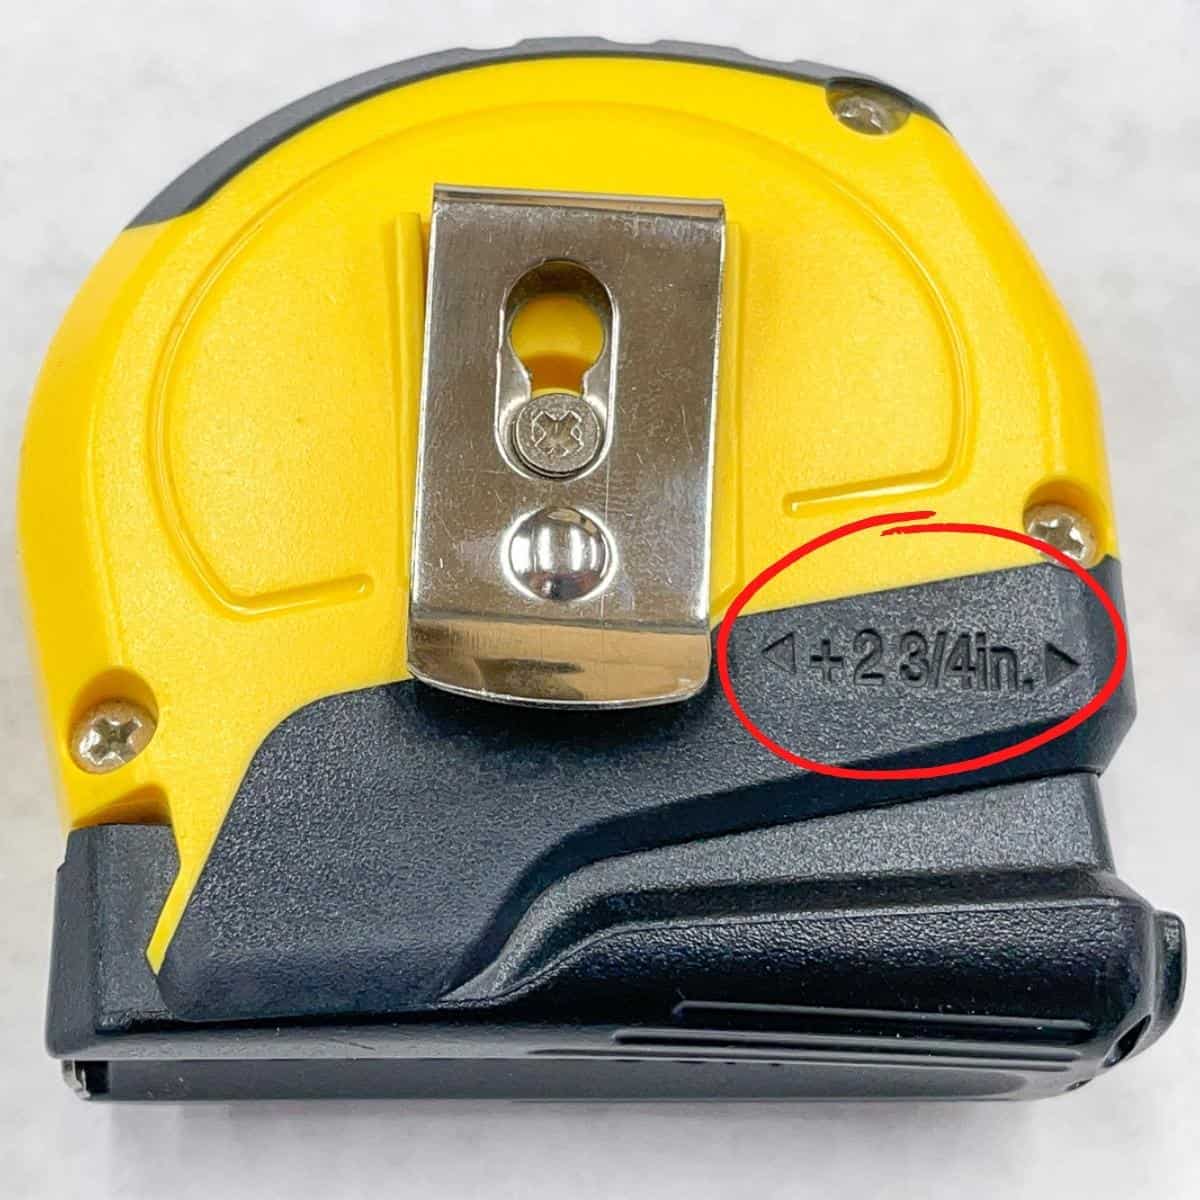
Just butt the housing up against the wall. Make a note of the measurement on your tape, and add it to the length of the housing. This will give you the precise reading for the inside of your project.
Hopefully these tips and tricks helped you master the measuring tape! Check out the articles below for more beginner woodworking tutorials!
Patti
Tuesday 29th of November 2022
Im an 80 yr old diy grandma. I always use a tape measure but I hv learned a couple new things bout them. Never to old to learn believe me. Thank You
Greg
Friday 28th of October 2022
On an inside measurement, mark 10" (for example) and flip over to the other side and measure from the inside edge to the 10" mark you just made. Add the two numbers for a more accurate measurement than using the body of the tape measure at one end.