Learn how to build a drawer box three different ways! Choose the right one for your project and skill level, from beginner to advanced!
Are you looking to add a drawer to an existing cabinet or piece of furniture? Or are you making a new nightstand or dresser and are stuck on how to make a drawer box? You've come to the right place!
YouTube is full of tutorials on how to build a drawer. You probably already watched a few and are still left scratching your head. Everyone seems to make it differently!
There are a few simple rules to follow when making a drawer box. After that, the building method is up to you! Each type of drawer has its own pros and cons, which I'll go over in each section. Let's dive in!
This post contains affiliate links for your convenience. Purchases made through these links may earn me a small commission at no additional cost to you. Please visit my disclosures page for more information.
Basic Rules for Building a Drawer
No matter which method you use, these principles will always apply.
- Decide whether you want inset drawers or overlay drawers first. This will change the length of the drawer. You can learn more about the difference between these two types in this article about the parts of a cabinet.
- Decide what type of drawer slides you'll use before you start building. The most common type of drawer slides are side-mounted, but undermount drawer slides are becoming more popular. Every drawer slide will have a different set of installation instructions, which will dictate the width of the drawer.
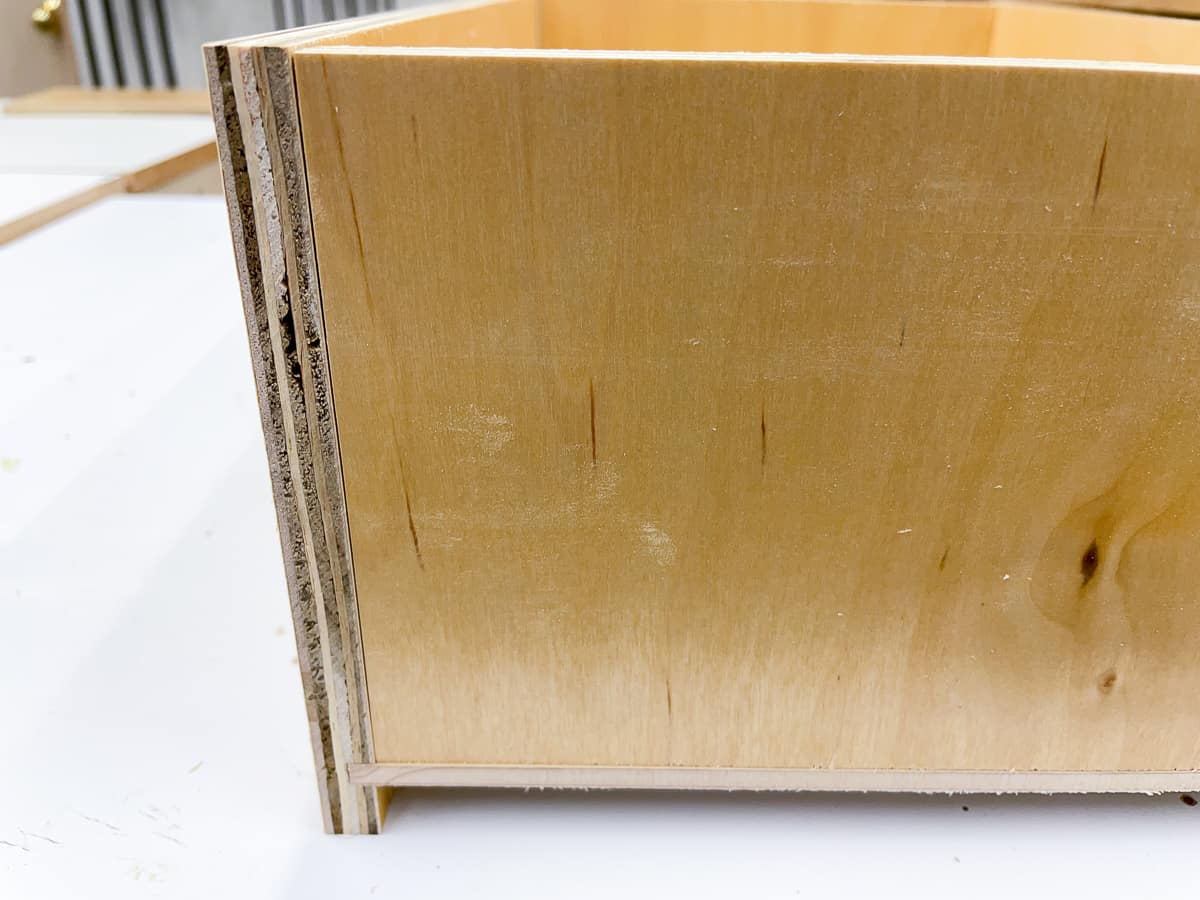
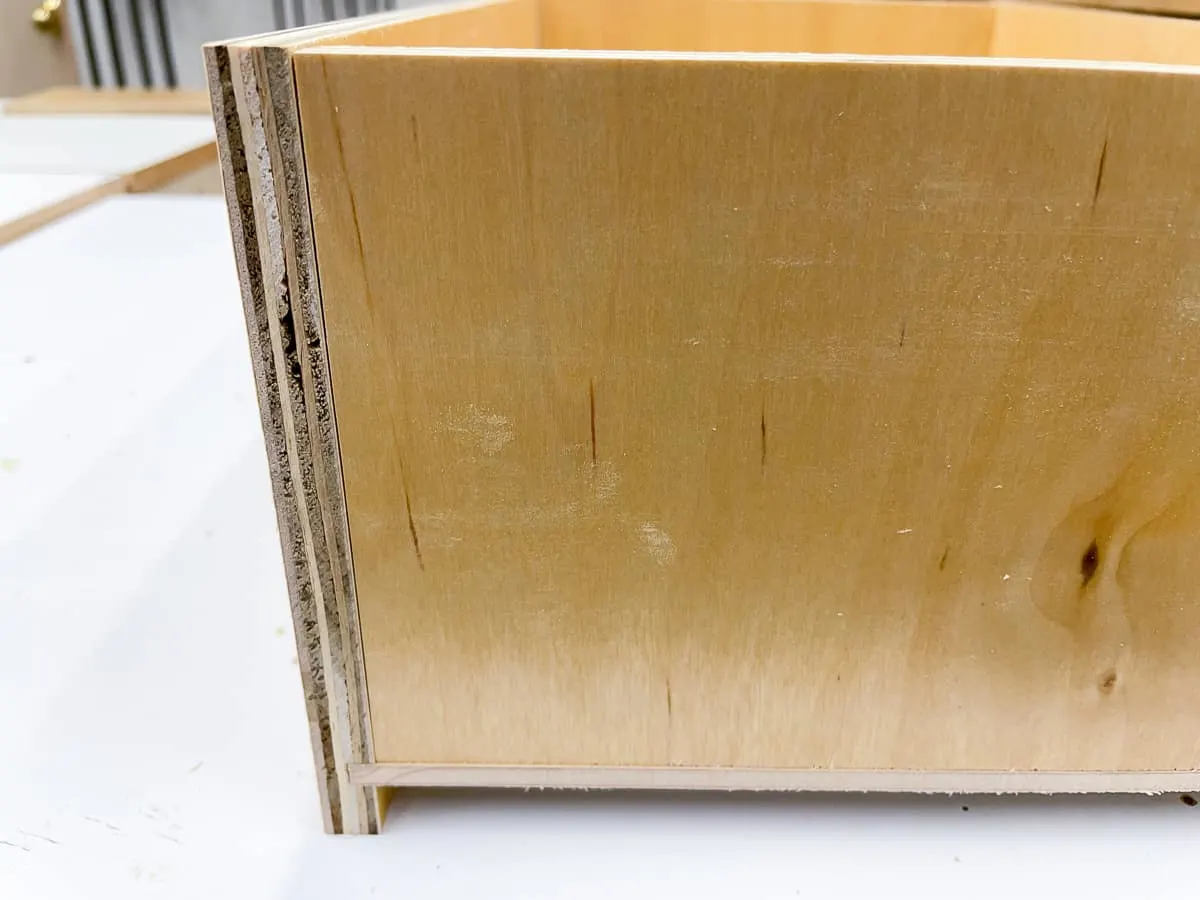
- If you're using plywood for the sides, apply edge banding before you start assembly. This will make the boards look like solid wood, and give your drawer a more professional look.
- Think about how much weight your drawer will hold. Some drawer building methods are better suited for heavy items. You don't want the bottom of your drawer to fall out!
- Measure the front opening of the cabinet, as well as the depth. Take the measurements from a few different locations in case it varies from one side to the other. Use the smallest measurement when planning your box dimensions.
- Assemble your drawer with the front and back between the sides. Not only does this look better when viewed from the side, but it also provides the shear strength necessary to withstand years of use.
- Make sure your drawer box is square! Measure from corner to corner across the box at a diagonal in both directions. If the measurements aren't exactly the same, your drawer isn't square and it won't fit properly.
Drawer Box Size
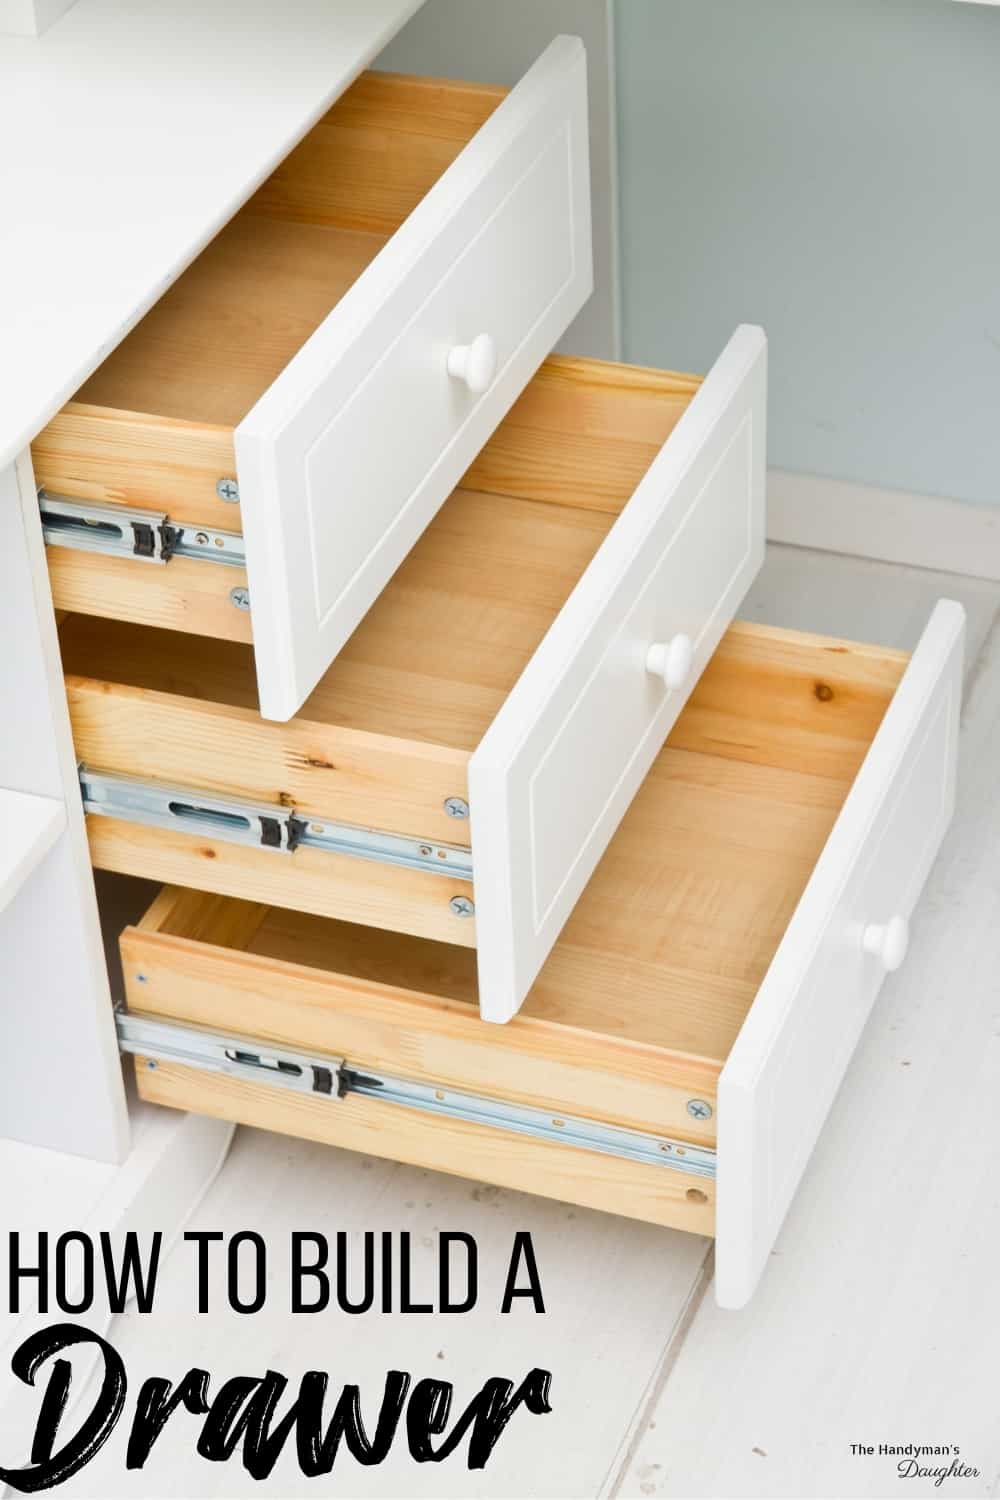
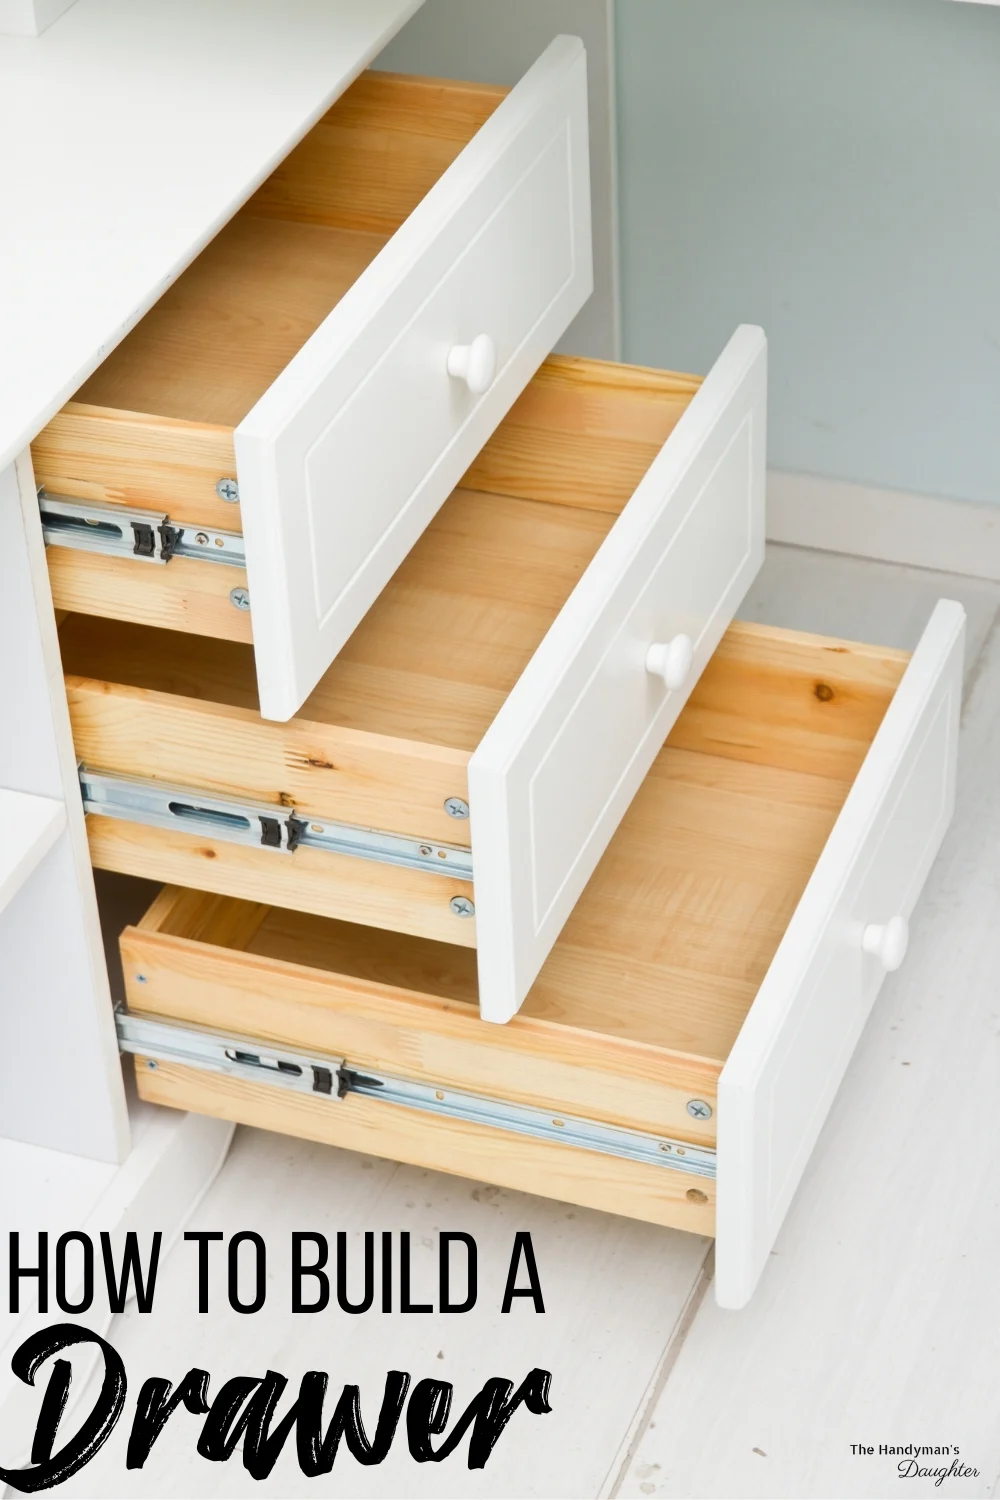
In the examples below, I'm going to use the same 3D model of an overlay drawer with standard ½" thick side-mount drawer slides for all three methods. This drawer will fit in a cabinet that measures 16" wide and at least 21" deep.
All the boxes in these example are using 1x6 boards for the sides, front and back to create a drawer box that is 5 ½" high, 15" wide and 20" long. Your cabinet will probably differ in size, so follow the guidelines below to figure out your own measurements.
Sides
The sides should match the length of the drawer slides, and should be at least an inch shorter than the depth of the cabinet.
Front and Back
The front and back size is determined by the width of your cabinet opening, as well as the thickness of the drawer slides and the sides. It involves a little bit of math, but you can do it!
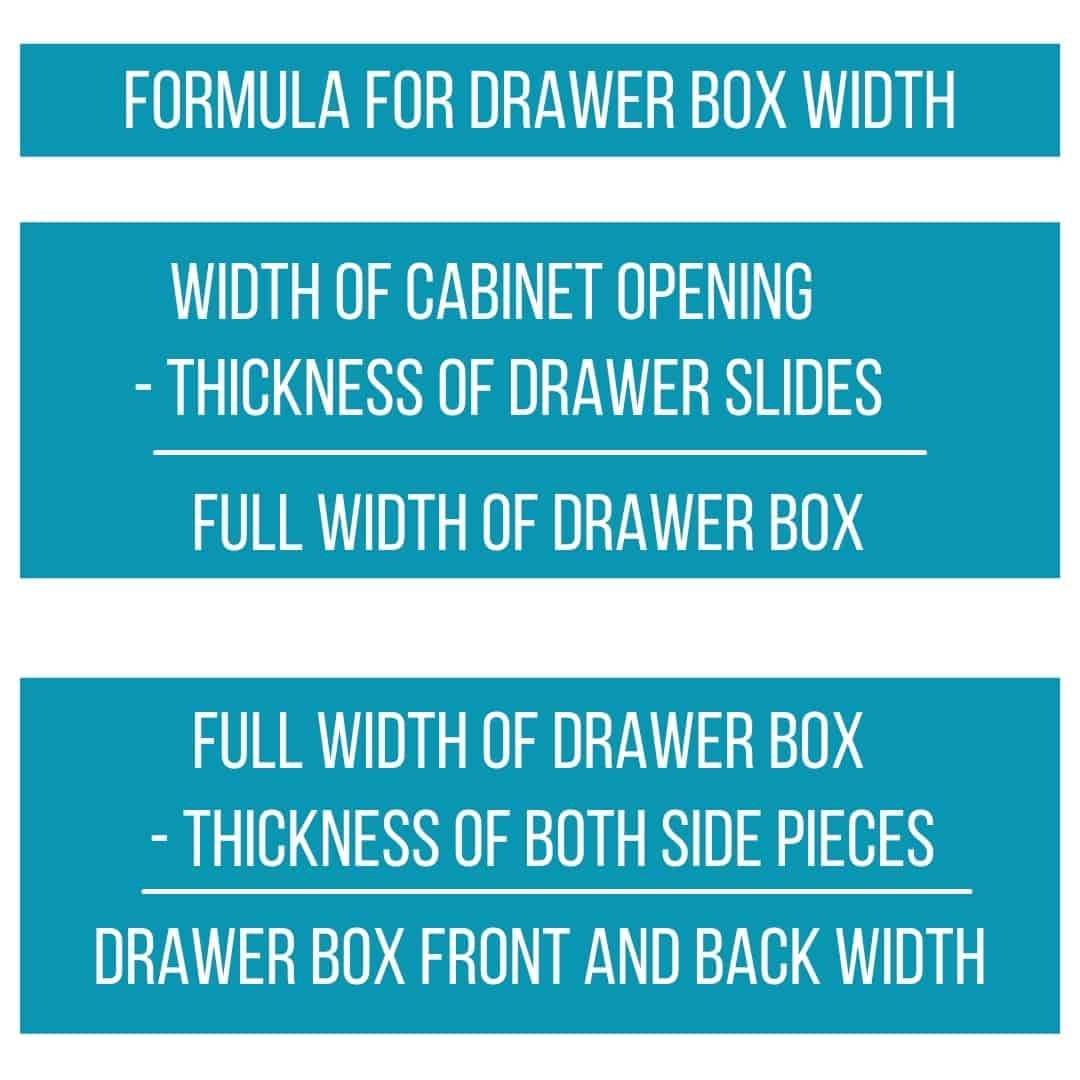

- Measure the width of the opening from left to right.
- Measure the thickness of both drawer slides (usually 1", but can vary depending on the manufacturer).
- Subtract the thickness of the drawer slides from the width of the opening.
- Measure the thickness of both of the drawer box sides together.
- Solid wood in 1x4 or 1x6 lengths is typically ¾" thick.
- ¾" plywood is typically slightly thinner than ¾".
- Subtract the thickness of the drawer box sides from the previous measurement to determine the width of the front and back.
Bottom
The size of the bottom will depend on the assembly method. If you're having the plywood precut for you at the store, err on the larger side and trim the bottom to fit once the box is put together.
I recommend using ¼" plywood for most projects, although you should consider ½" plywood for drawers that will hold heavy items.
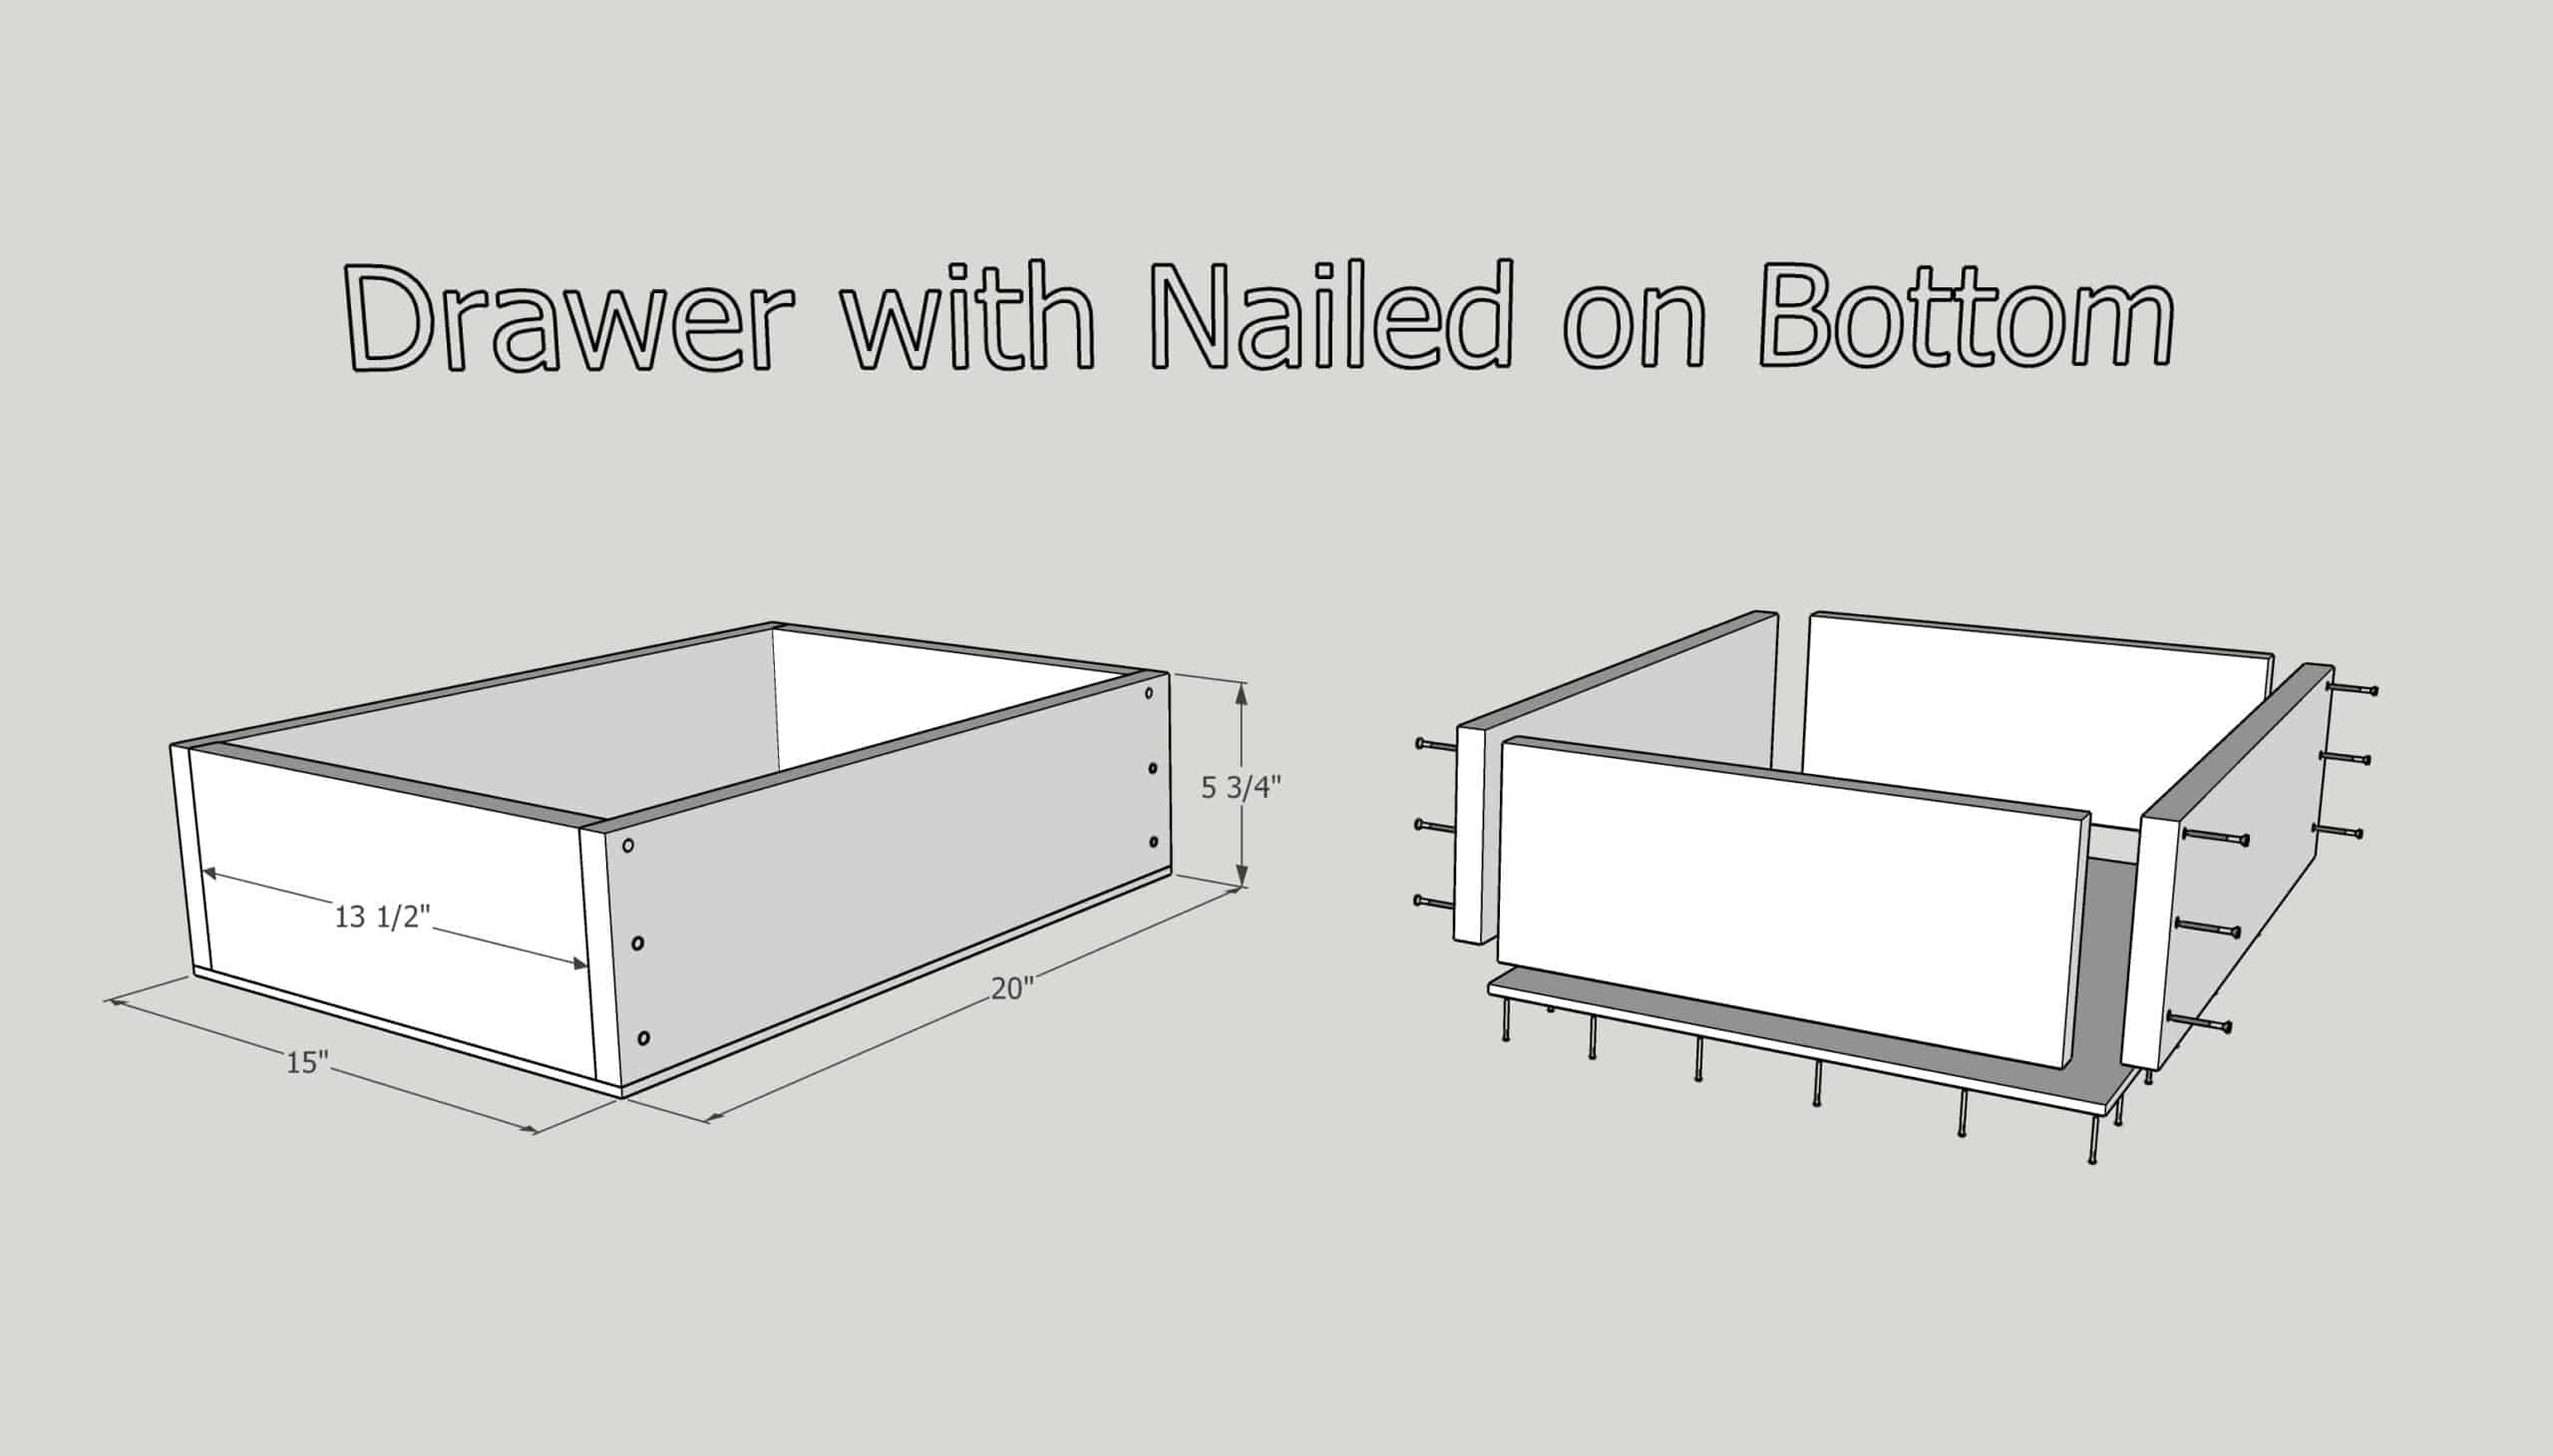
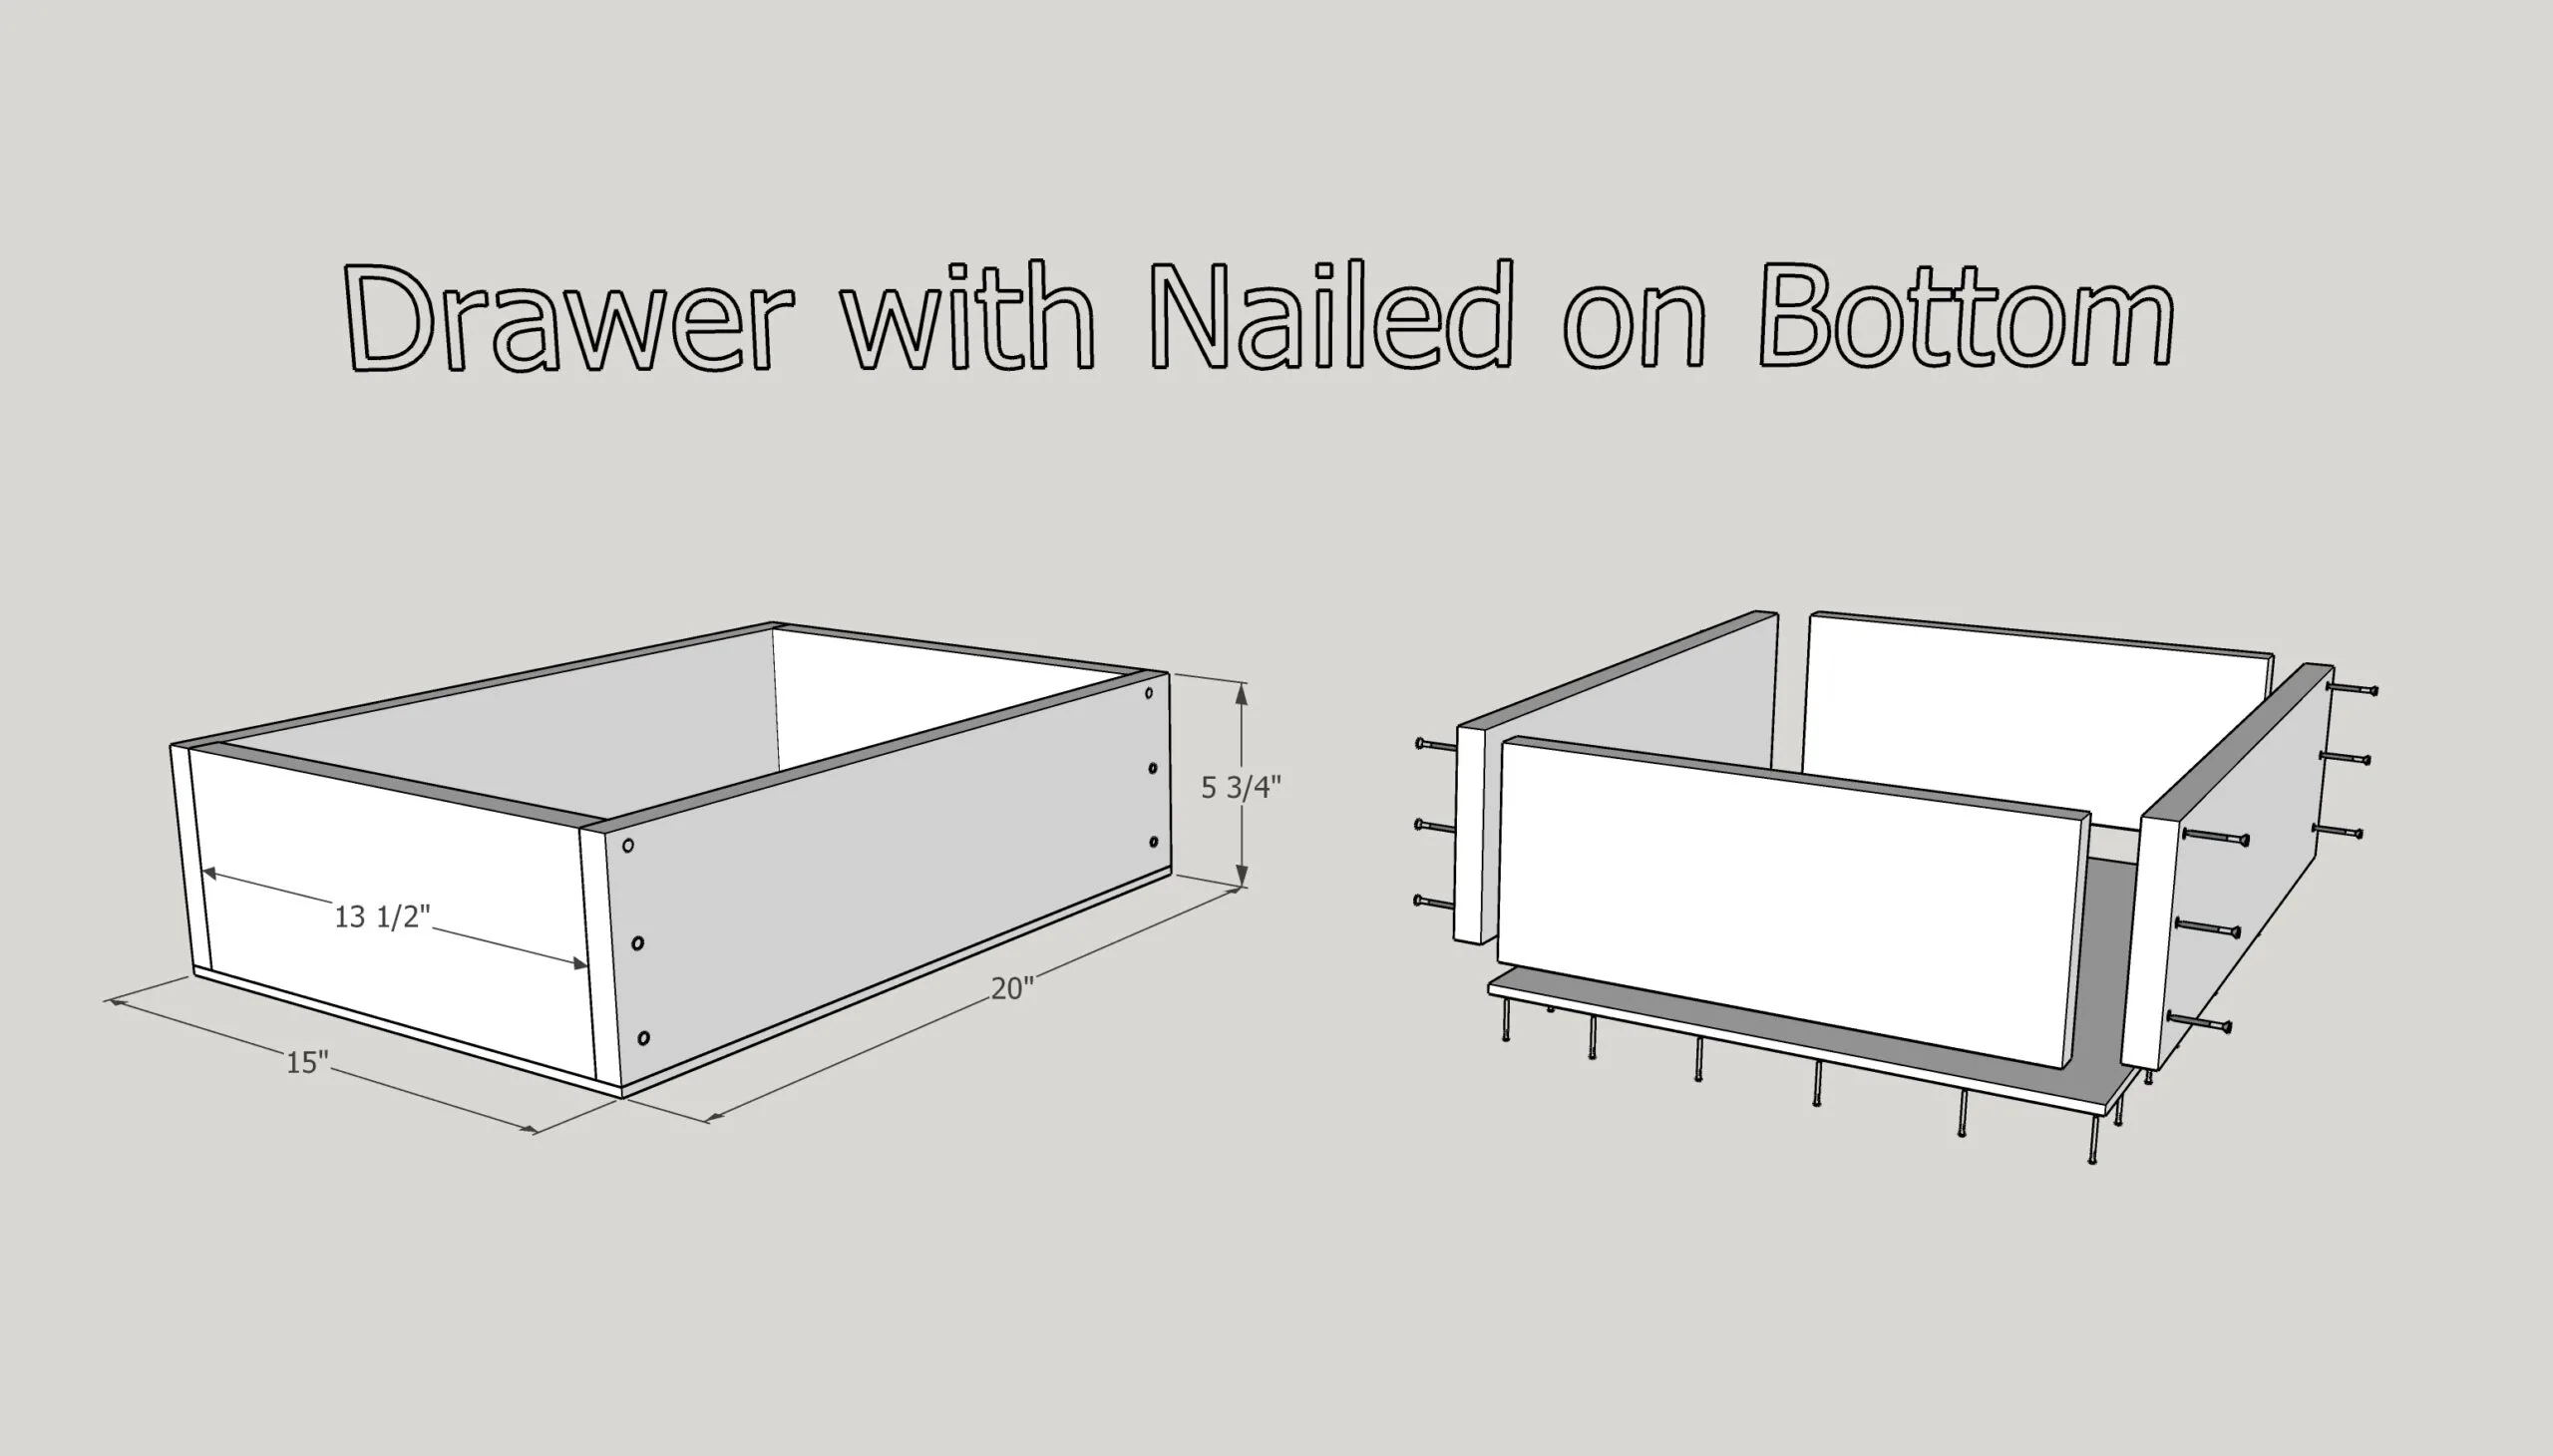
How to Build a Drawer with a Nailed on Bottom
This is the easiest method of the three, but also the least sturdy. I used this type of drawer in my table saw stand because they didn't need to hold a lot of weight, and I could assemble them quickly with just a brad nailer.

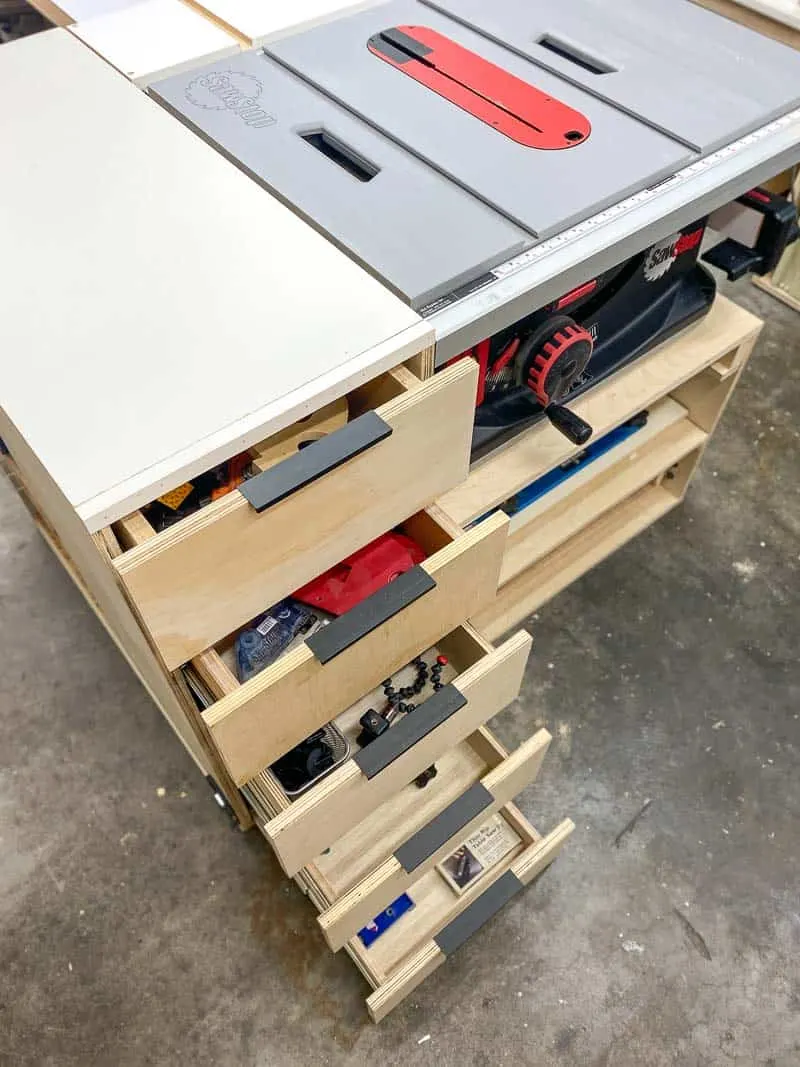
Keep in mind that heavy items can cause the bottom to bow, break or fall out over time. For this reason, I only use this method for smaller drawers.
Also note that the bottom will add ¼" to the total height of the box, so take that into account when planning your project.
Materials
- 1x6 board
- ¼" plywood
- Countersink bit
- 1 ¼" wood screws
- Drill
- Wood glue
- Panel nails
- Hammer
- Square
- Tape measure
NOTE: You can also build this drawer with pocket holes in the front and back pieces. This will look a little nicer since the screw heads won't be visible from the sides, but it's totally optional!
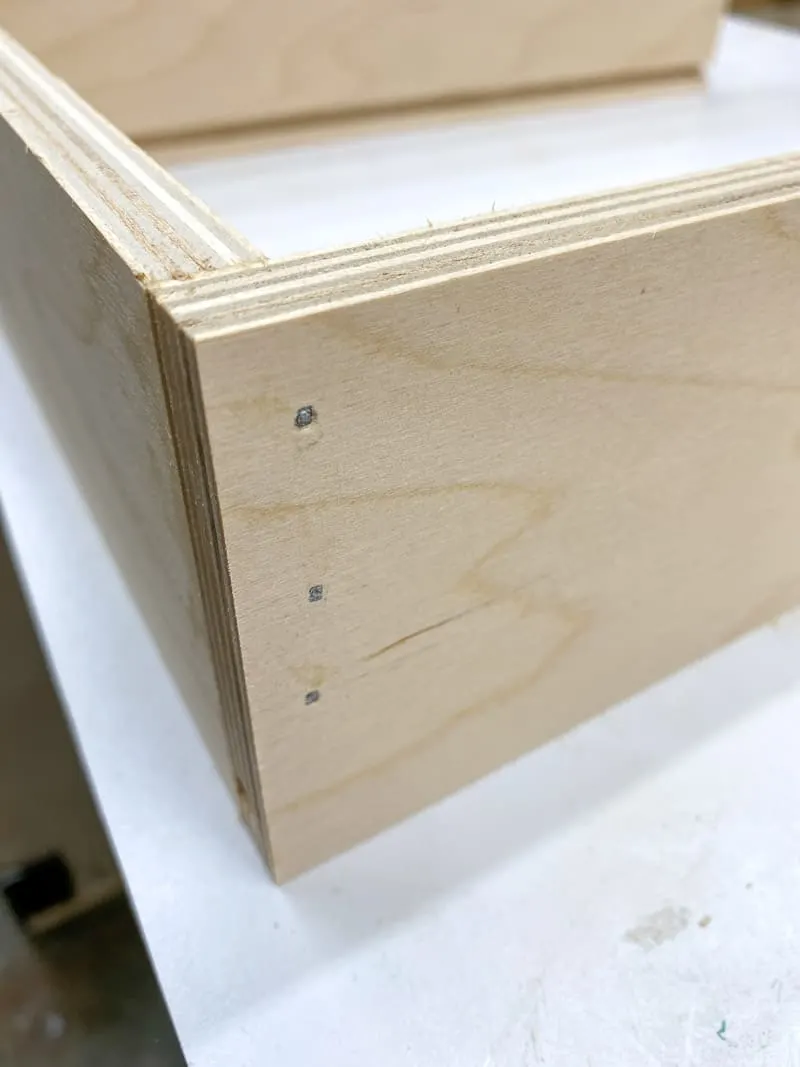
Step 1 - Predrill
Predrilling the screw holes will prevent the wood from splitting near the edge. Countersinking the screws will allow the screw heads to sit flush with the side of the drawer box.
Mark a line ⅜" from both ends of the longer side pieces. Drill three countersink holes along this line.
Step 2 - Glue and Screw
Apply wood glue where the boards will be joined together. Use a square to align the pieces at a 90 degree angle, then screw the sides to the front and back with 1 ¼" wood screws. Make sure the screw heads are at or below the surface of the wood. You could also use brad nails, although this isn't as strong.

Check to make sure your drawer box is square. Measure from corner to corner across the diagonal in both directions. If the numbers are the same, it's square. If they're not, use a clamp to squeeze across the larger diagonal to shift the box into alignment. Allow the glue to dry before moving on to the next step.
Step 3 - Glue and Nail on the Bottom
Measure the exact dimensions of the box you just made, and cut the ¼" plywood bottom to those measurements.
Apply wood glue along the bottom edge of the drawer box, and align the plywood bottom with the corners and sides. Use panel nails and a hammer or a brad nailer to attach the bottom to the box. You can also use small screws if you prefer.
That's it! You can leave the drawer box as is, or you can use wood filler to cover up the screw holes before painting.
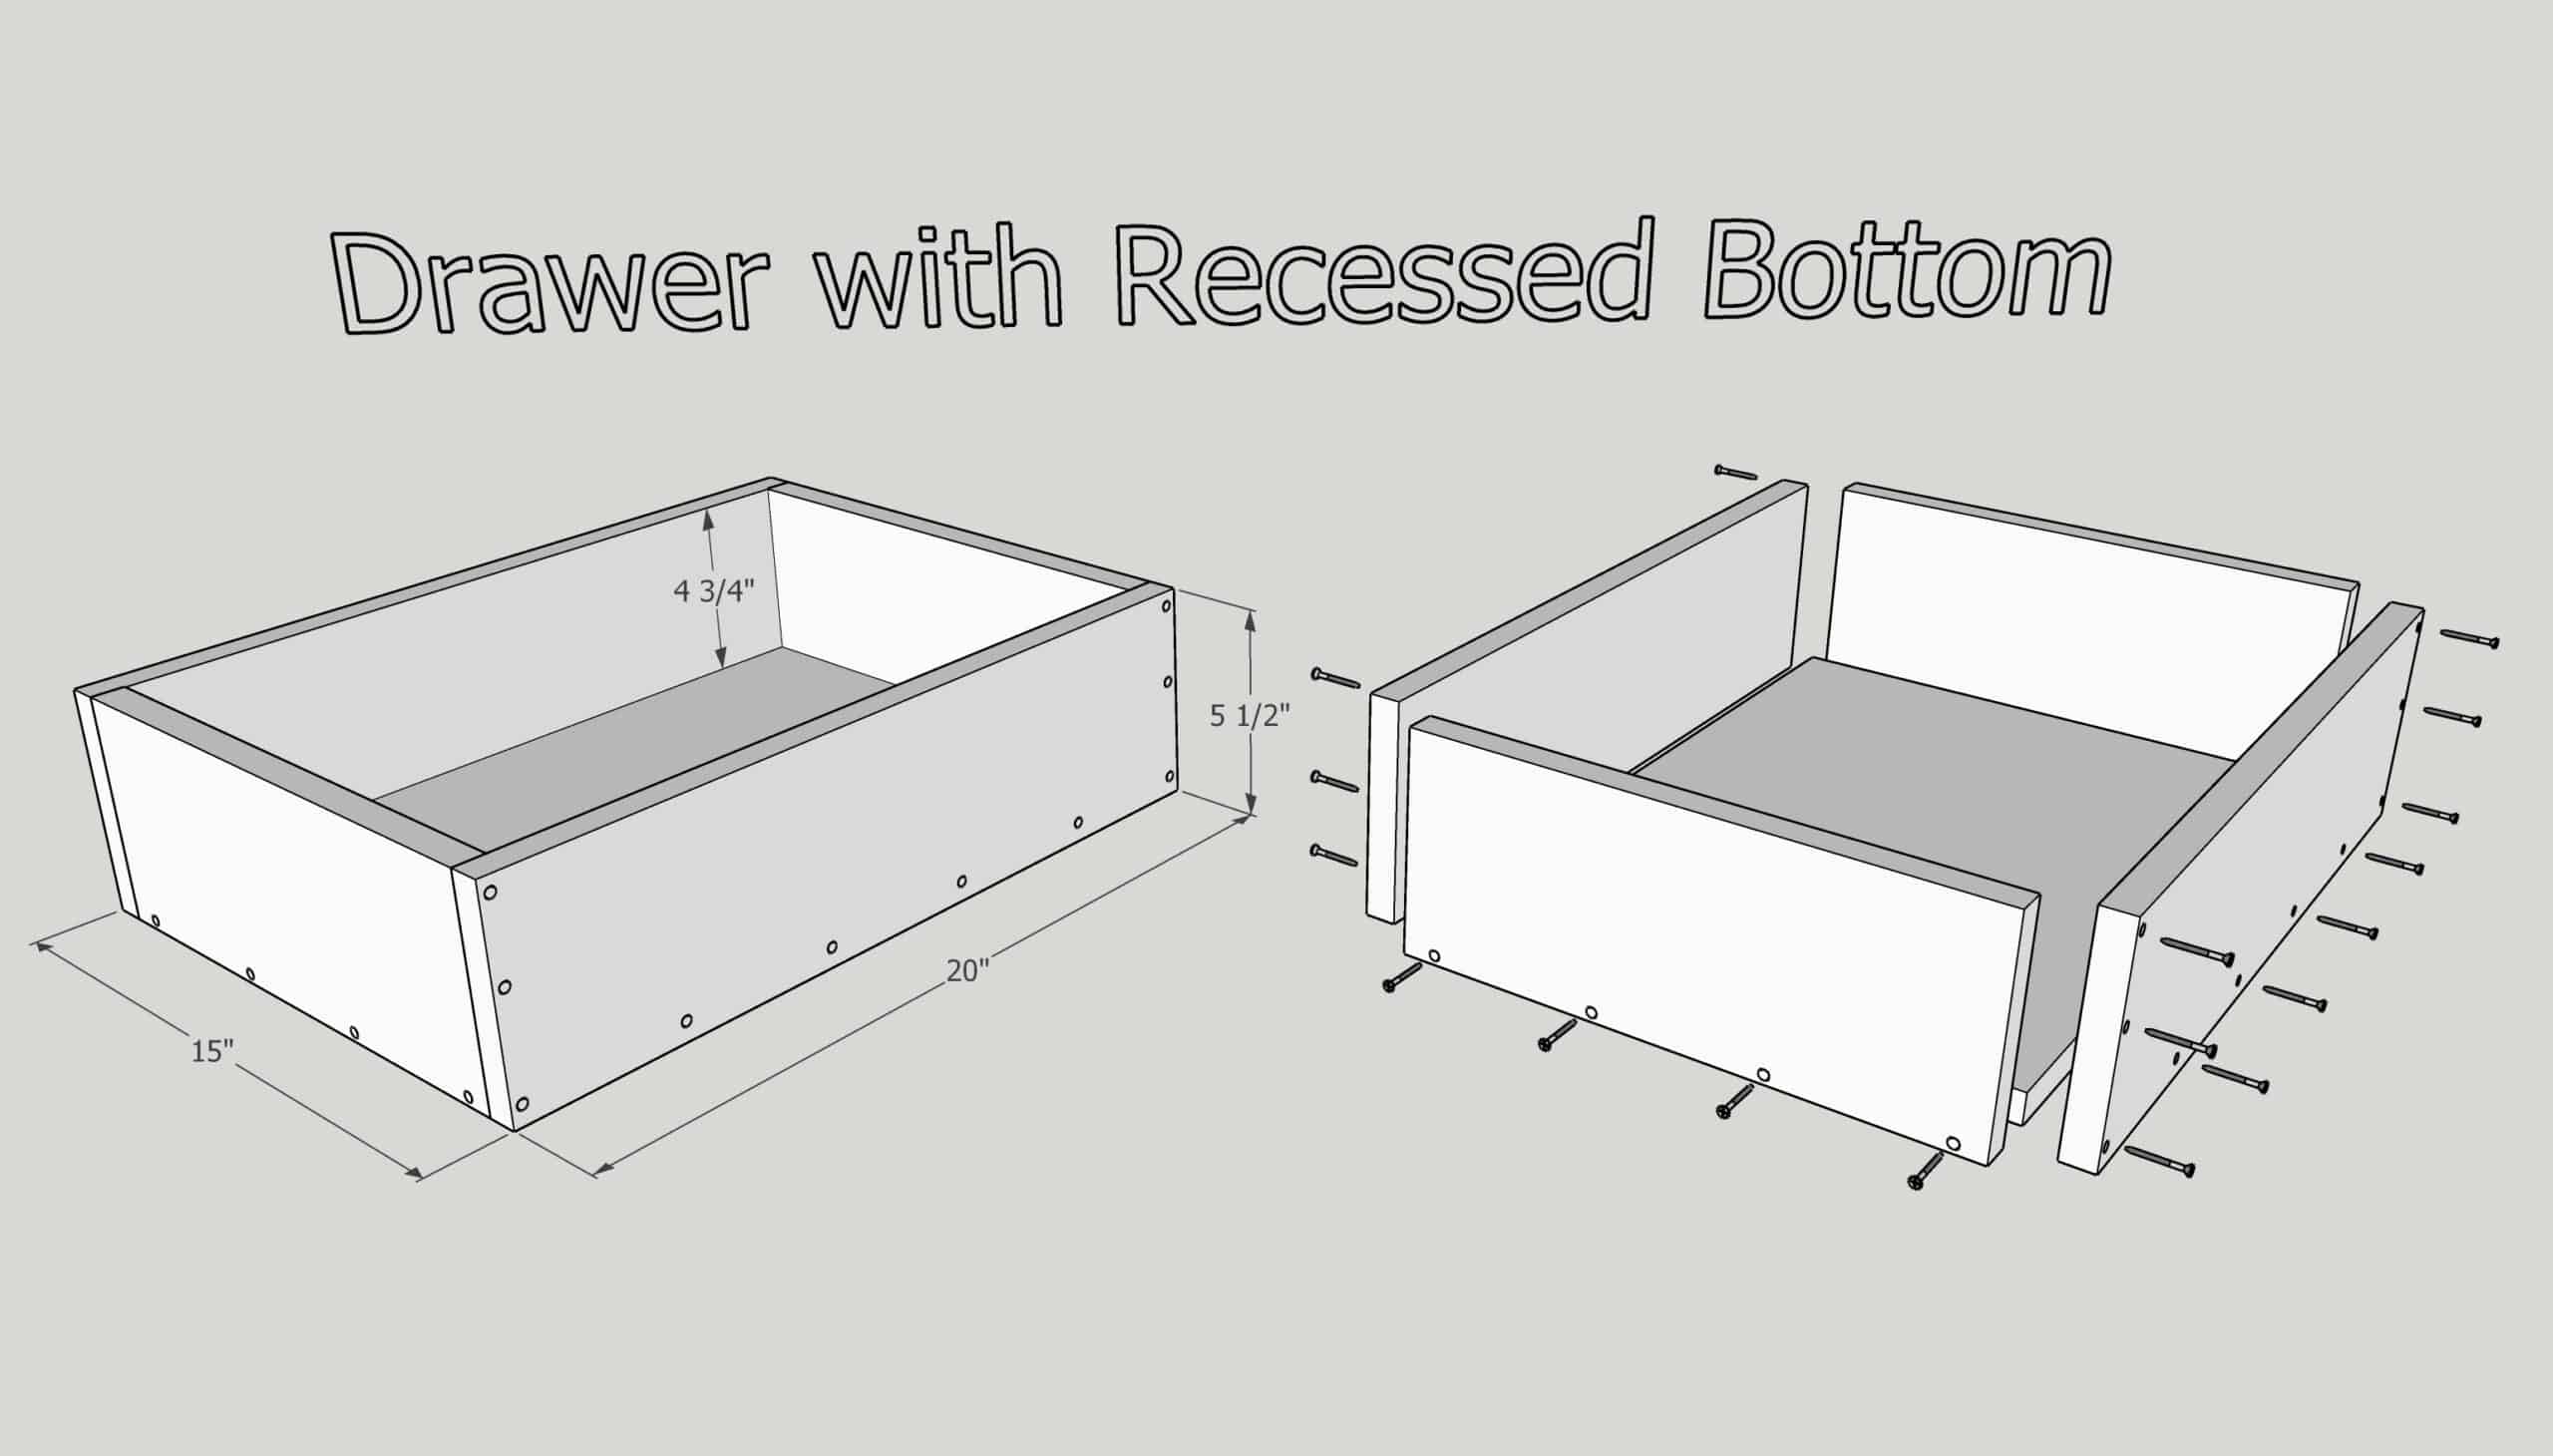
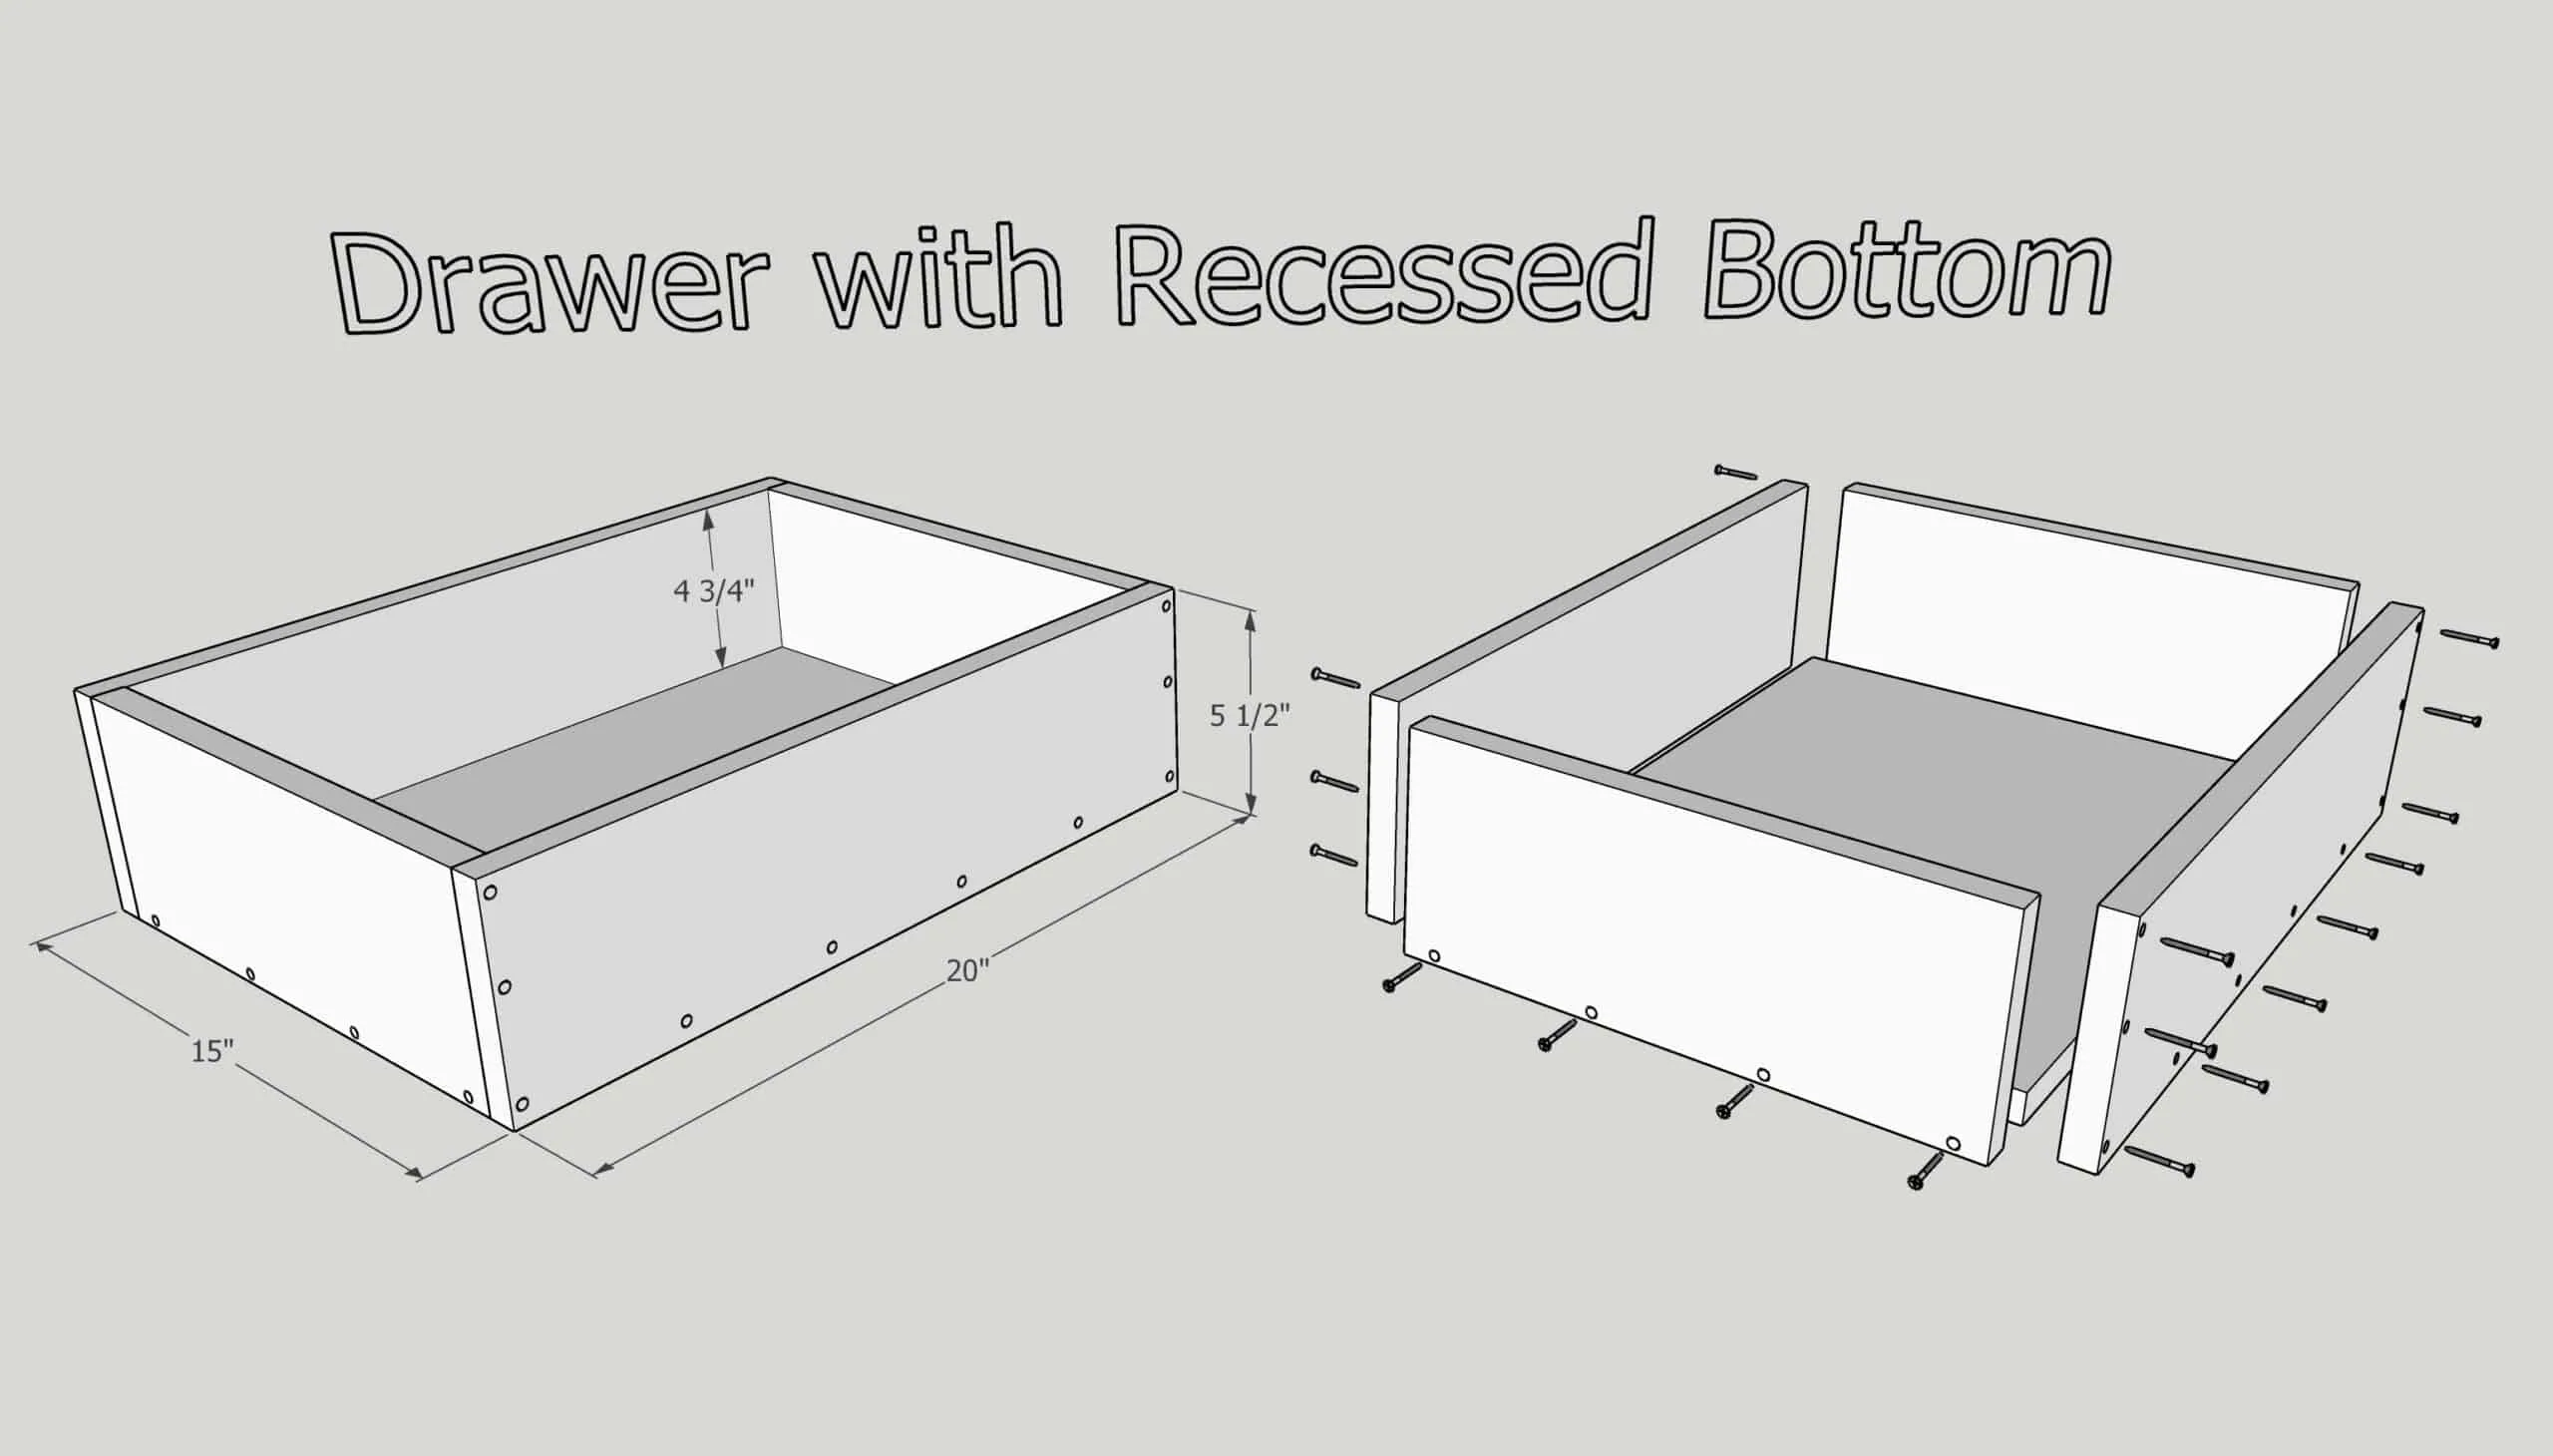
How to Make a Drawer with a Recessed Bottom
This type of drawer is also pretty easy to make, and only requires a drill and screws. The bottom sits flush with the bottom edge of the box, and is attached with screws through the sides all the way around.
This gives you a stronger drawer than the nailed on bottom method, because the bottom is made of thicker material and the shear strength of the screws keeps it from falling out.
One drawback to this method is that you'll need to use thicker material (at least ½") for the bottom so the screws have something to hold onto. This adds to the total weight and cost of the drawer, and takes away some of the depth inside.
This method also leaves a bunch of screw holes visible on the sides, but you can fill and paint over them or hide them under the drawer slides.
Materials
- 1x6 board
- ½" or ¾" plywood
- Countersink bit
- 1 ¼" wood screws
- Drill
- Wood glue
- Square
- Tape measure
Step 1 - Predrill
Mark a line ⅜" from the bottom of all the pieces, as well as the ends of the side pieces. Drill countersink holes every 4-6 inches along these lines. This will prevent the wood from splitting when you drive in the screws.
Step 2 - Assemble the Box
The outside of this drawer box is assembled the same way as the previous version. Apply wood glue where the boards will be joined together. Use a square to align the pieces at a 90 degree angle, then screw the sides to the front and back with 1 ¼" wood screws. Make sure the screw heads are at or below the surface of the wood.
Check to make sure your drawer box is square. Measure from corner to corner across the diagonal in both directions. If the numbers are the same, it's square. If they're not, use a clamp to squeeze across the larger diagonal to shift the box into alignment and allow the glue to dry before moving on to the next step.
Step 3 - Cut and Attach the Bottom
Once your drawer box is assembled and you've checked that it's square, measure the interior dimensions of the box from side to side and front to back.
Cut a piece of ½" to ¾" plywood for the bottom to the exact dimensions of the inside of the drawer box. Apply wood glue along all four sides of the bottom piece and set it down on a flat work surface. Place the drawer box over the bottom so it fits snugly within the sides.
Drive 1 ¼" wood screws into the predrilled holes along the bottom edge of the box to secure the bottom in place. If possible, keep the box and bottom tight against the work surface so both stay flat as you drive in the screws.
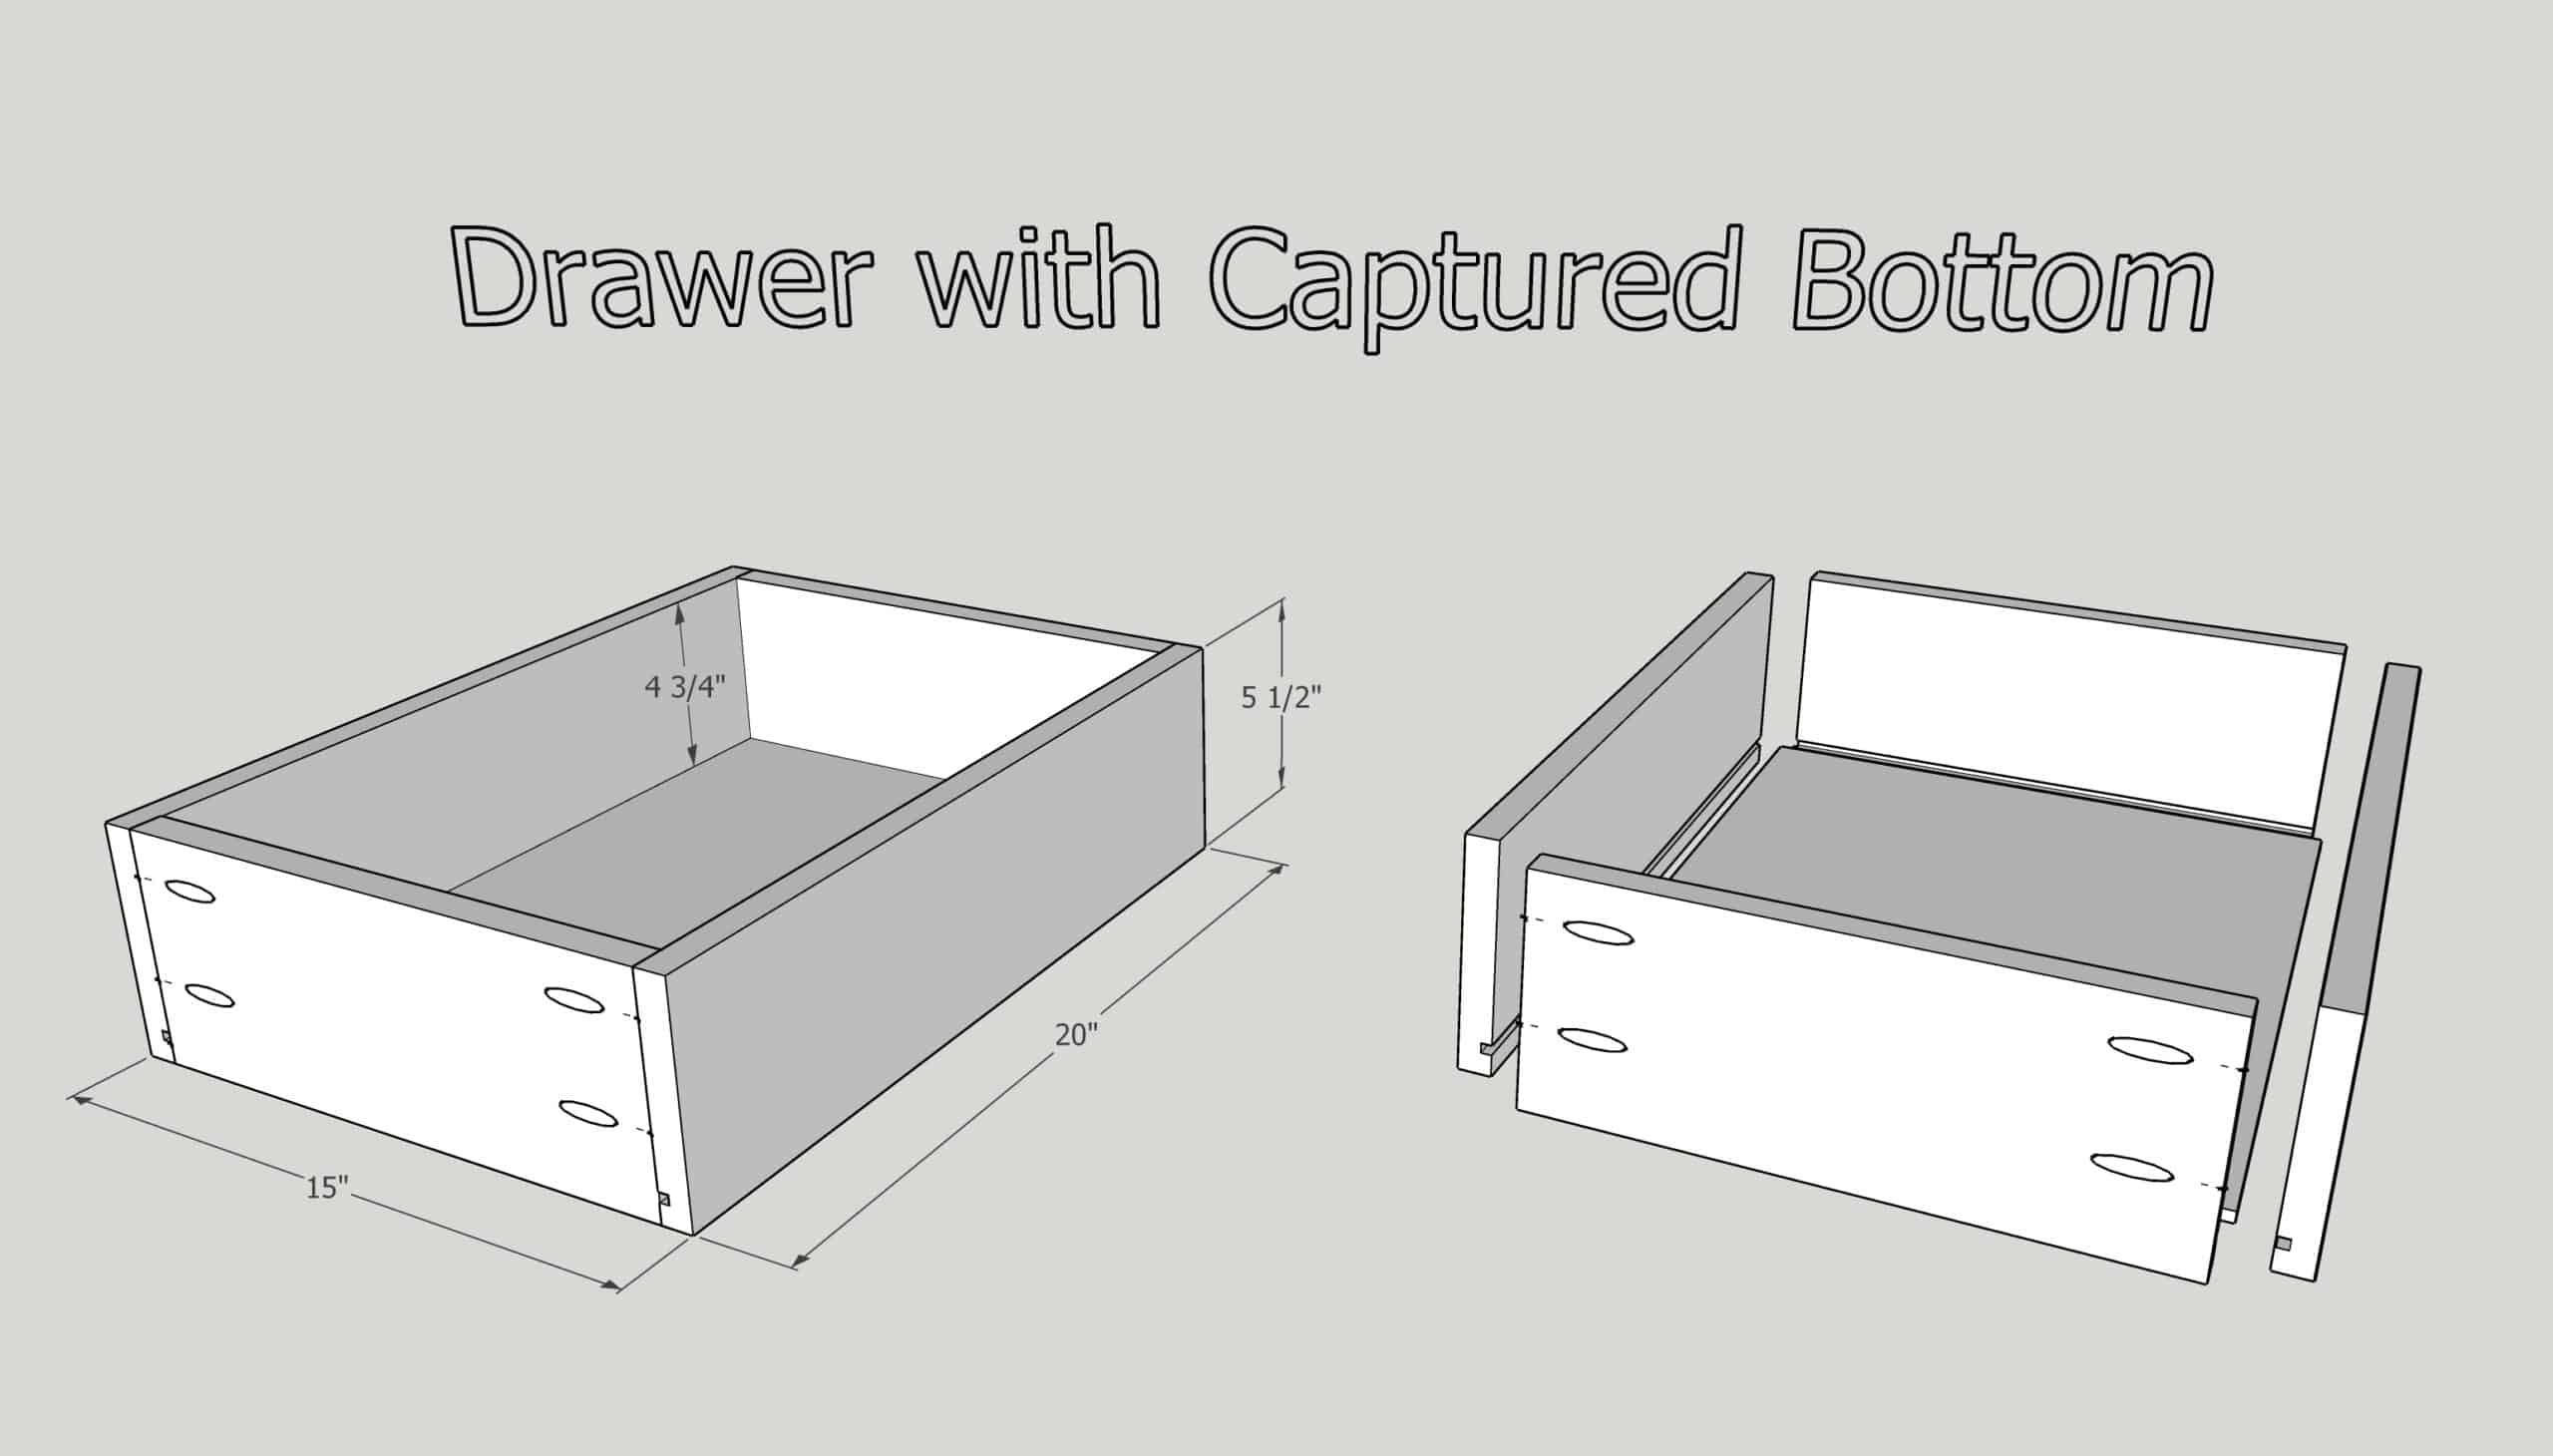
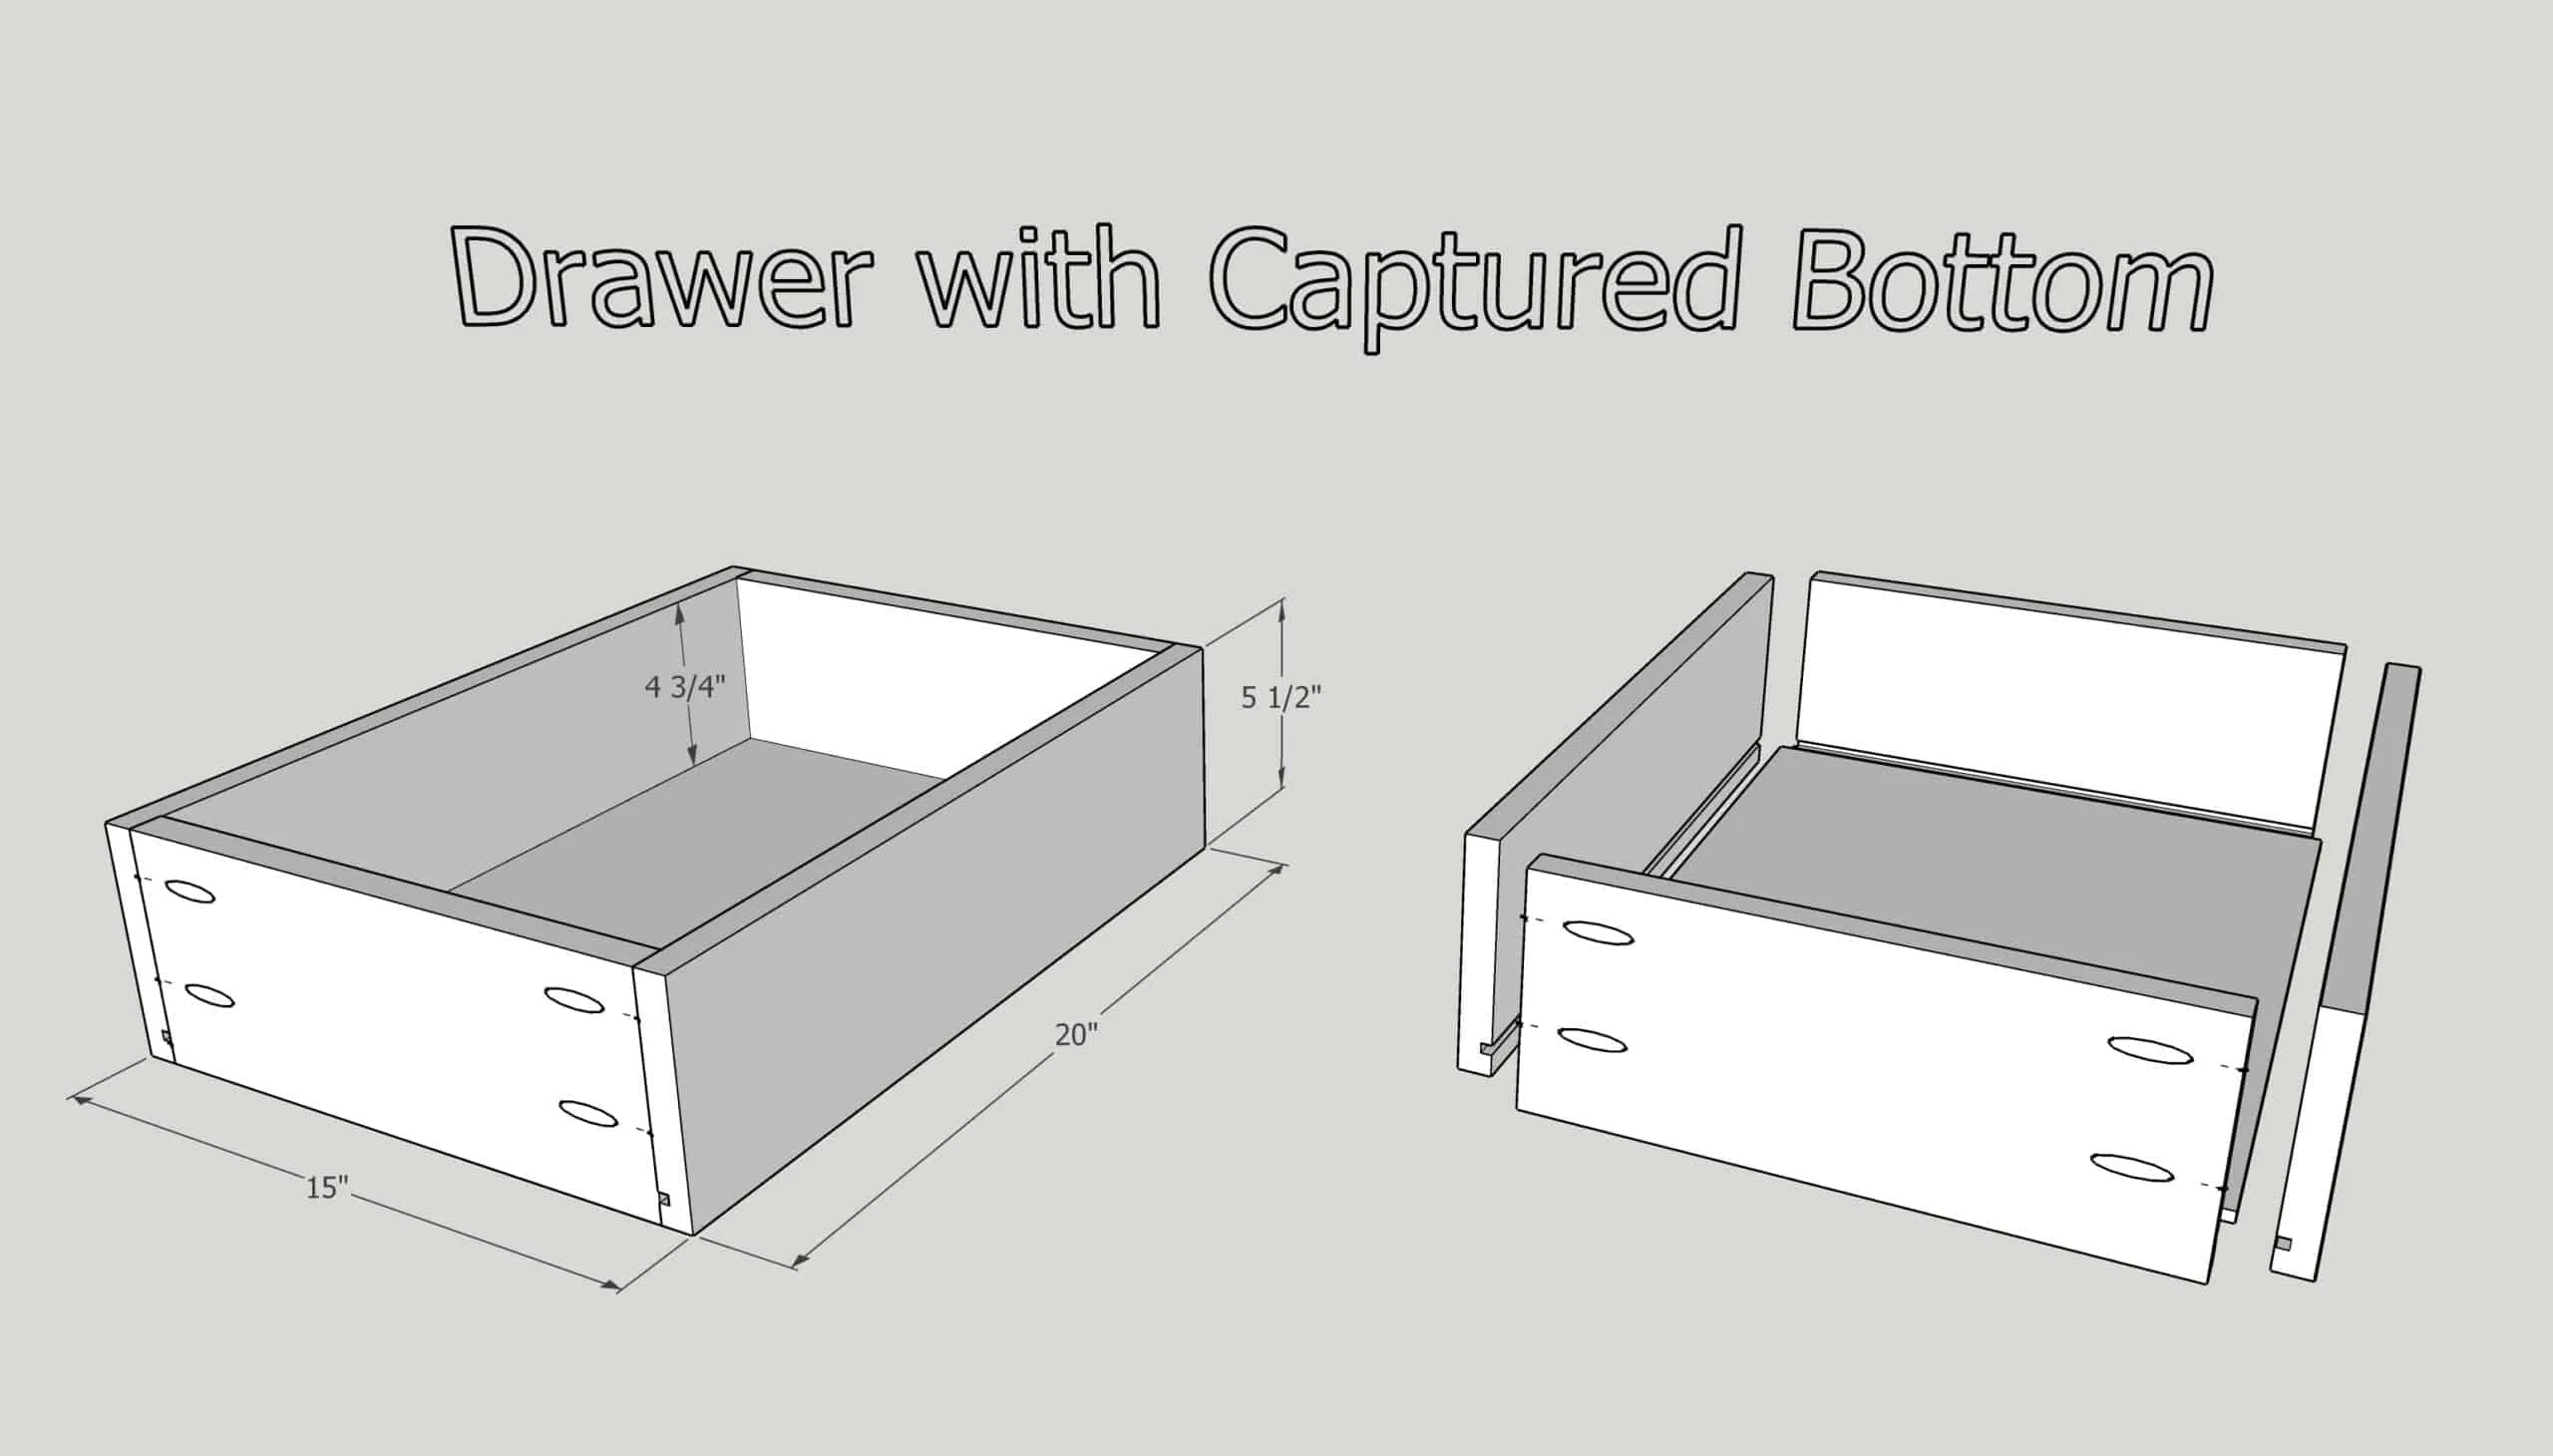
How to Build a Drawer with a Captured Bottom
This is the traditional way to build a drawer, and it's the type you'll find in most furniture you buy at the store. A captured bottom means that the bottom panel floats in a groove cut into all the sides of the box.
With this method, there aren't any visible screws in the sides. If you use undermount drawer slides, all you'll see is a nice, clean box that appears to float when you pull it out of a cabinet.
You can add wood glue to the inside of the groove for a super sturdy drawer box, or just a dab of hot glue in the corners to keep the bottom from rattling. I'll also share my favorite technique for making this style of drawer with a replaceable bottom in case it gets damaged!
Materials
- 1x6 board
- ¼" plywood
- Pocket hole jig
- 1 ¼" pocket hole screws
- Drill
- Wood glue
- Square
- Tape measure
You'll also need a table saw or router table to cut the grooves into all the pieces. Alternatively, you can purchase pre-cut drawer sides to skip this step entirely!
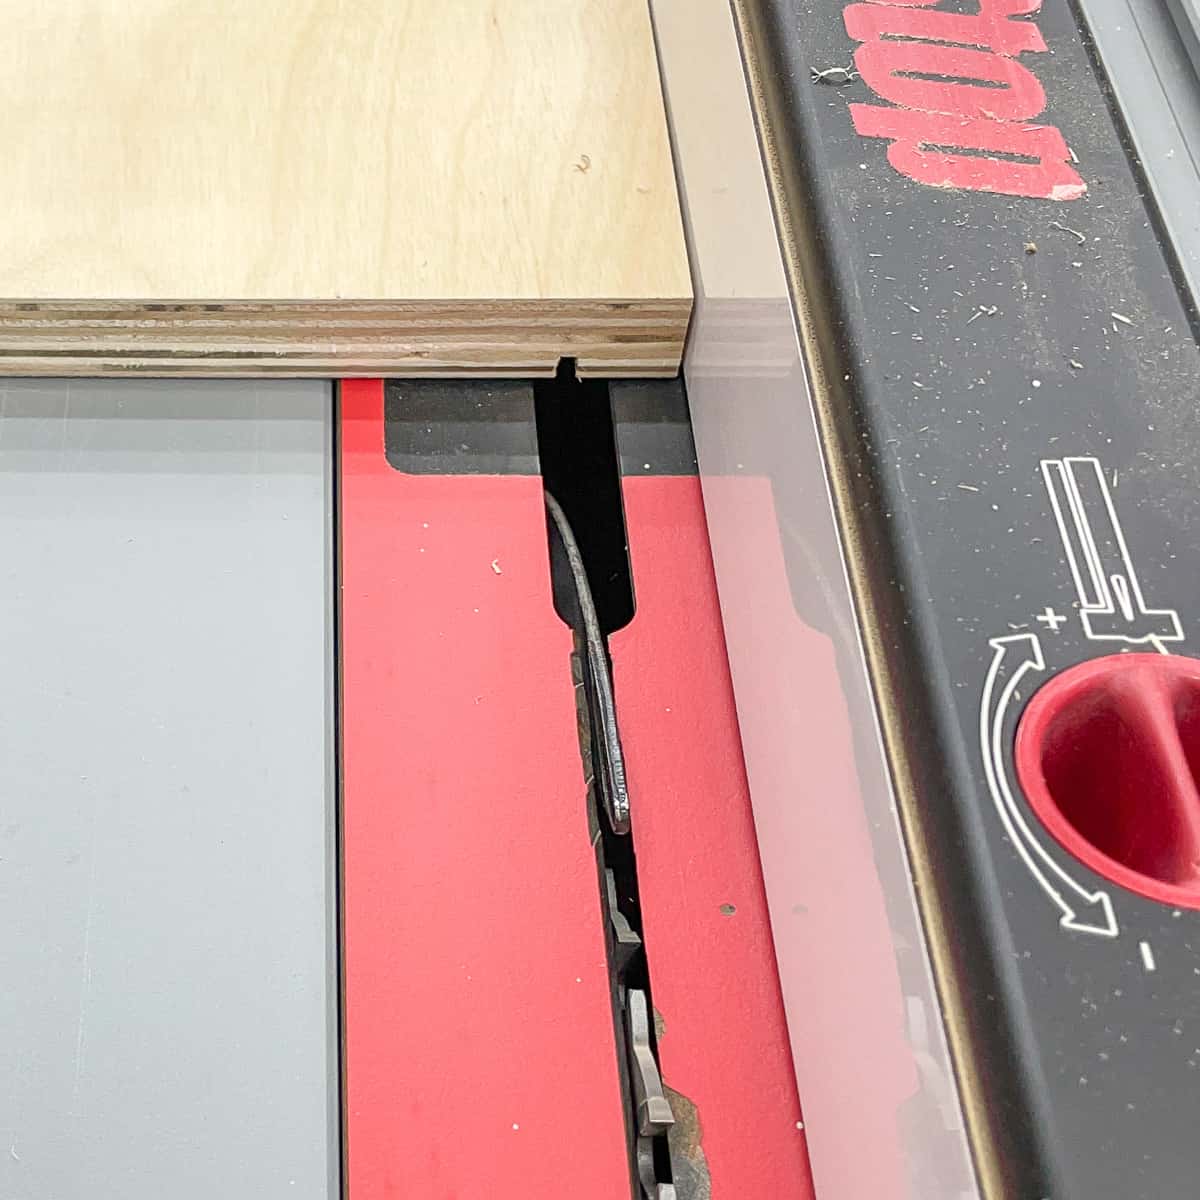
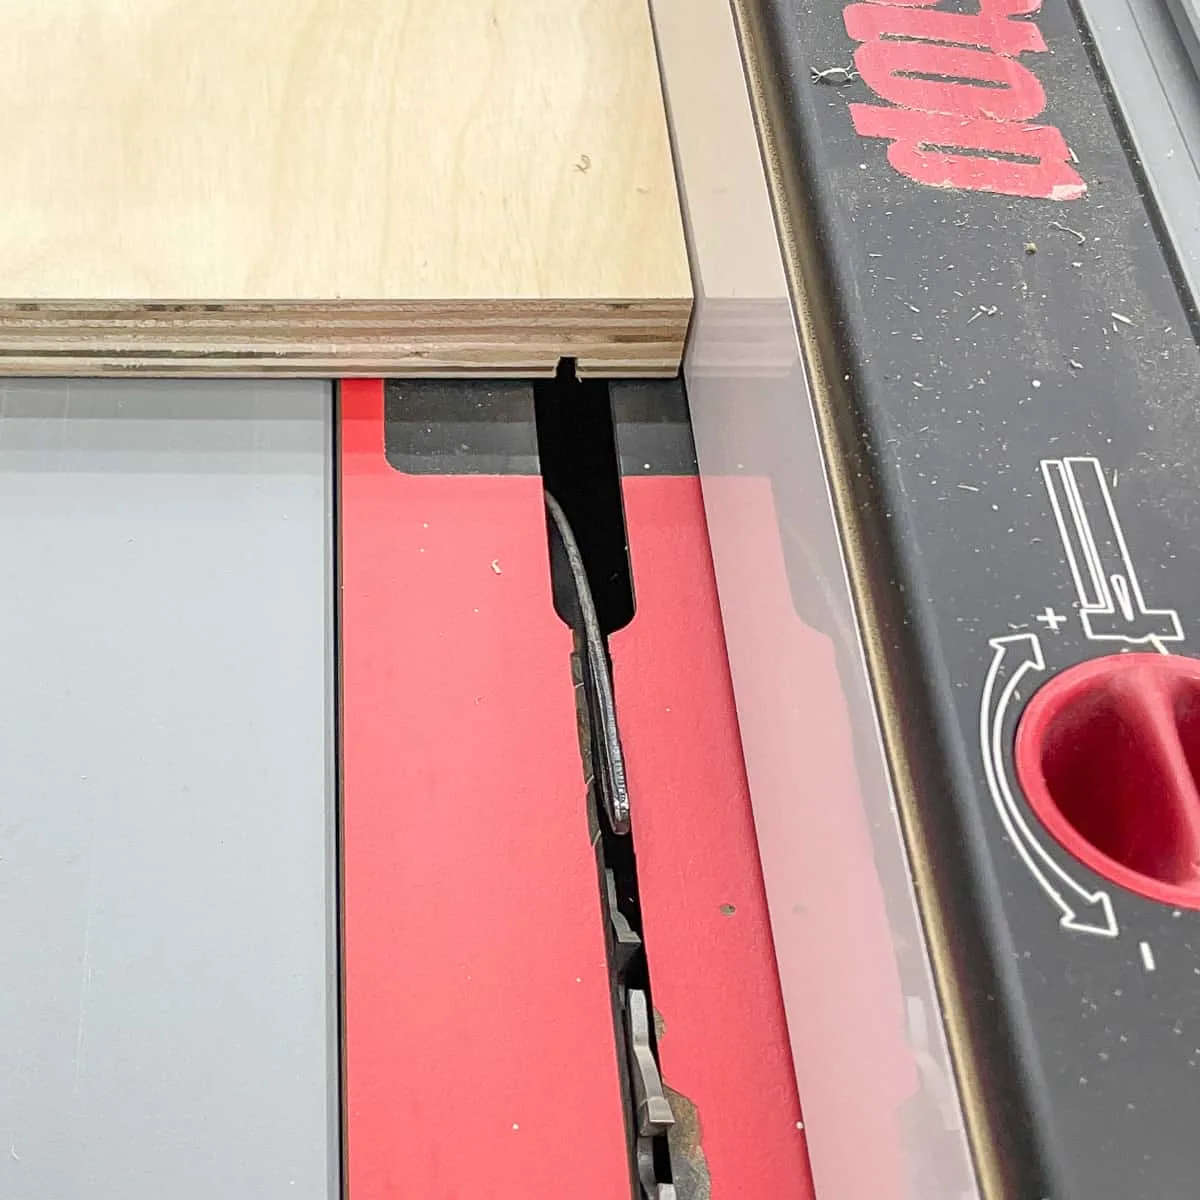
Cut the Grooves
Set the table saw blade height to anywhere between ¼" and ⅜", so it cuts a third to halfway through the ¾" plywood. Then set the table saw fence to ½"-¾" away from the blade.
Make a test cut with the scrap piece of plywood. If everything looks good, set the test piece aside (you'll need it later!)
Now you can cut the bottom of the groove on all of the drawer box pieces on the "good" face of each piece with this table saw setting.
Now, grab your test piece again. Move your table saw fence slightly further away from the blade. I prefer to go about half a blade's width away to start with. Make a test cut to widen the groove.
Check the fit of the ¼" plywood in the groove. If it doesn't fit, move the fence over a tiny bit and cut it again. You want to get this fit tight enough to hold the bottom in place, but not so tight that it can't slide into the groove smoothly. It's better to make multiple cuts to sneak up on the fit, rather than cutting it too loose the first time.
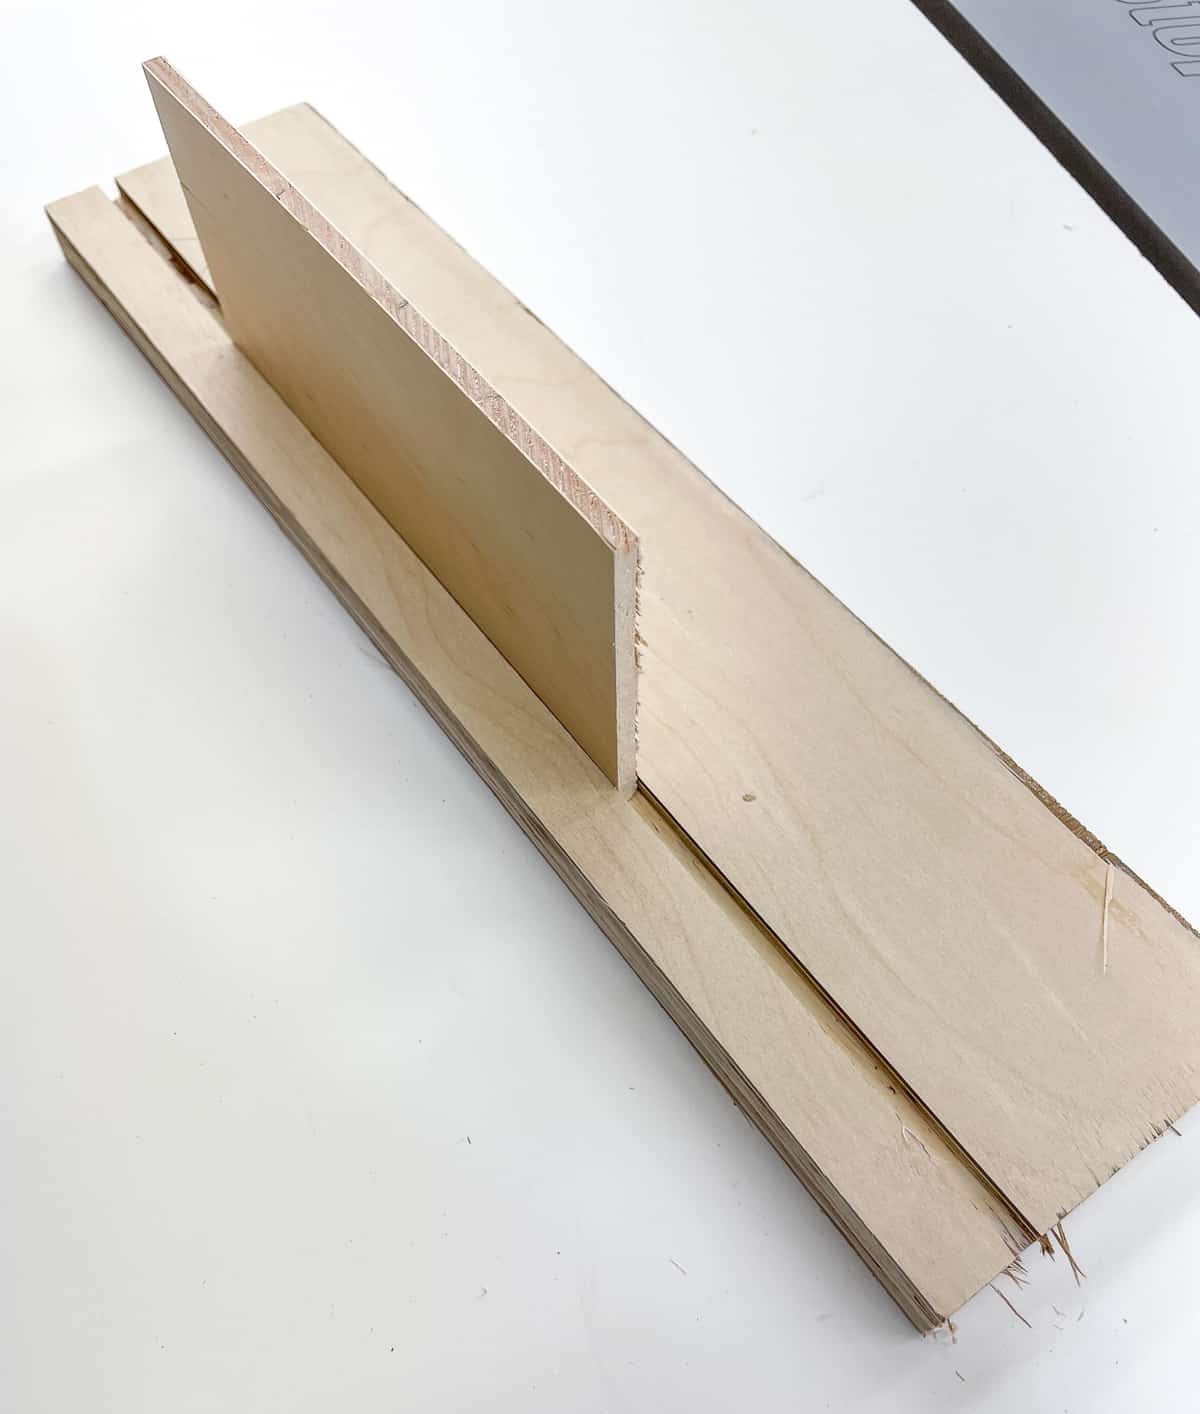
Once you have the fit dialed in, cut all the drawer box pieces again at this setting to create the perfect fitting groove.
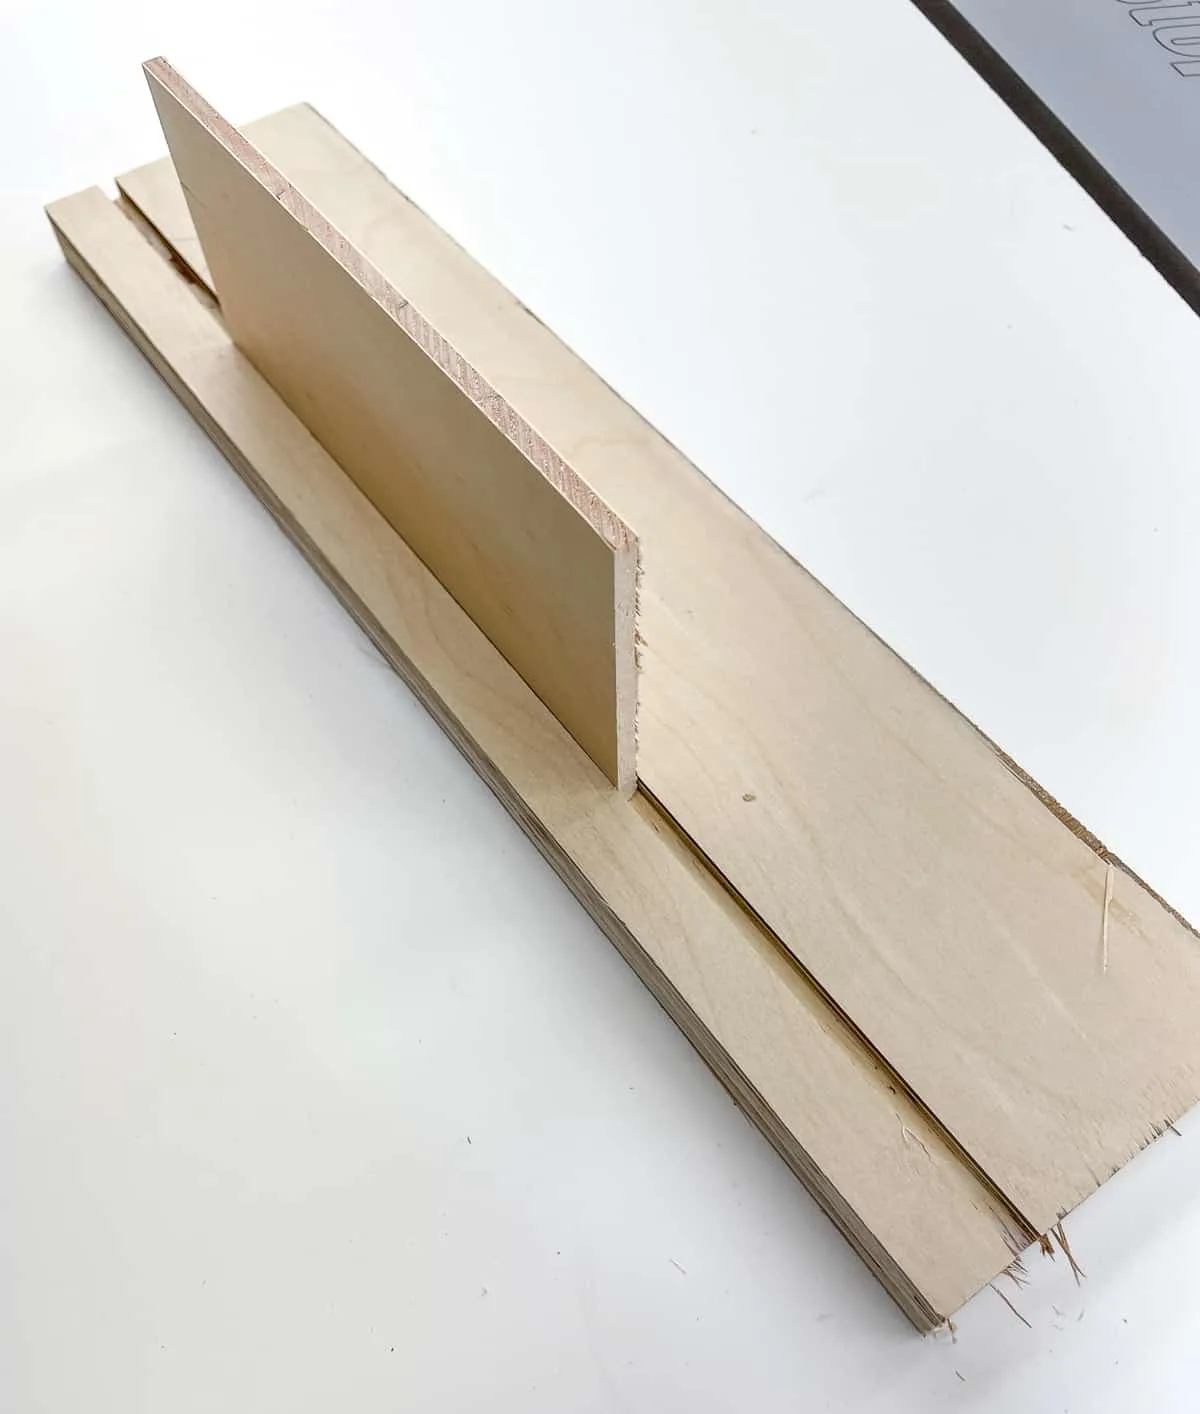
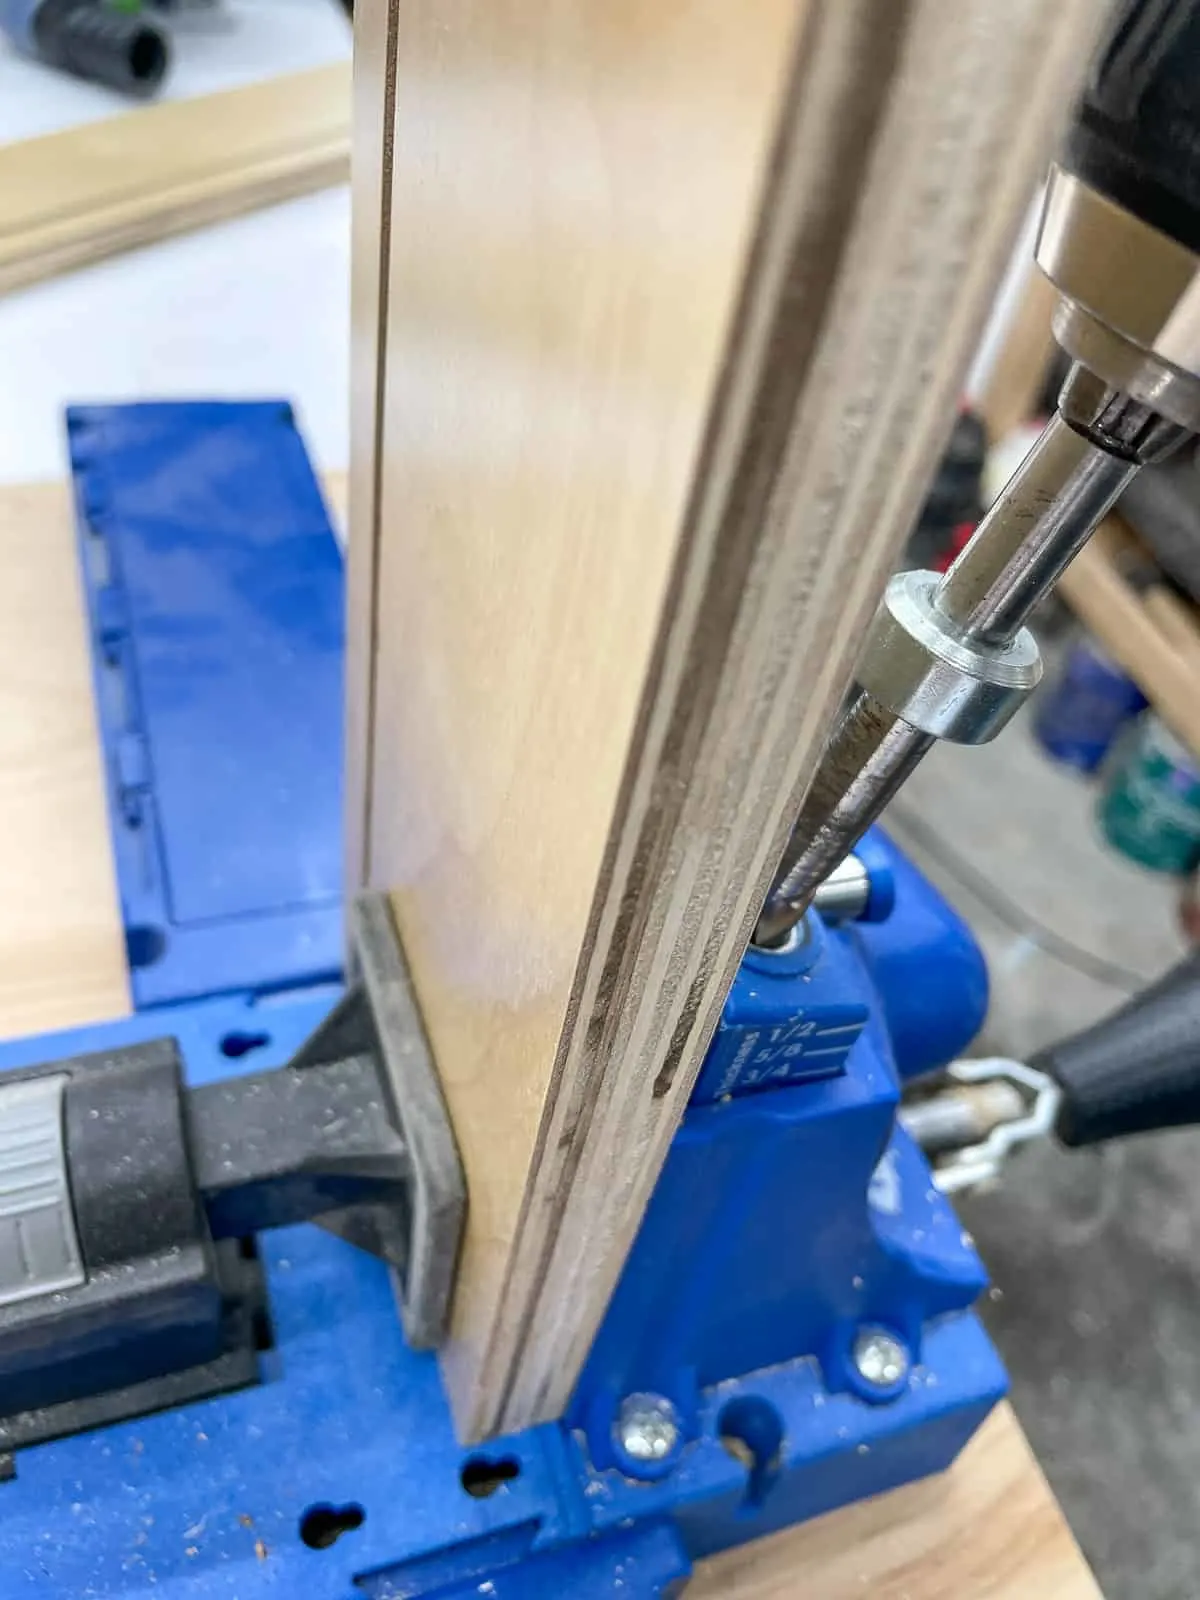
Drill the Pocket Holes
Drill pocket holes on both ends of the front and back pieces, on the opposite side from the groove. Make sure to avoid drilling through the groove!

Assemble the Drawer Box
Attach the front piece to both side pieces with wood glue and 1 ¼" pocket hole screws. Make sure that all the grooves line up correctly so the bottom can slide in smoothly.
For a completely captured bottom, cut the ¼" plywood so that it fits into the grooves evenly on all sides. For example, if you cut a ¼" groove, add ½" to both the length and the width of the bottom. Slide the bottom into the grooves in the drawer box sides.
Now you can add the back by slotting the bottom into the groove and screwing in the pocket hole screws.
How to Make a Replaceable Captured Bottom
One problem with using wood glue when assembling drawer boxes is that it's basically permanent. But what happens if the thin plywood bottom cracks, or something spills inside the drawer? You'd have to build a whole new one!
I prefer to change the building method slightly to make the bottom easily replaceable. As an added bonus, if you're using the Blum undermount drawer slides, this also eliminates the need to cut those little notches in the back!
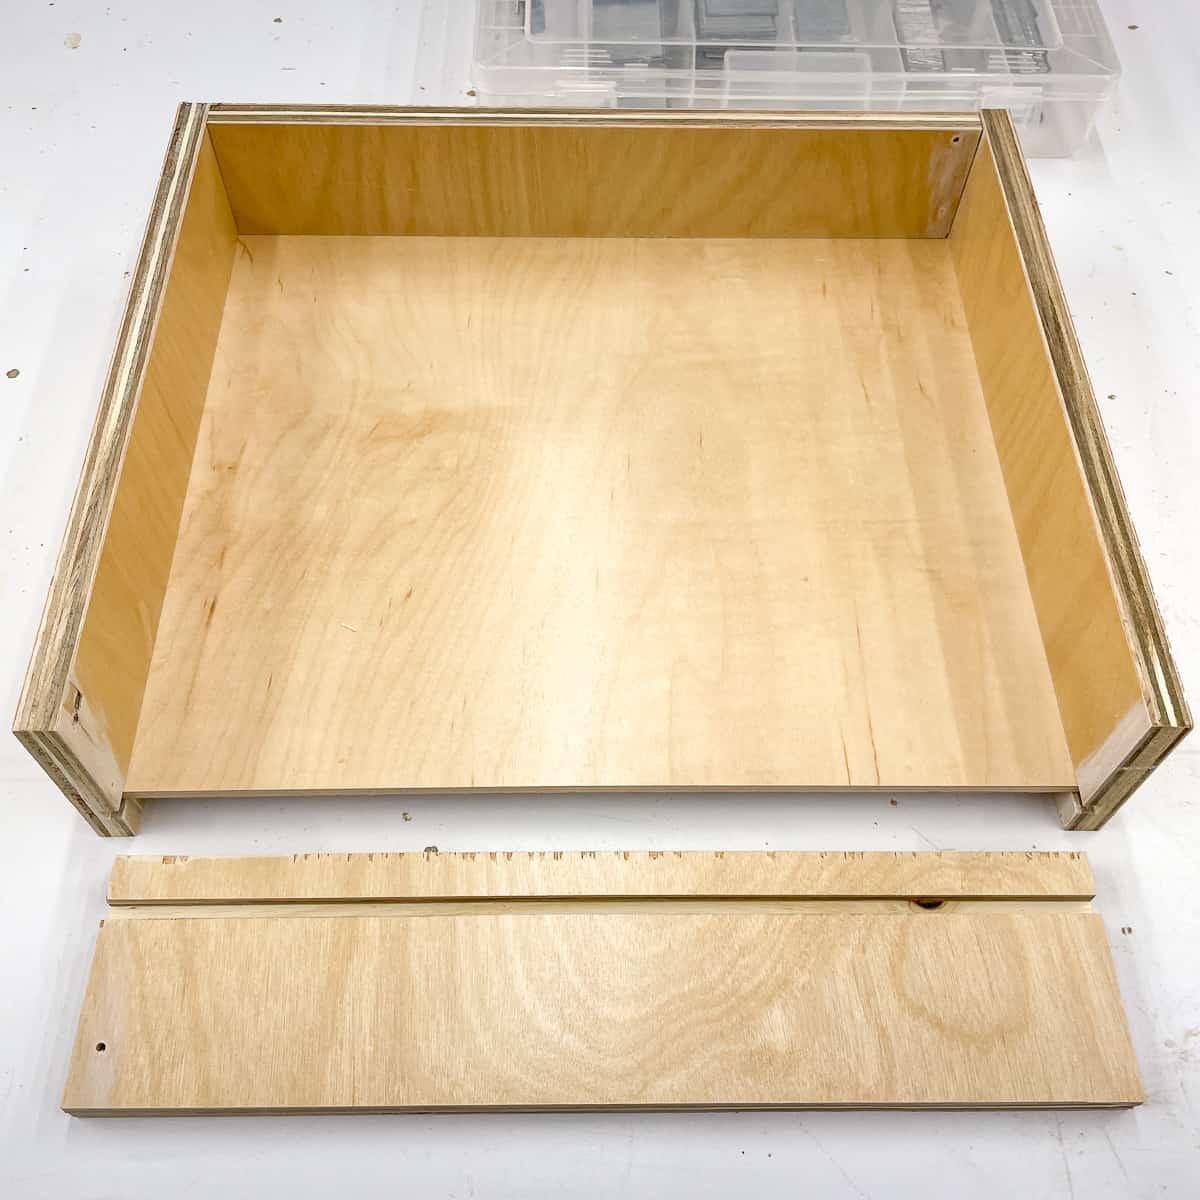
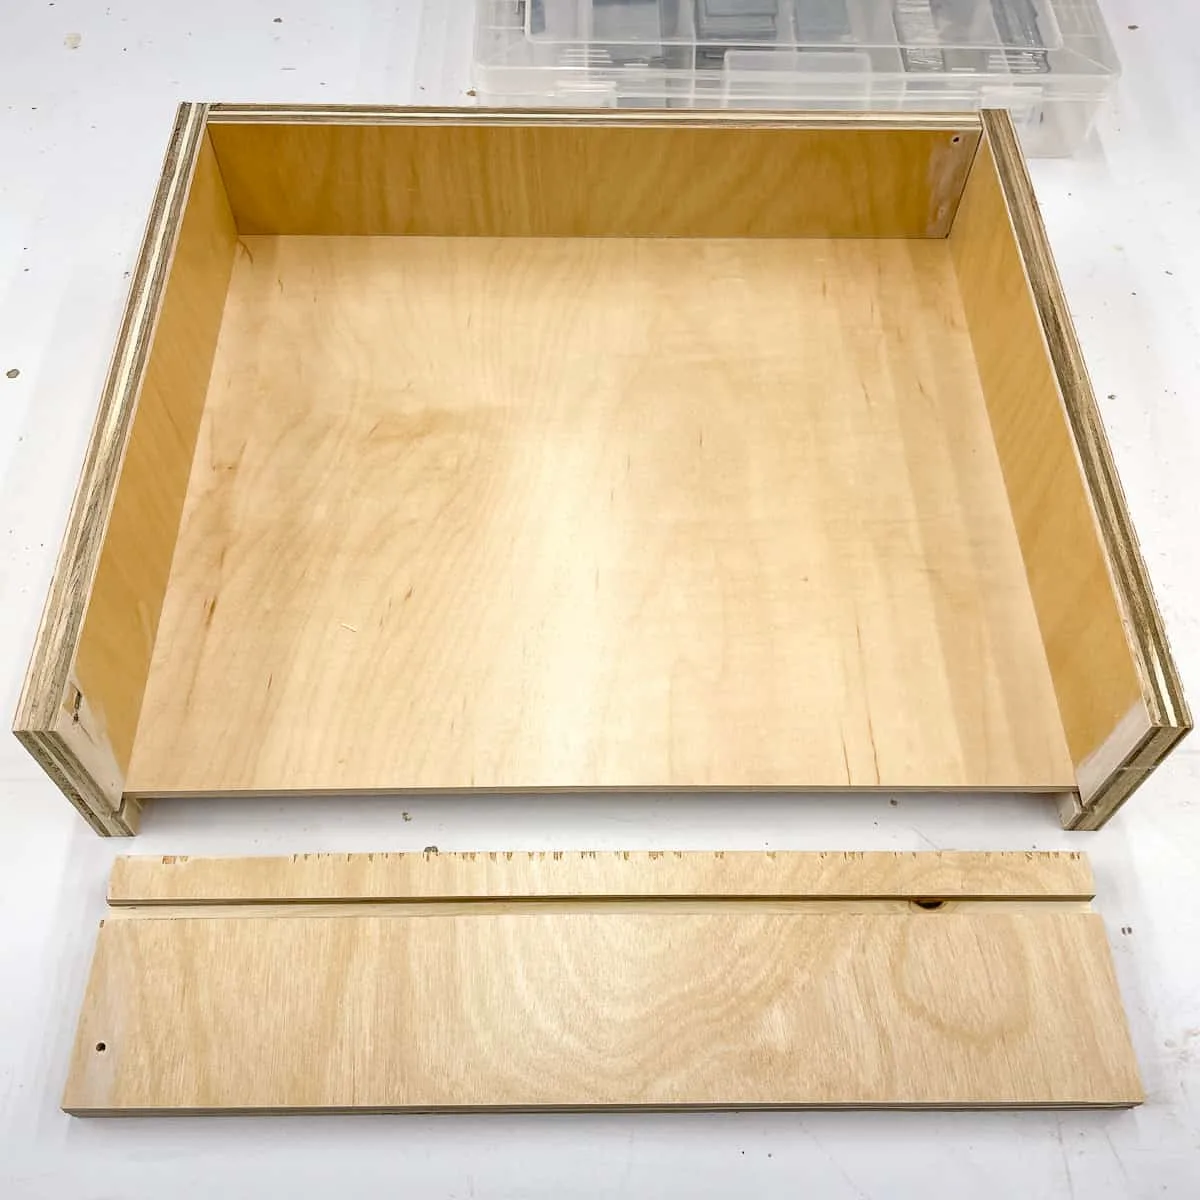
After cutting the grooves for all the drawer box pieces, leave the table saw fence in place but raise the blade so that it cuts all the way through the thickness of the board. Locate the back piece, and cut off everything below the top of the groove.
When you cut the plywood for the bottom, add ¼" to the length for the front groove as usual, but also add the entire thickness of the back piece. Slide the bottom into the grooves. It should come all the way to the back of the drawer.
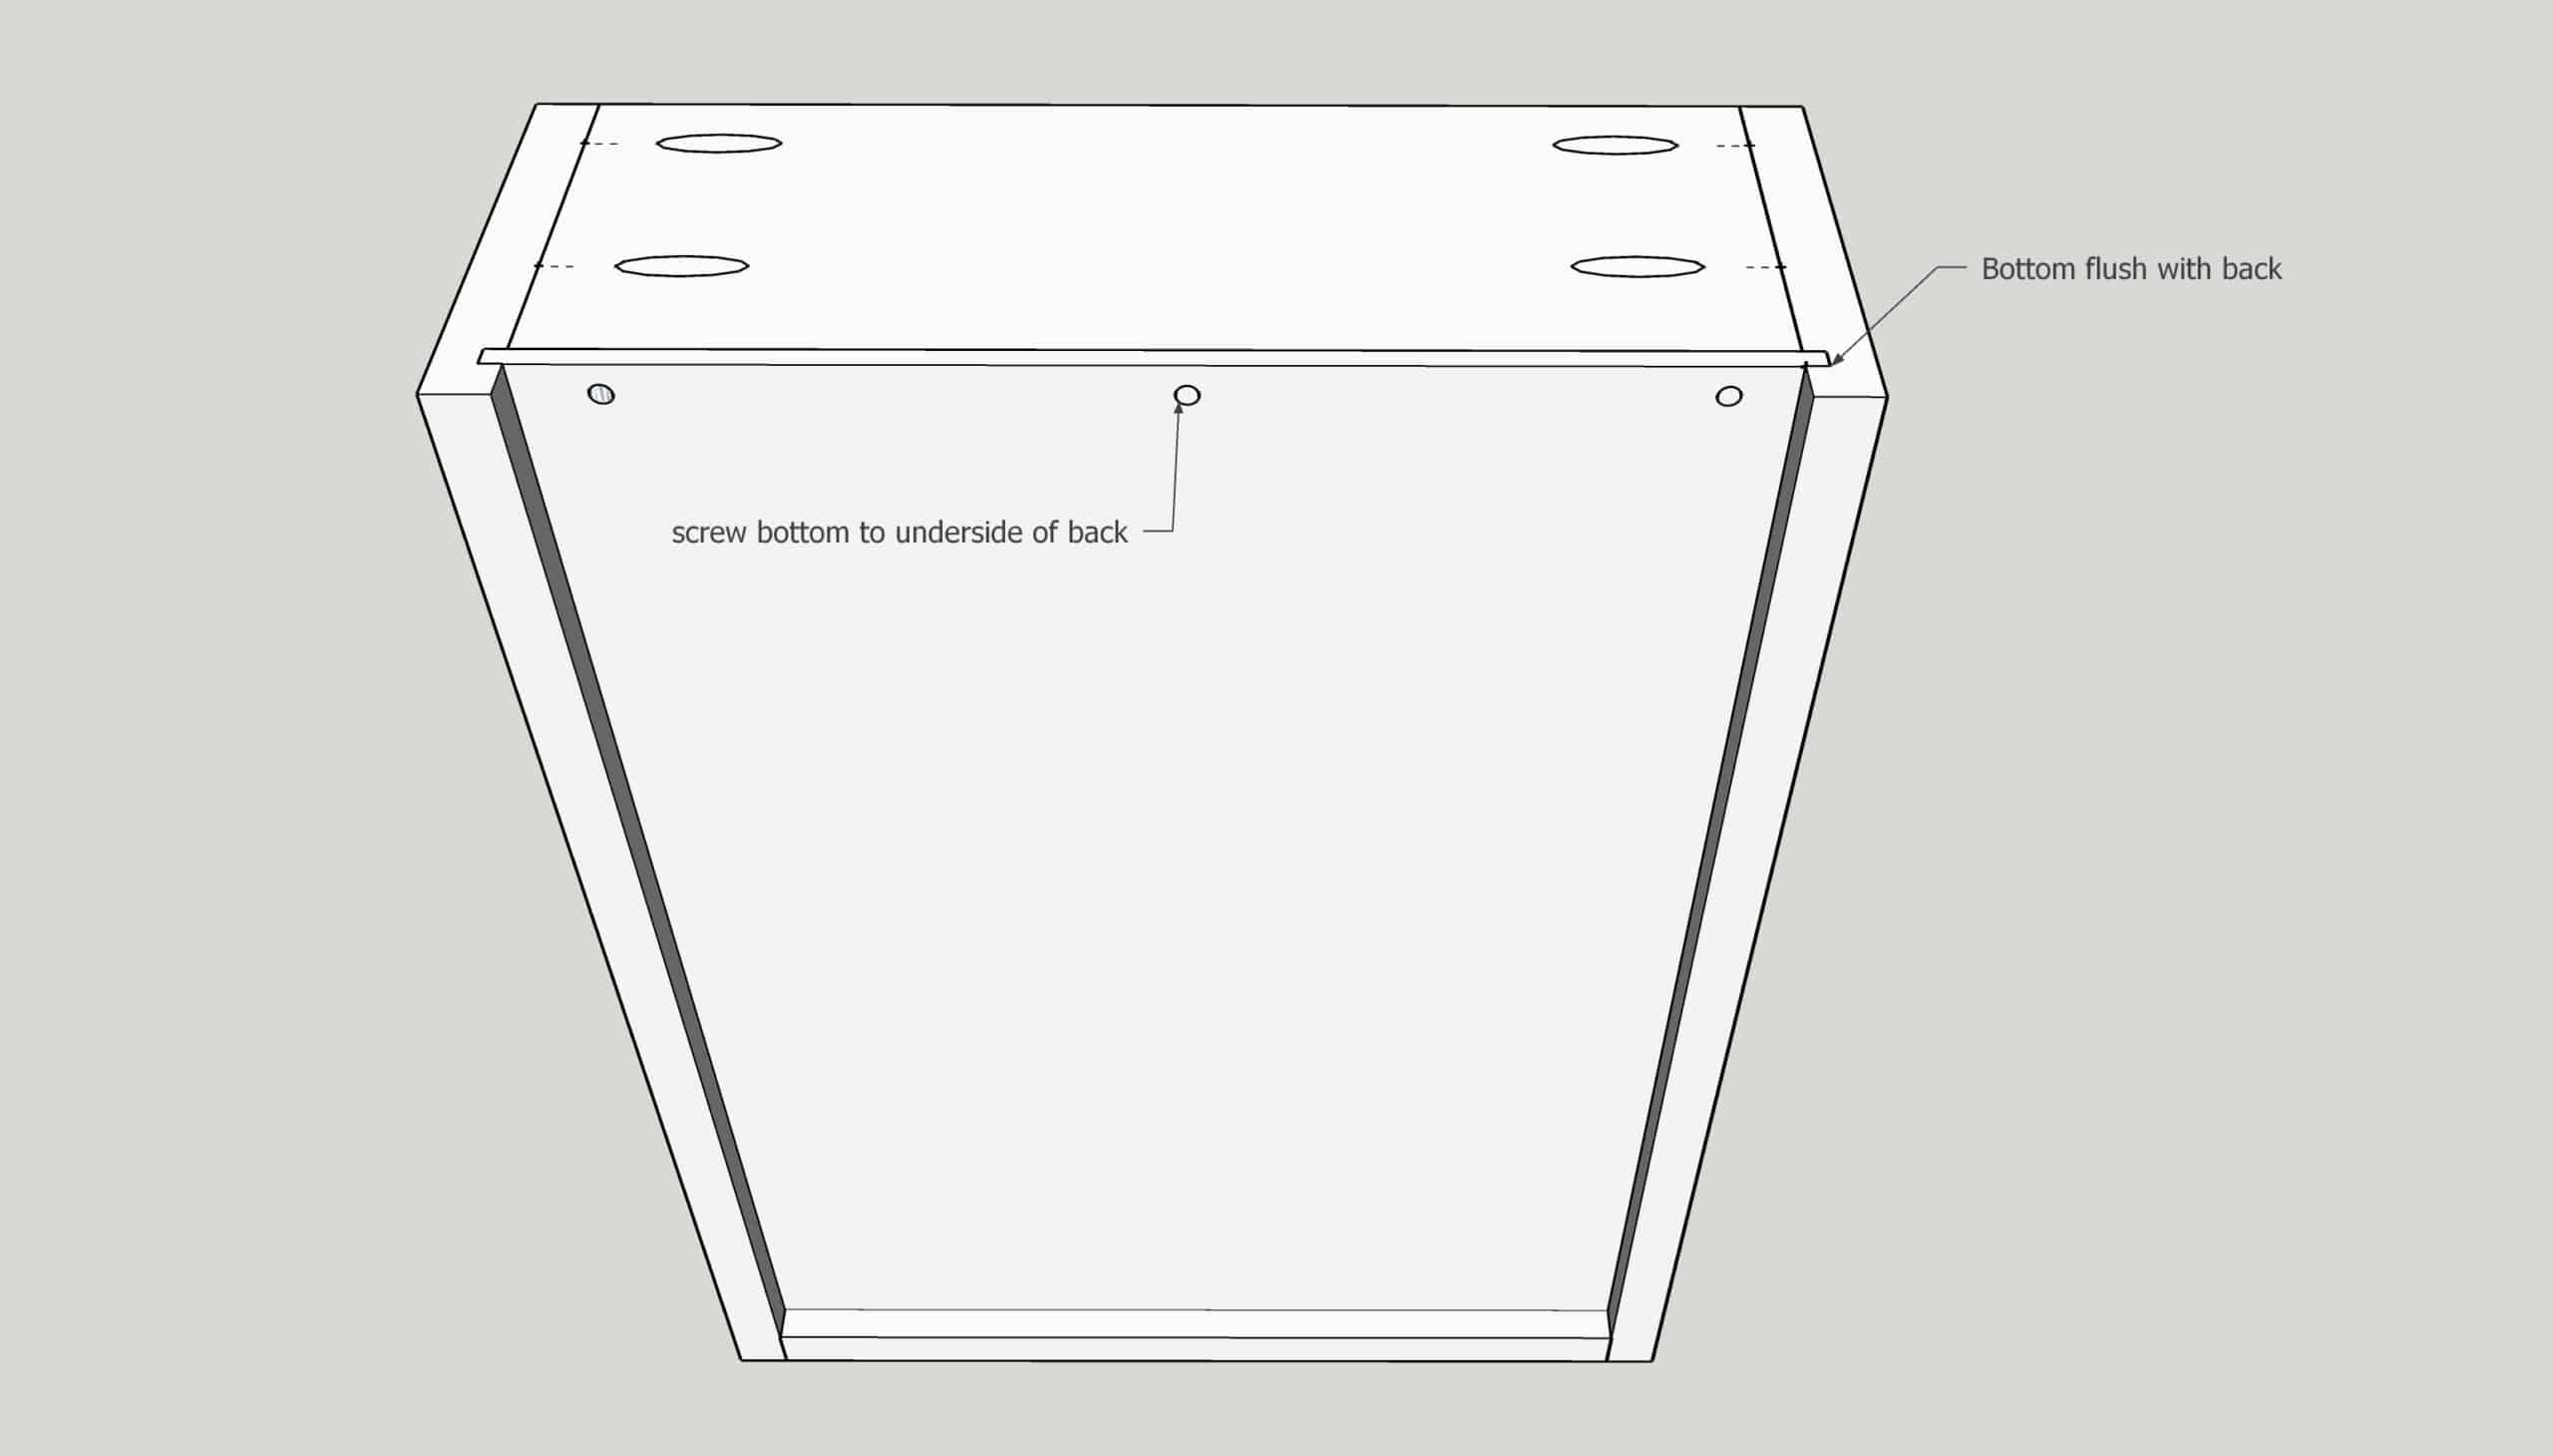
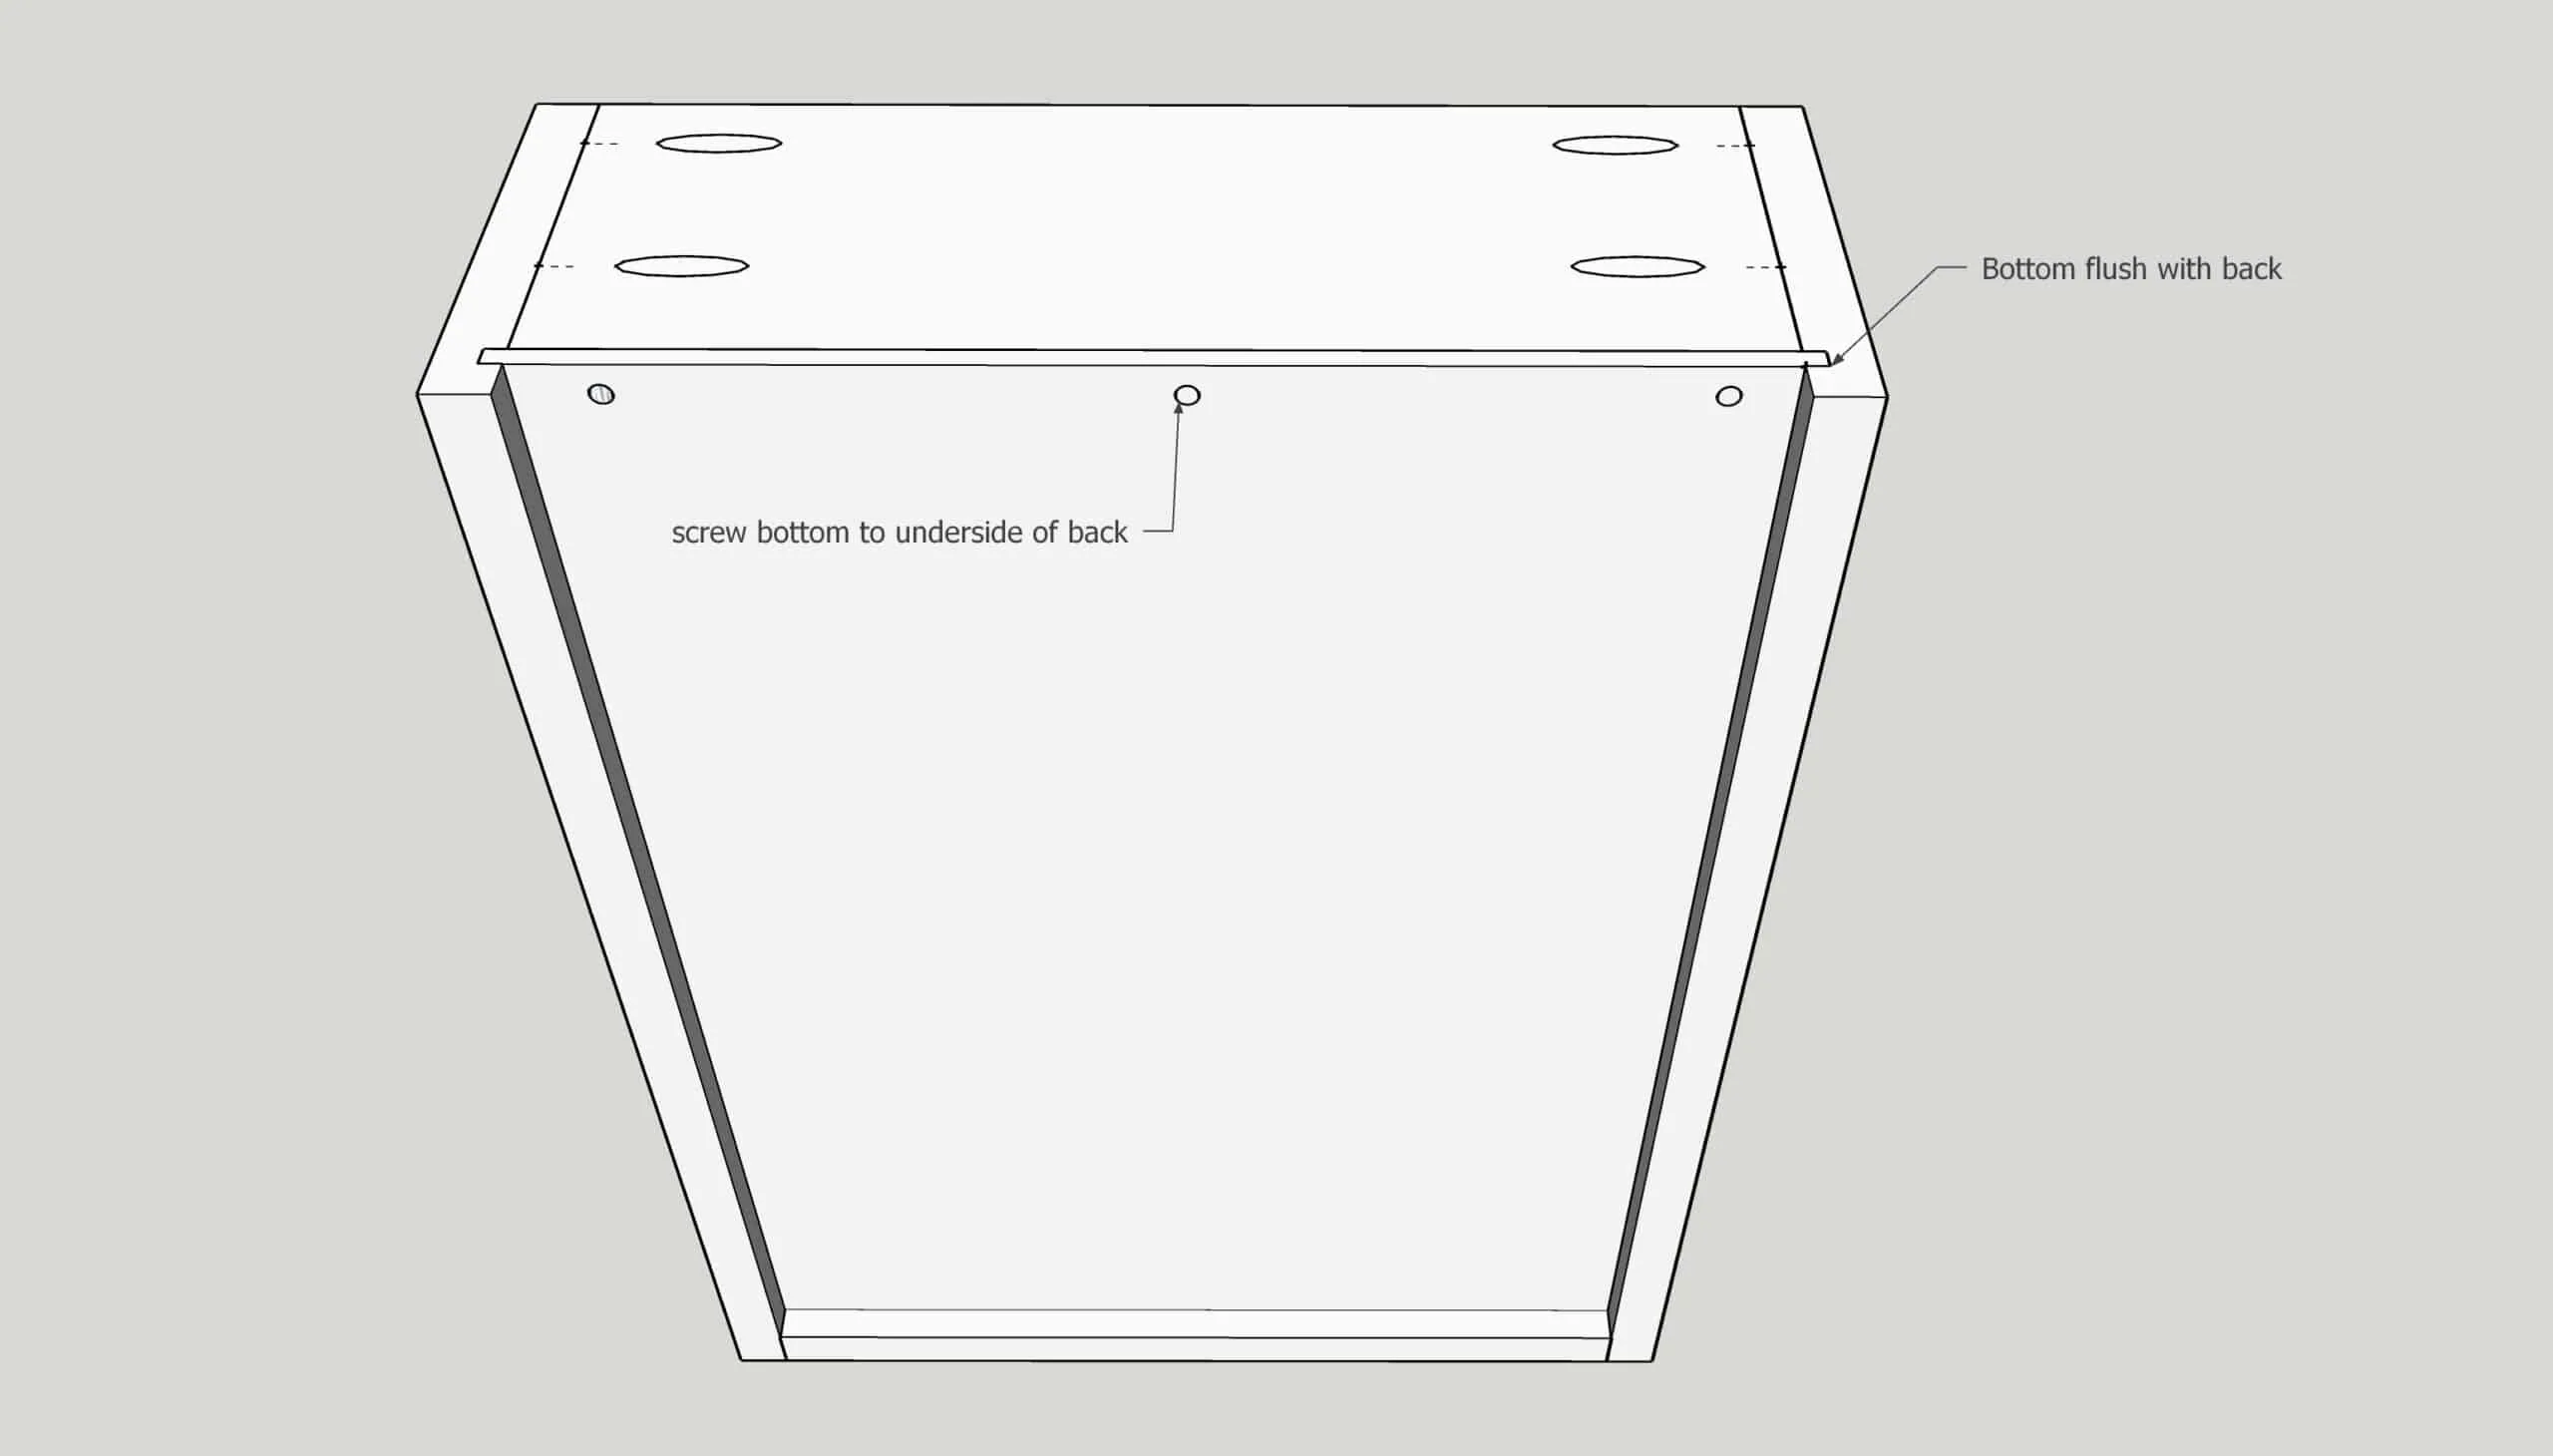
The back piece rests on top of the bottom. Secure it in place with pocket hole screws into the sides.
Now flip the drawer box over and insert a few small screws through the bottom into the back piece. If you ever need to replace the drawer bottom, just unscrew the screws and slide it out! The screws also prevent the bottom from rattling around in the groove.
Hopefully this article answered all your questions about how to make a drawer box! Stay tuned for my tutorial on the different types of drawer slides and how to install them coming soon!
Check out these other cabinetry tutorials!