Learn how to use rail and stile router bits to make your own cabinet doors! This tutorial shows you how to set them up for the perfect fit!

Making your own cabinet doors isn't as difficult as you might think! Rail and stile bits make it easy to get professional results with your router table. The interlocking elements make the process almost foolproof, so long as you set them up properly.
This post contains affiliate links for your convenience. Purchases made through these links may earn me a small commission at no additional cost to you. Please visit my disclosures page for more information.
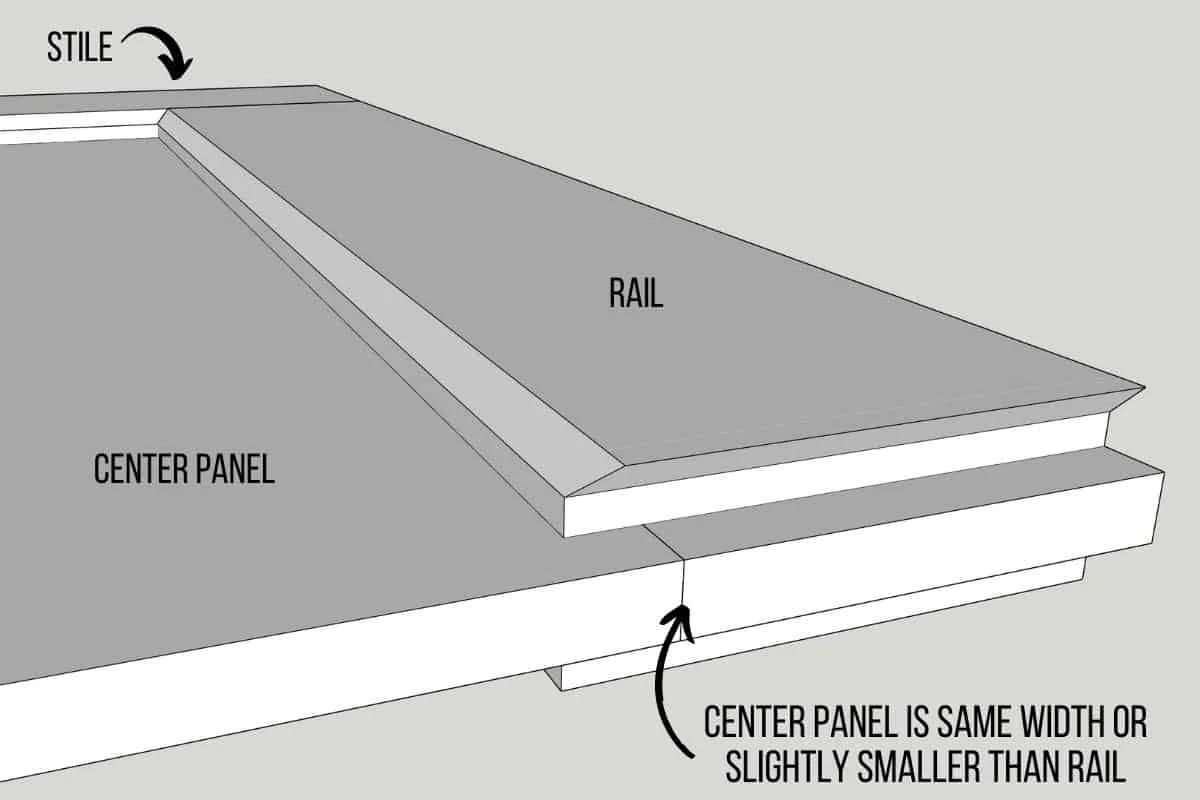
What are stiles and rails?
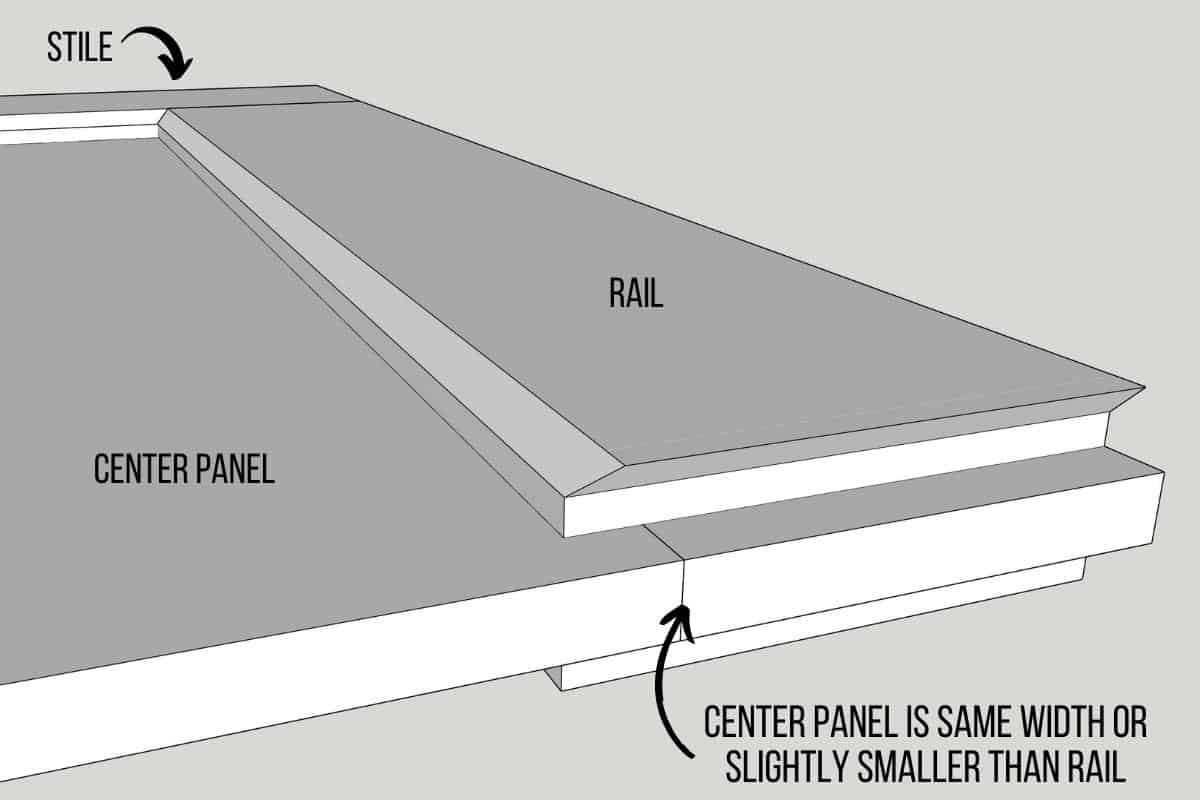
Rails and stiles frame the center panel of a door. Rail and stile widths can vary depending on the cabinet door style, but are typically 2 to 2 ½ inches wide.
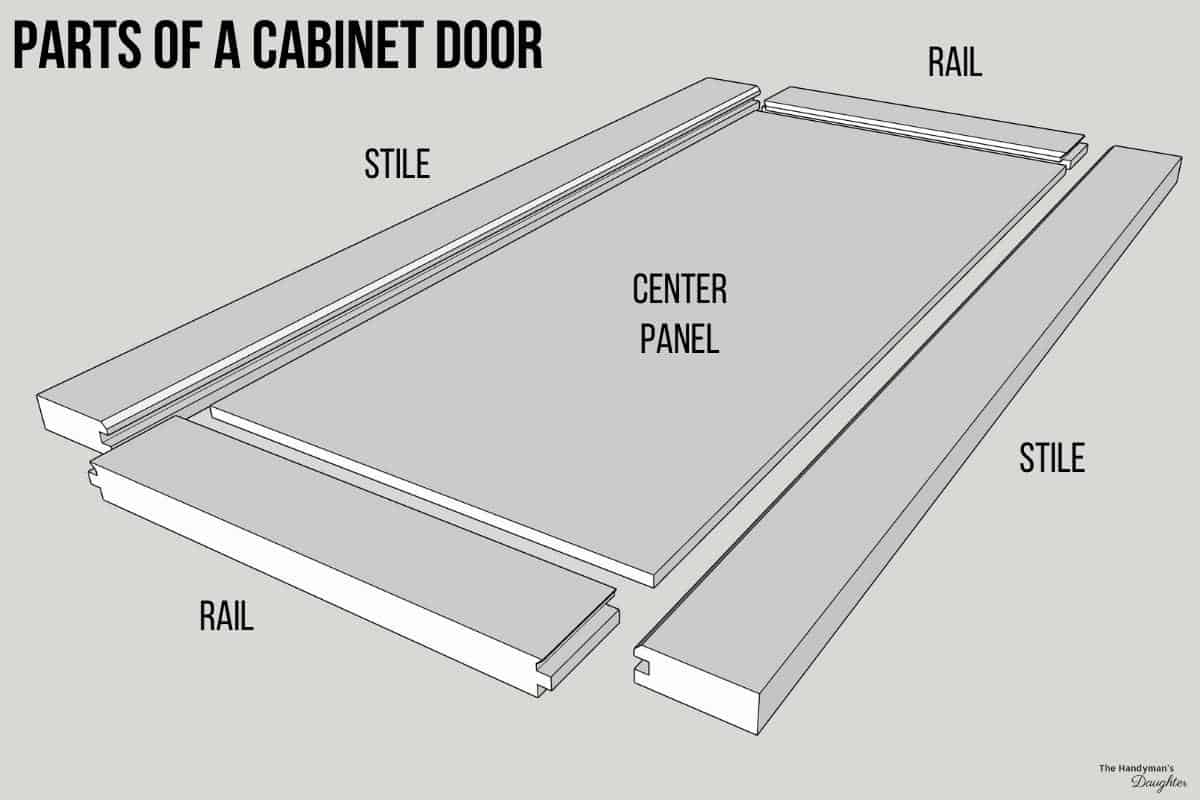
The stiles are the vertical pieces on the outside of the door. They run the entire length of the door from top to bottom, so you don't see the end grain when viewed from the side. The rails run between the stiles horizontally to create the top and bottom of the door.
Learn how to calculate the length of the rails, stiles and center panel in this tutorial! Don't forget to download the free worksheet to help keep track of all your measurements.
[convertkit form=3262547]What are rail and stile router bits?
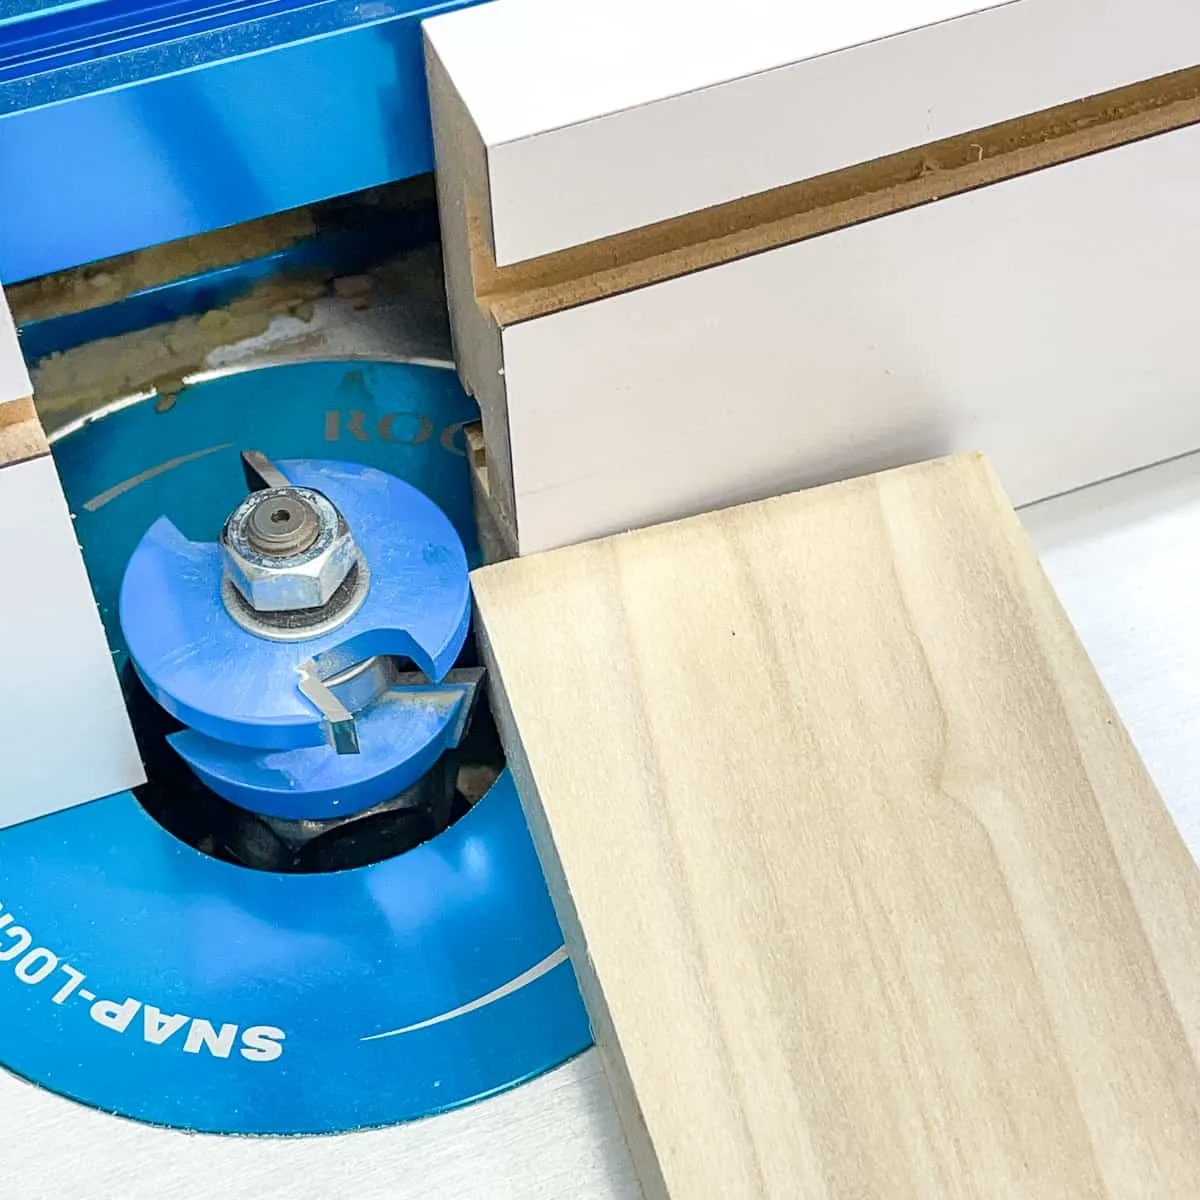
Rail and stile router bits create a decorative profile along the inside edge of the rails and stiles, as well as the groove for the center panel. The tongue on the end of the rails interlocks with the groove on the stile, providing plenty of surface area for wood glue to hold the pieces together without fasteners.
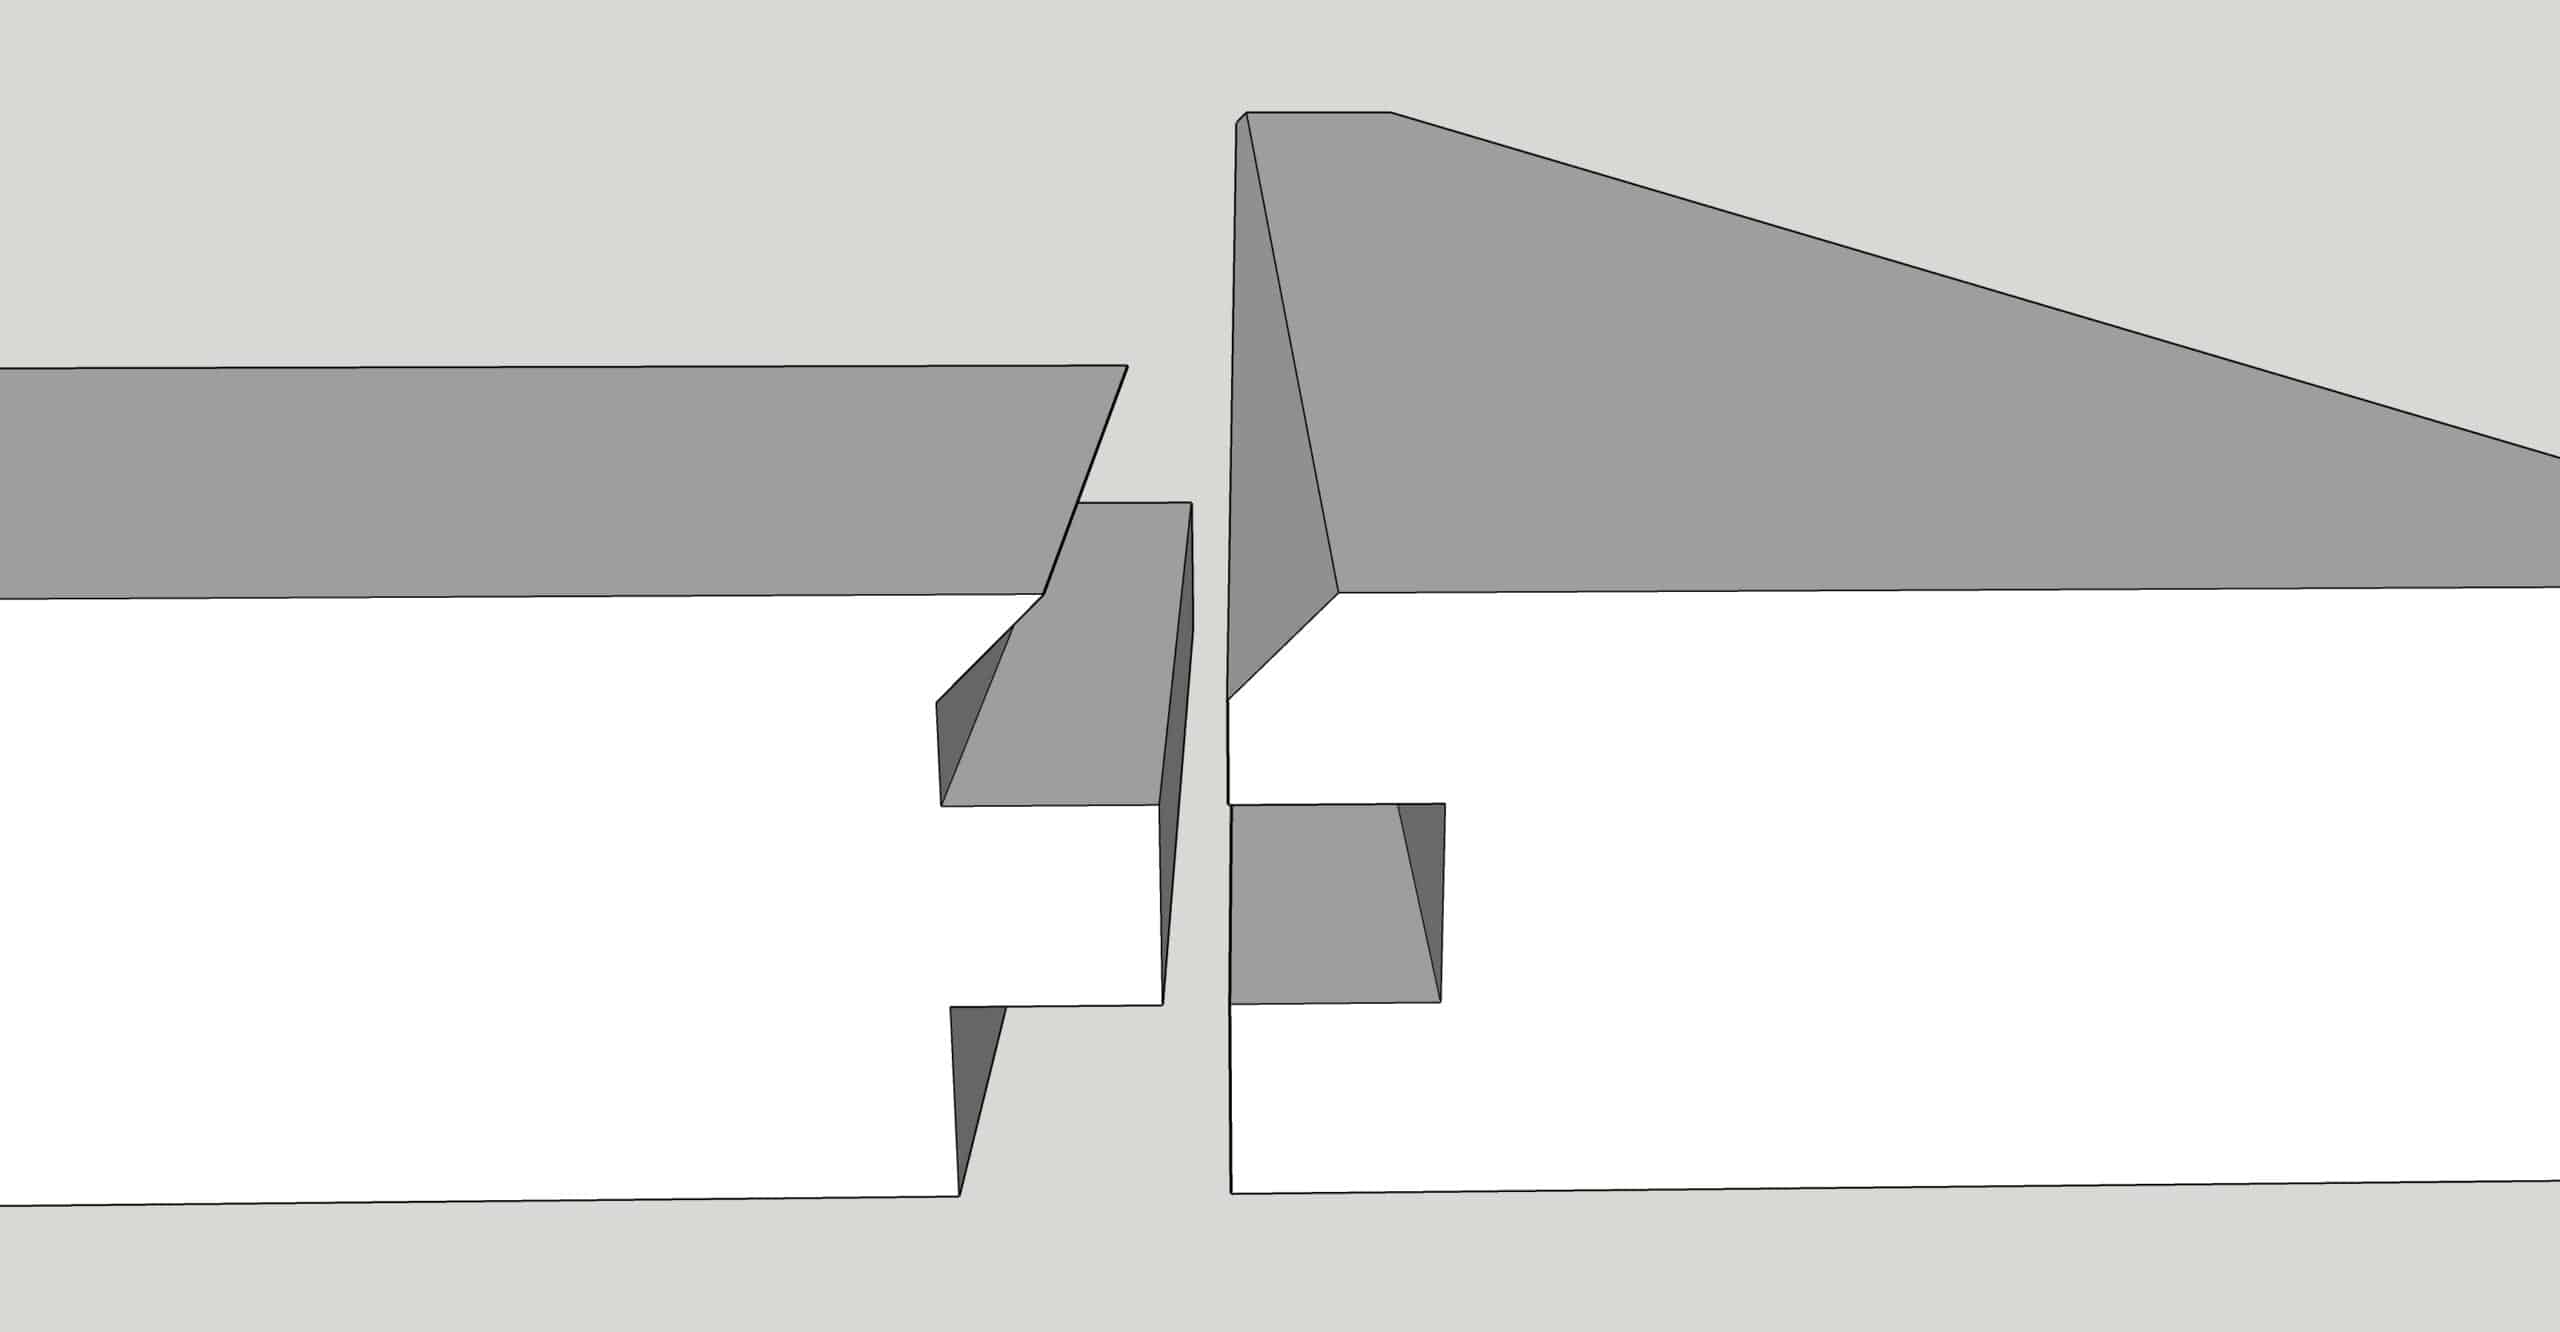
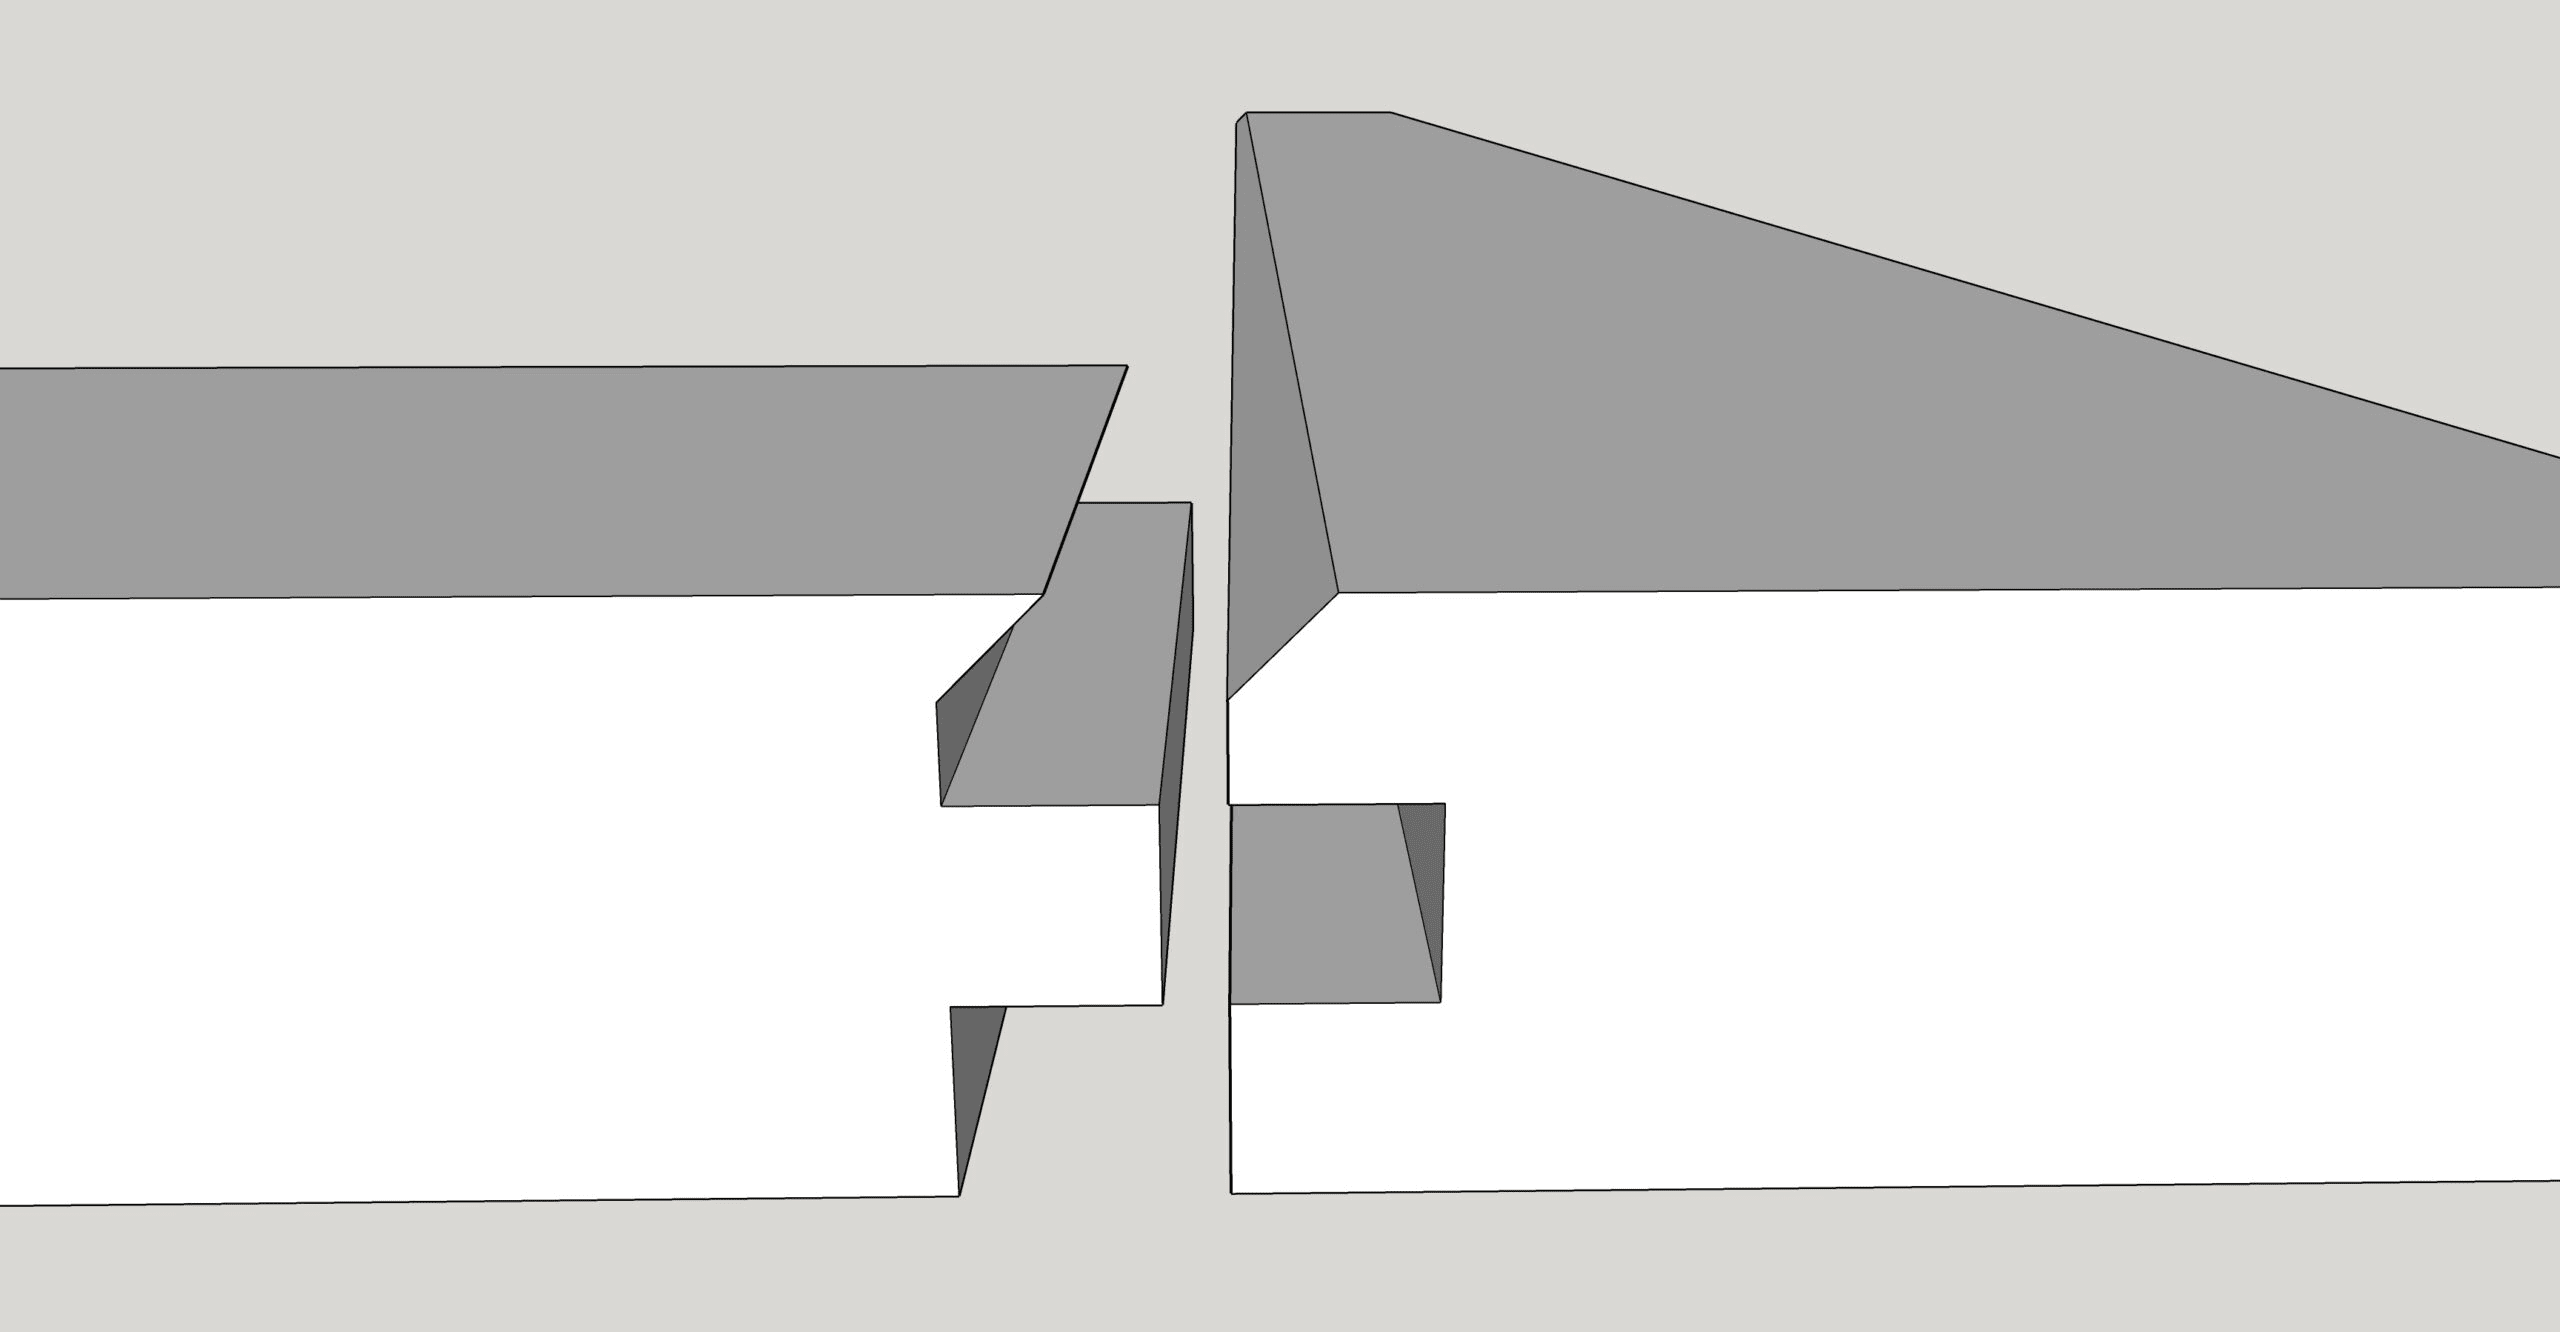
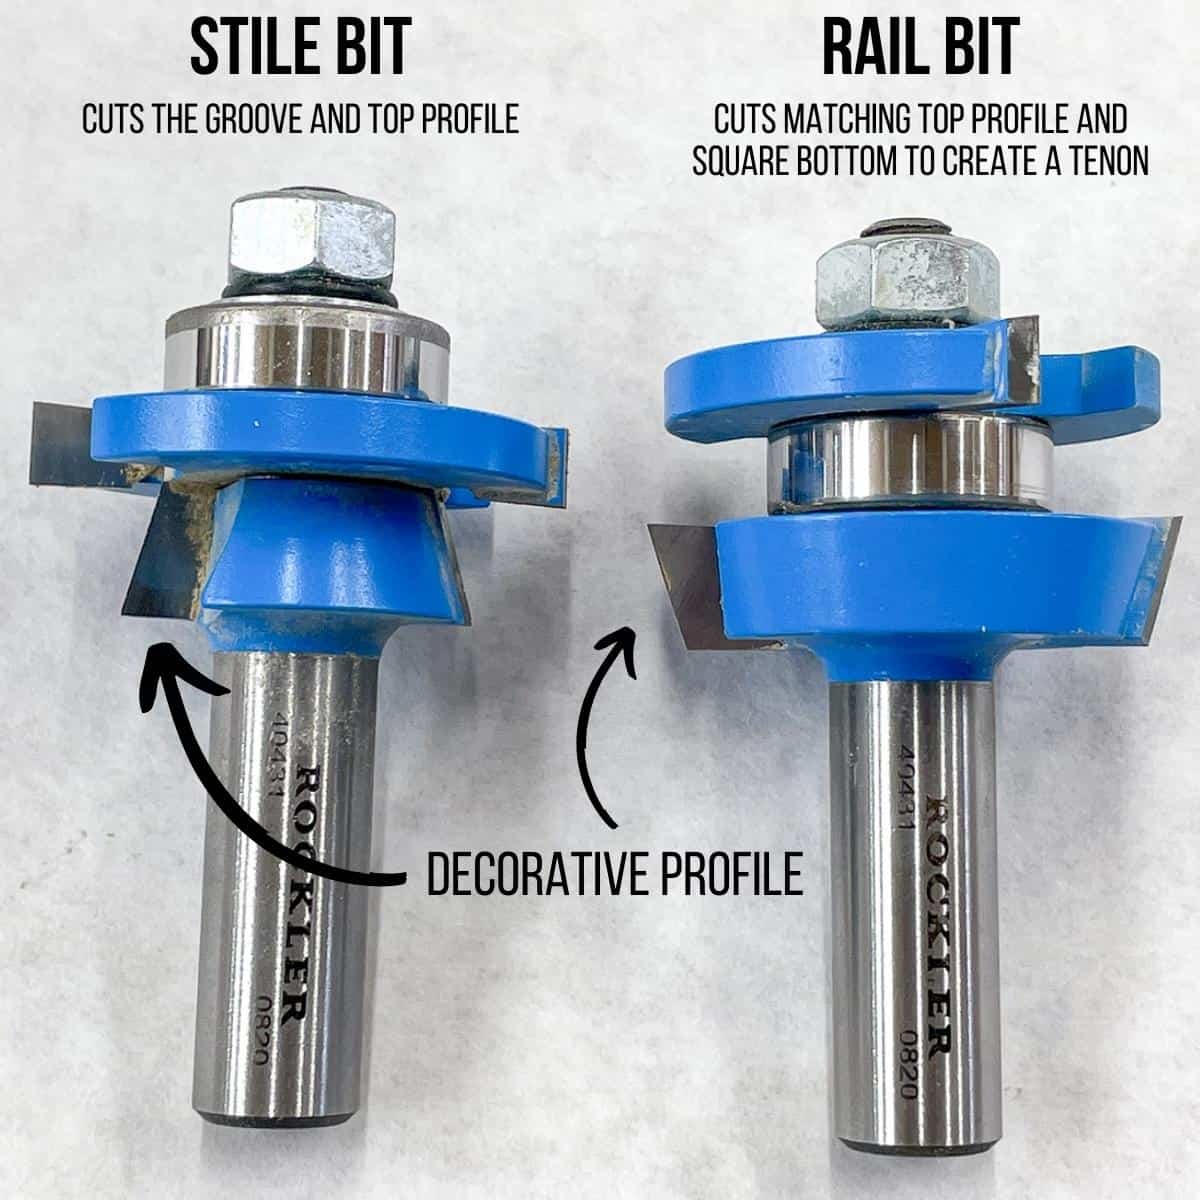
Rail and stile bits are also known as cope and stick bits. The rail bit creates the coped ends of the rail by cutting a tenon as well as the decorative profile. The stile bit is used on all the pieces (not just the stiles) to create the corresponding groove for the tenon and panel.
This is the set I used, which creates a chamfered edge around the inside panel.
The center panel is typically made from ¼" MDF or plywood, and fits snugly in the groove on all four sides to form the cabinet door. It should be the same width as the rails (including the tenon) or slightly smaller to allow space for wood glue.
When you buy a set of rail and stile router bits, they're designed to fit together perfectly. But setting them up in your router table can be a little tricky!
What is a coping sled?
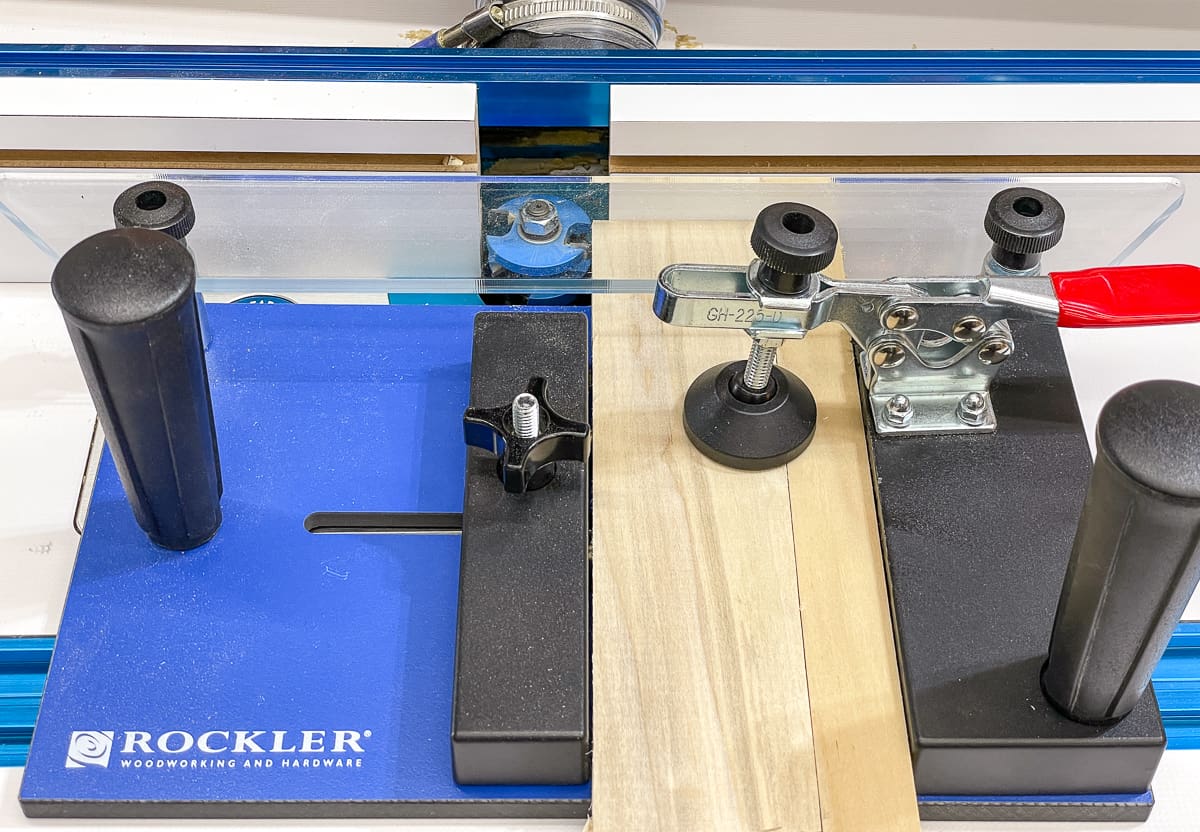
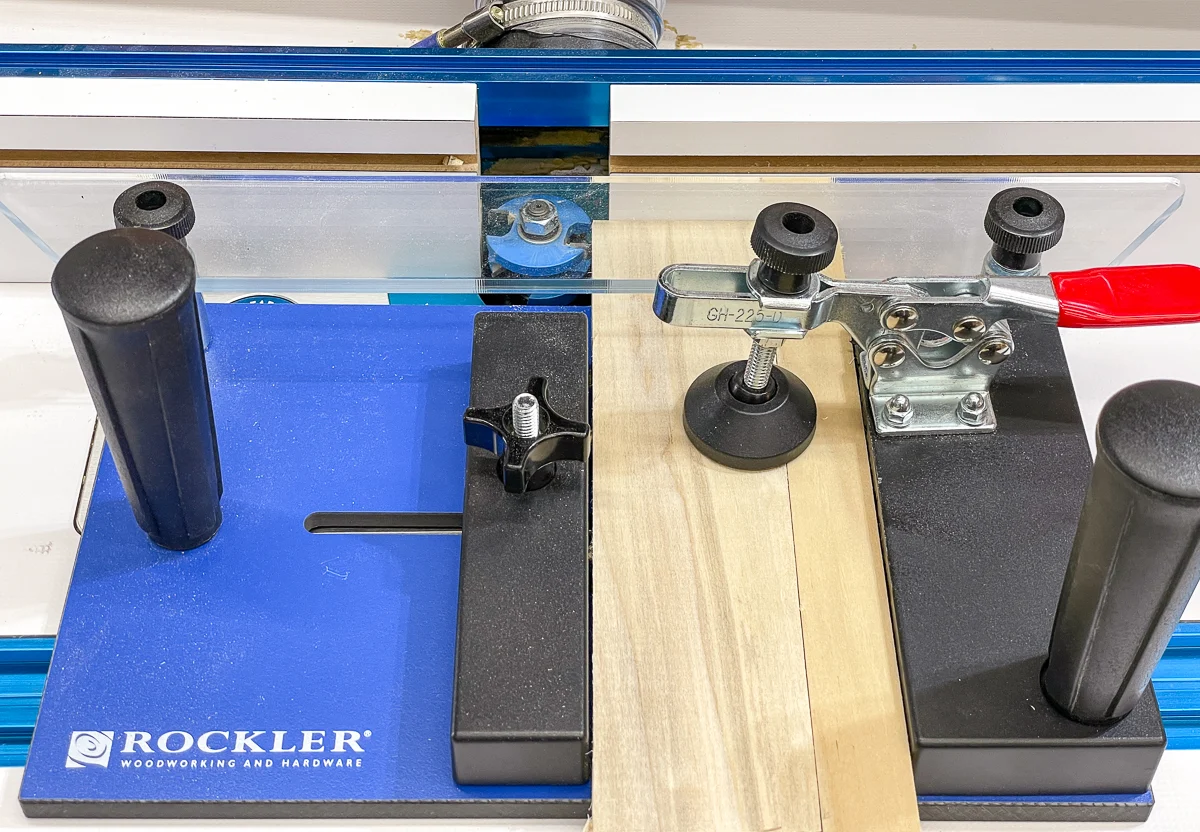
A coping sled supports the narrow end of the rail to keep it straight through the cut and prevents both tear out and kick back.
If the board tilts as it hits the spinning bit, it can create a crooked profile which will result in a crooked door. Even worse, since the narrow end may not be fully supported by the fence, the bit can grab the board and send it spinning back at you!

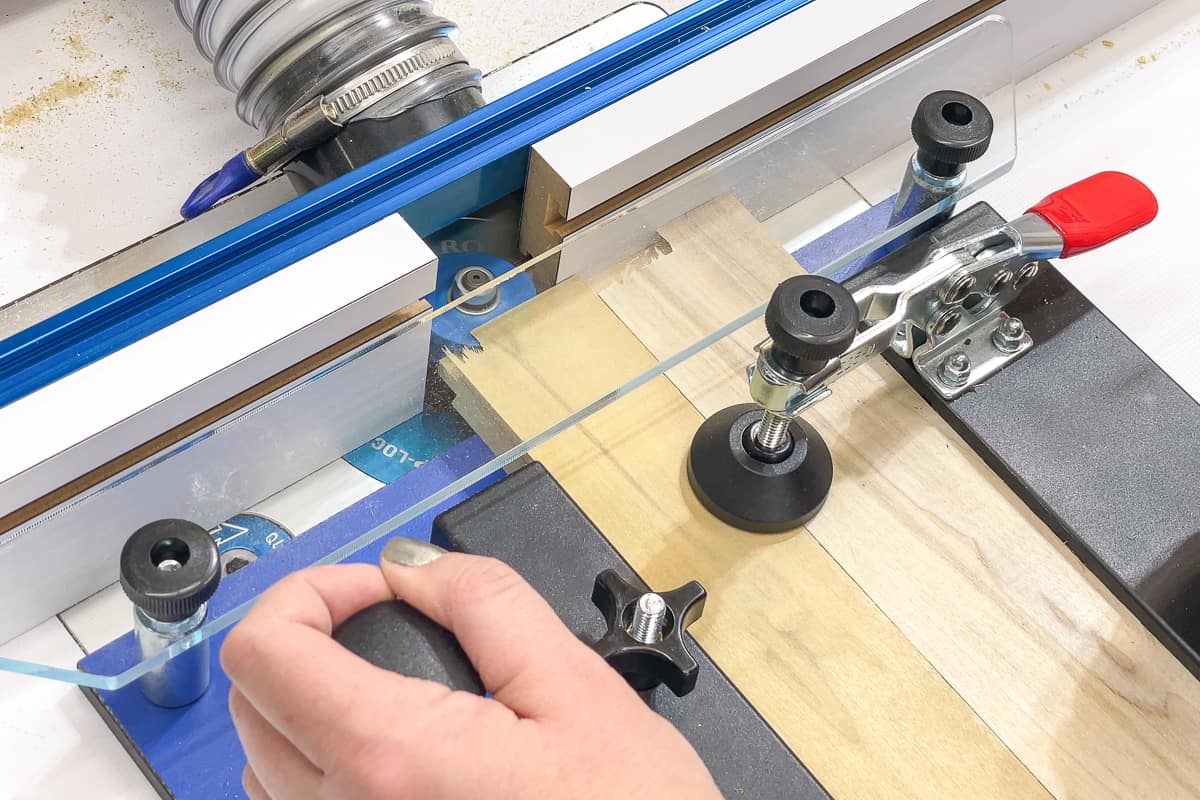
You can buy a coping sled like this one from Rockler, which is what I used for my cabinet doors. You can also make your own coping sled! The video below shows you how.
The long plexiglass guide spans across the fence on both sides of the router bit to keep the sled straight throughout the cut. A sacrificial board prevents tear out and the toggle clamp holds the board down flat from the top. The board is held at an exact 90 degree angle to the fence to prevent tilting, and tall handles keep your hands at a safe distance from the spinning blade.
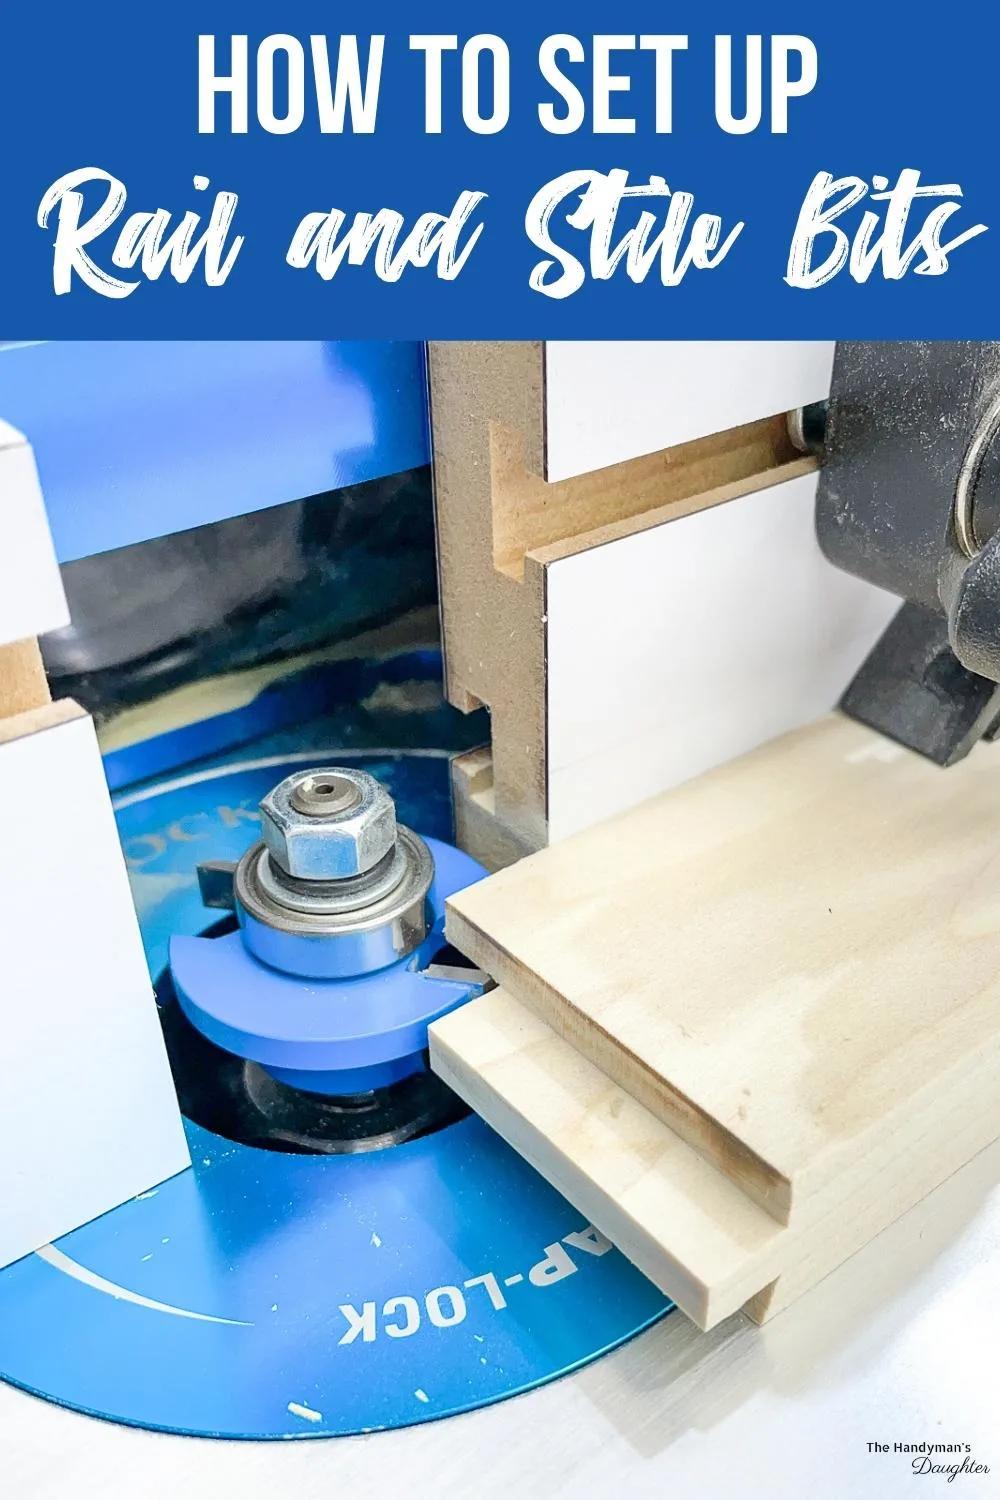
How to set up rail and stile bits
Save the scraps
After milling the lumber for the rails and stiles and cutting them to length, set aside the scraps. These pieces will be essential for getting the perfect router bit height! You can test the exact placement of the tongue and groove on these scrap pieces before cutting into the real thing.
Set up the rail bit first
Use the rail (or cope) bits on the ends of the rails first. The square stock will give you full support through the cut instead of putting pressure on a small angled edge. It also allows you to clean up any tear out with the stile bit later on.
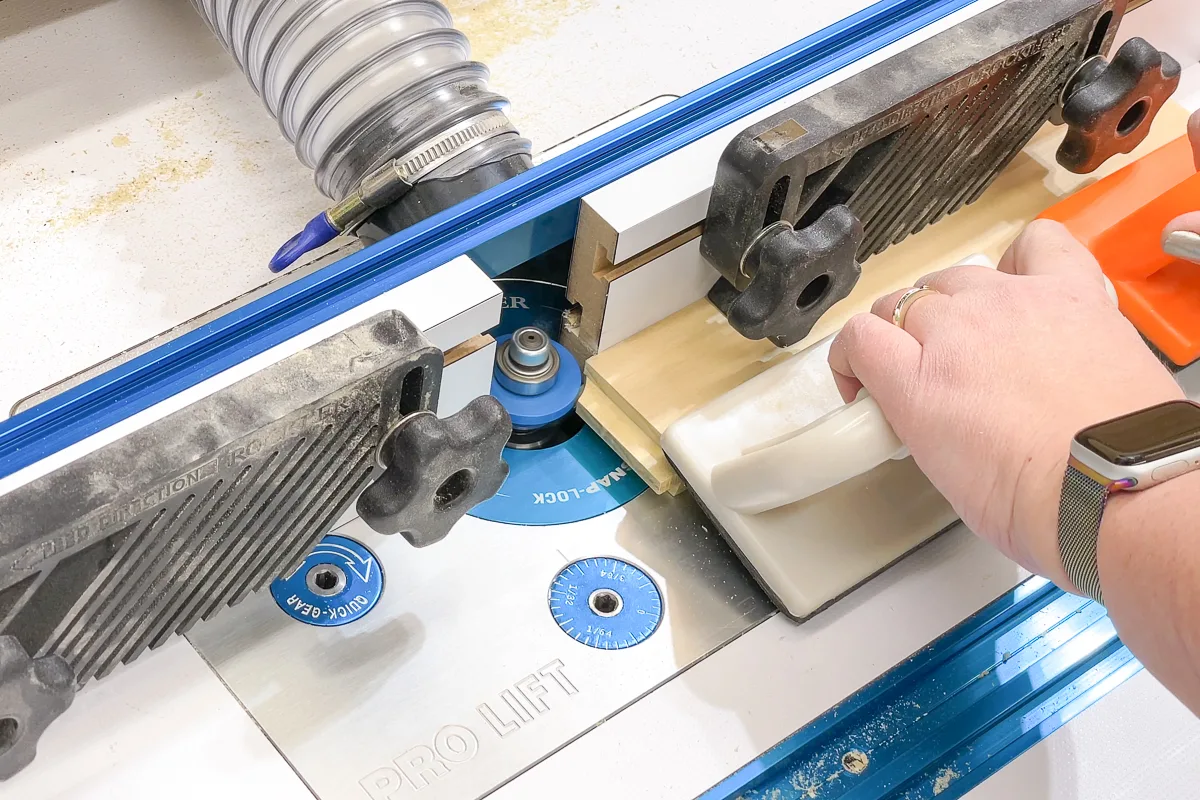
Insert the rail bit into the router, and adjust the fence so that lines up with the bearing. Use a straight edge like this metal ruler to verify that your board will be able to pass through smoothly.

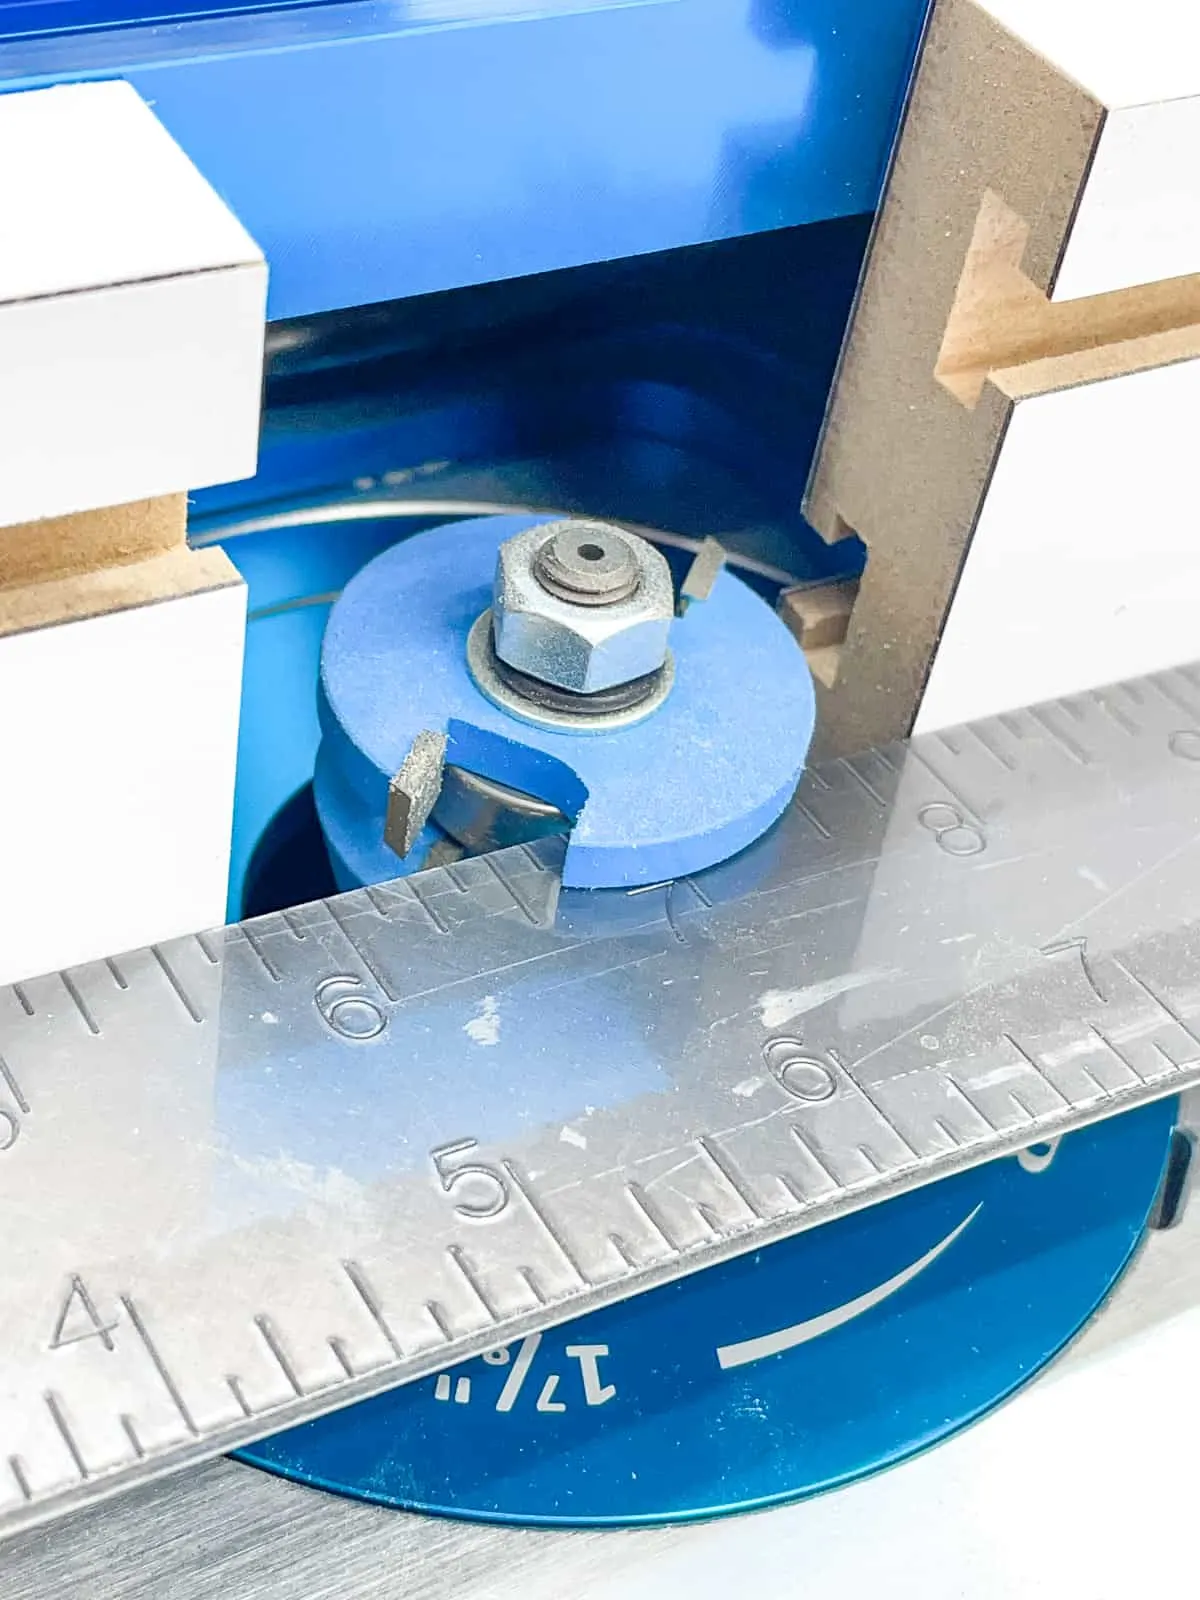
To set the height, I'm using a plastic set up block that corresponds to the same model of rail and stile bits I'm using for my cabinet doors. These take out some of the guesswork and fiddling, but only if your lumber thickness exactly matches the thickness of the set up block (typically ¾").
Place the set up block or scrap of lumber on top of the coping sled, then slide it next to the rail router bit. Adjust the height of the bit so that the tongue will be cut in the exact middle of the board. With the set up block, I can just crank up the height until the tenon slides in easily.

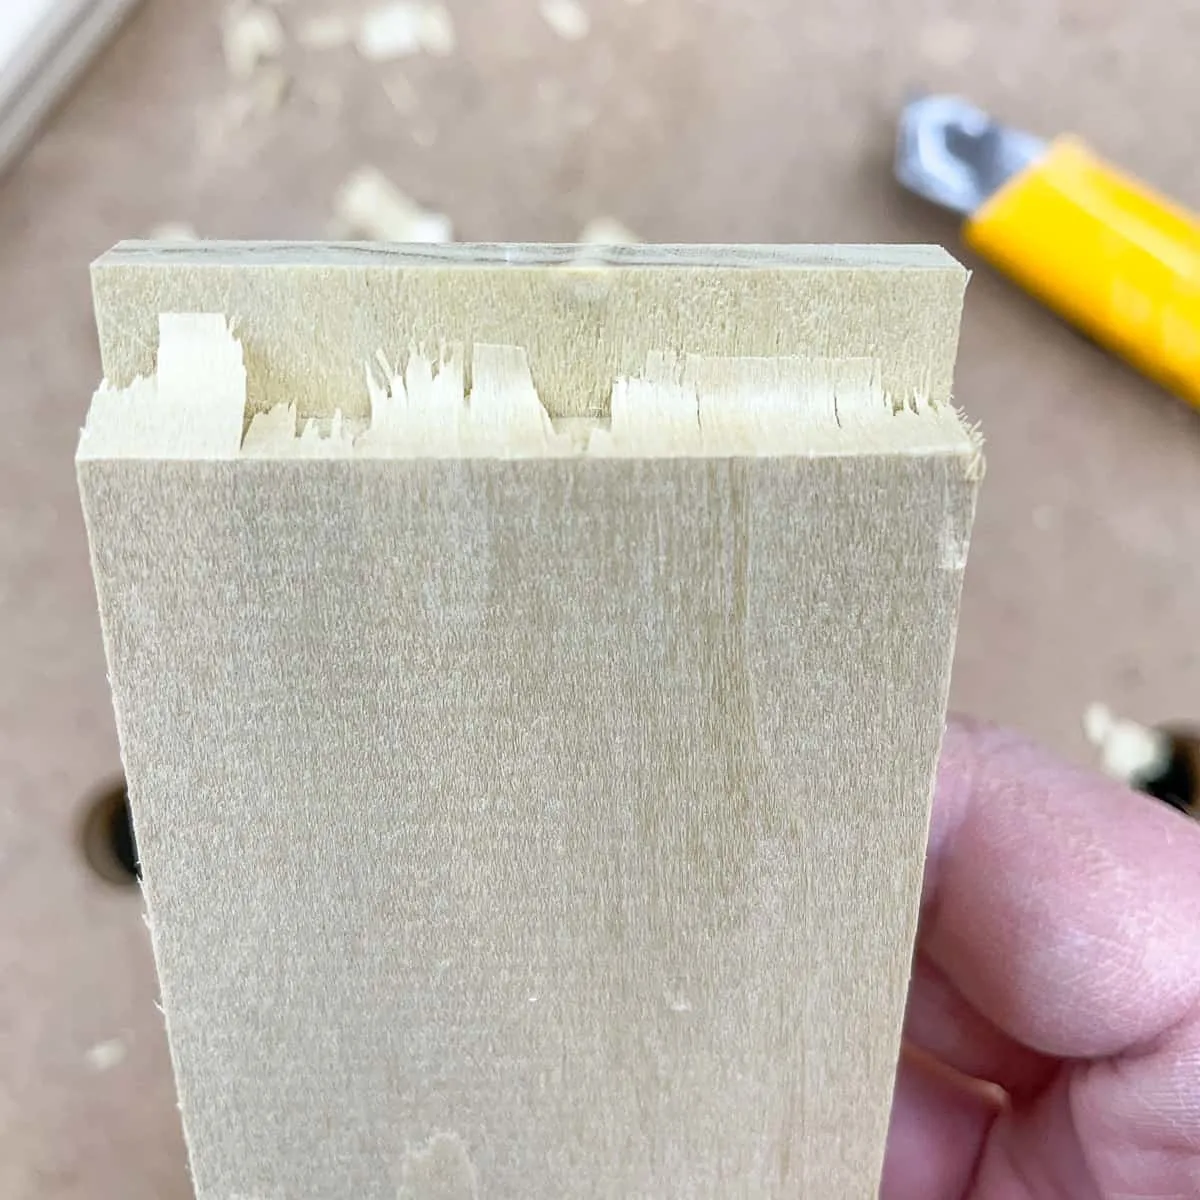
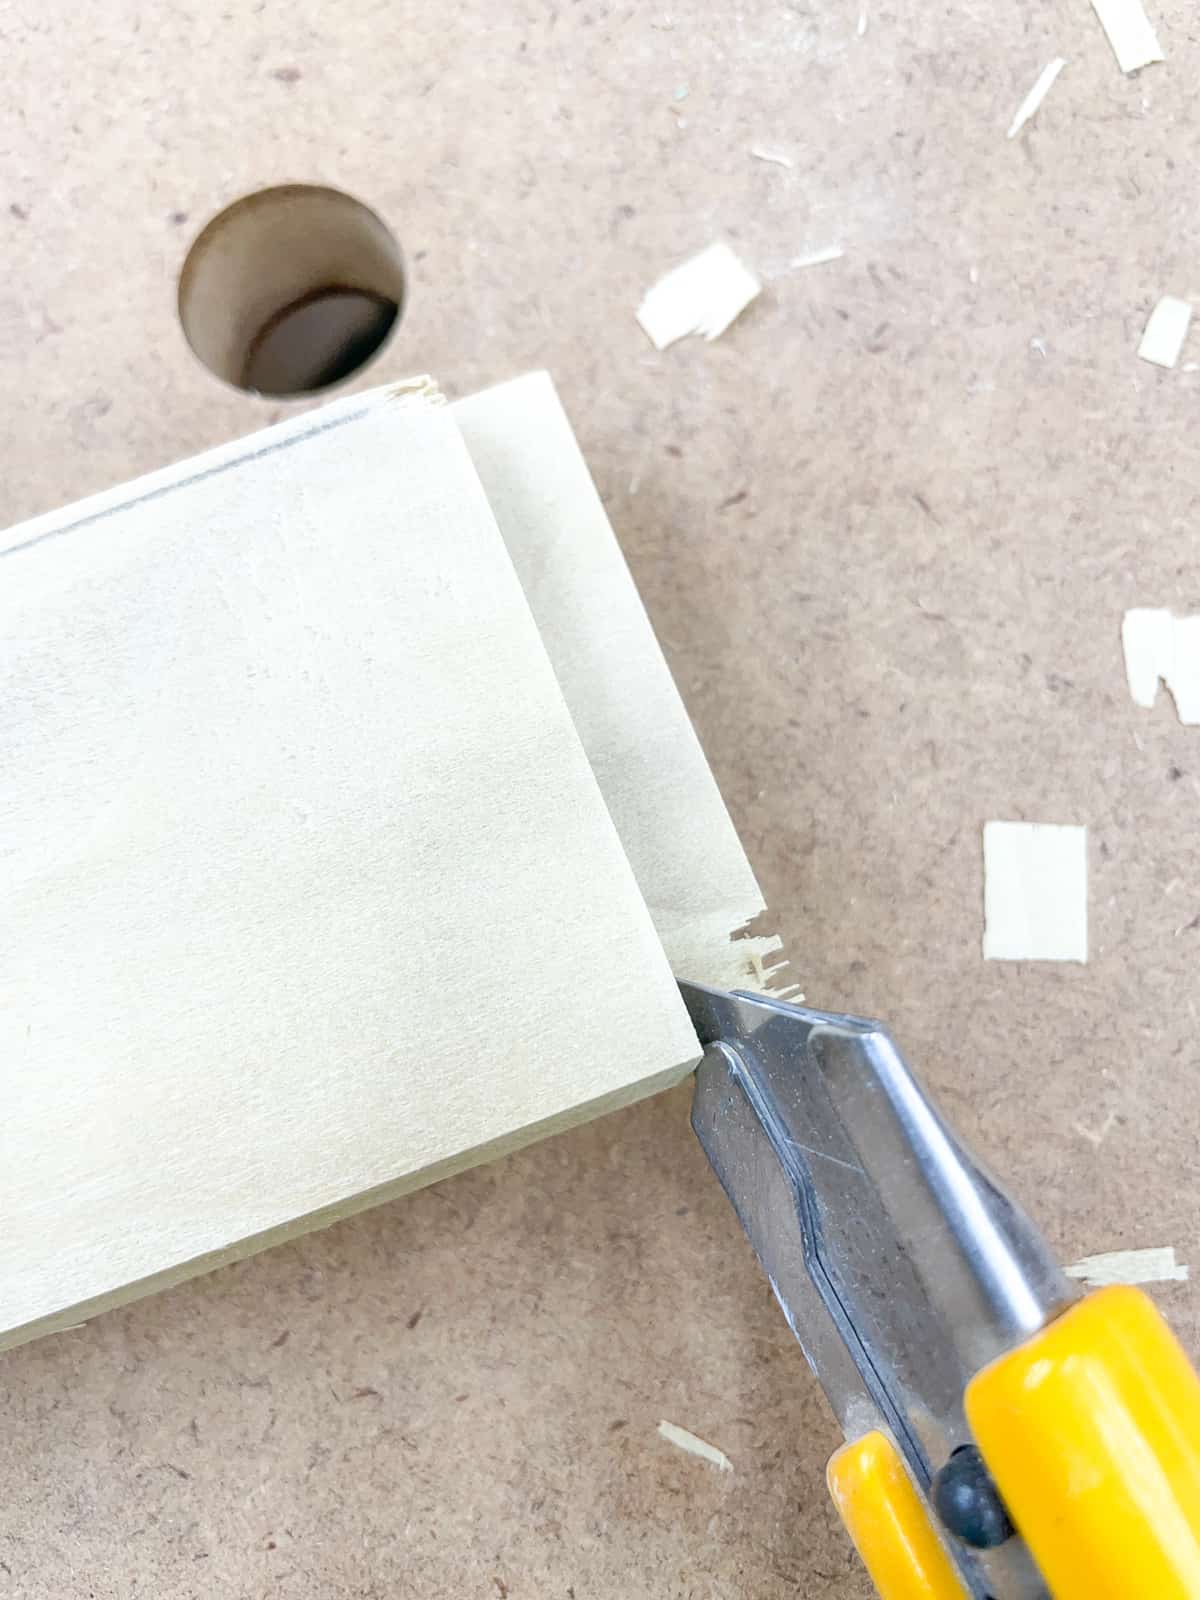
Place a scrap of wood into the coping sled and make a test cut. My lumber is very slightly thicker than ¾" (so I can sand it down later), so it leaves a little bit hanging on at the top.

The excess can just be folded down, then cleaned up with a utility knife or a chisel and sanded smooth. If I raised the bit up to remove this little sliver, I ended up with a fuzzy angled cut on the other side. I would rather have a perfectly clean decorative profile cut on the front and have to do a little extra work on the back where it won't be seen!

If the rail bit doesn't cut exactly where you want it, adjust the height and try again. You're looking to get the entire decorative profile cut onto the front of the board and the tongue exactly in the middle. This is why you save all those scraps!
Once you have the rail bit set up perfectly, lock in the router height and cut both ends of all the rails. Make sure to rotate the rails without flipping them over, or you'll end up with profiles on opposing sides!
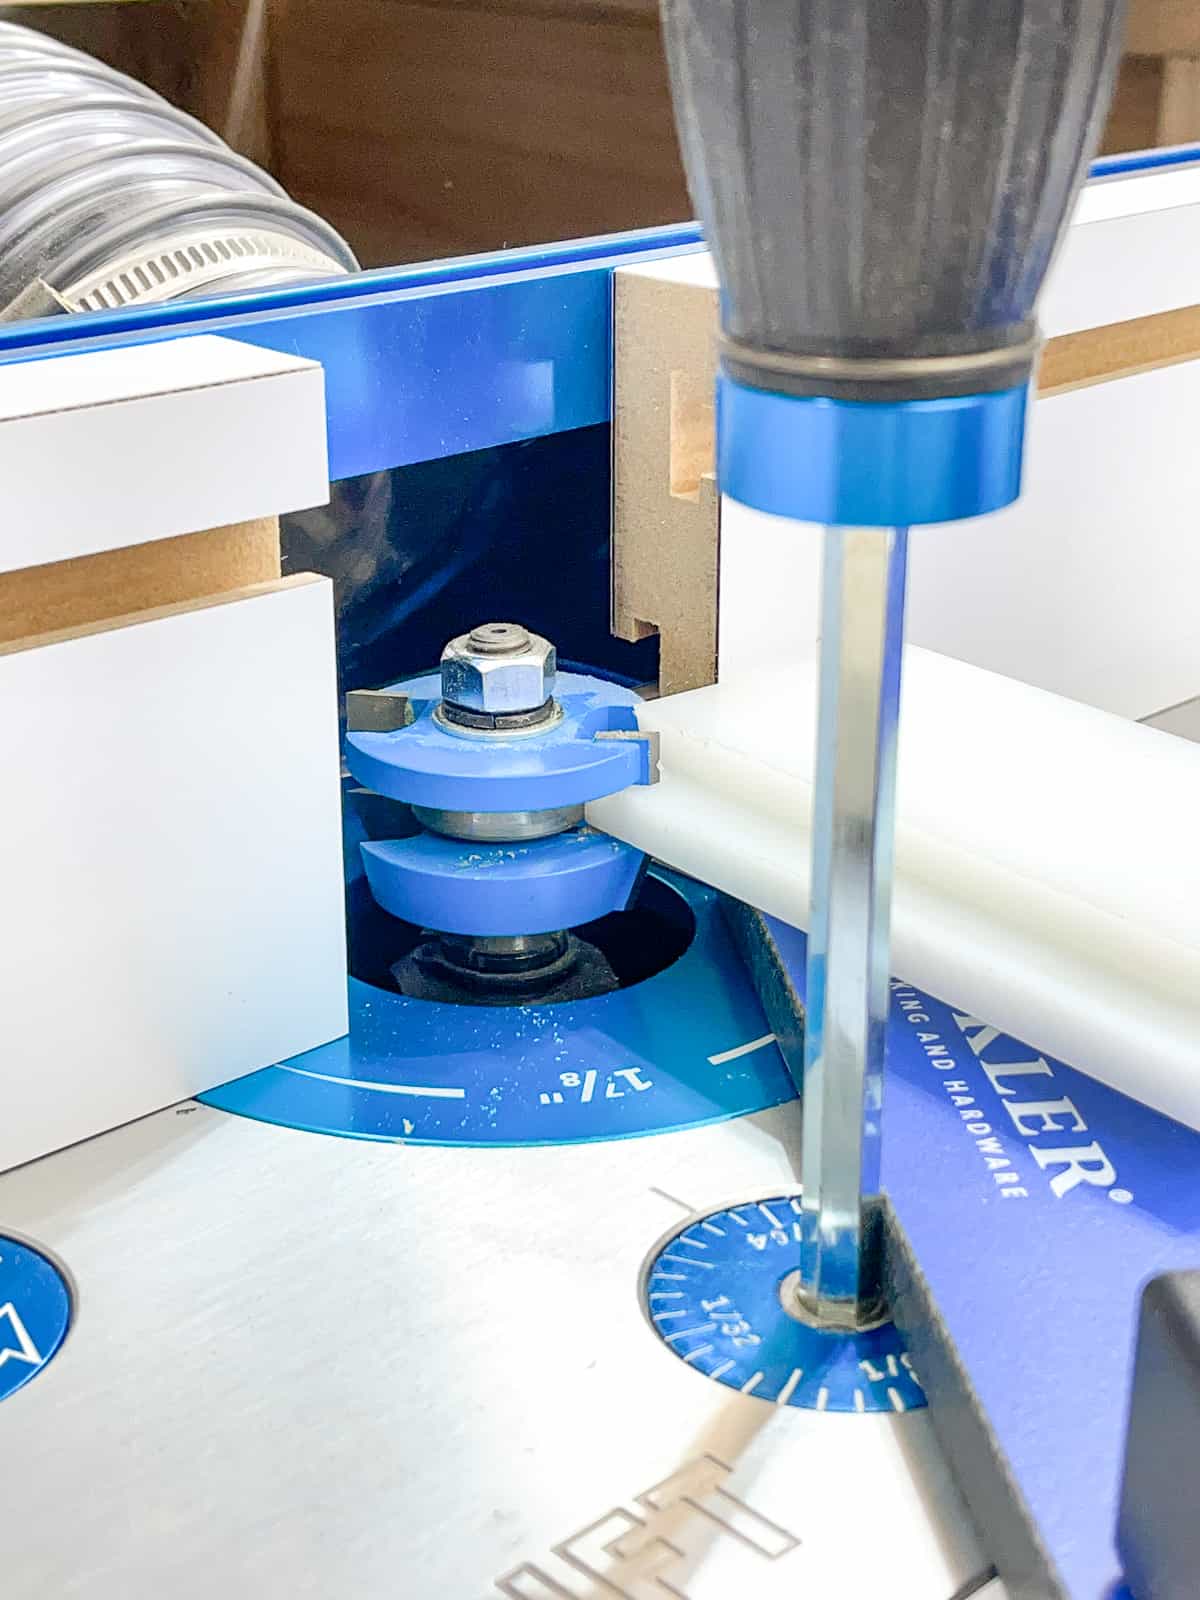
Set up the stile bit
You don't need the coping sled for the stiles, but I recommend using featherboards or rollers on the fence to keep the boards flat against the router table surface. You'll also need push blocks to move the board past the bit without getting your fingers too close.
Use your final test rail piece to set up the height of the stile bit. The cutter should line up with the top and bottom of the tenon. Remember that the decorative profile should be facing down!


Set the test rail piece aside (I marked mine with KEEP on the end so I don't accidentally toss it!) and grab another scrap of the same lumber. Run the long edge of the board past the stile bit, then check the results.
The tongue of the rail should fit snugly in the groove of the stile to create a perfect 90 degree angle, and the top and bottom should be flush.
You can see a little bit of tearout on the inside corner of the rail here. This will be cleaned up once the groove is cut, so make sure that edge is facing in towards the stile bit.


It may take a few tries to get the top and bottom surfaces lined up correctly. The first time I set up these rail and stile bits, I went through half a dozen scrap pieces before I finally got it right!
You should also inspect the cut quality along the groove. Is the profile smooth, or are there chunks missing? If you're running the board through the router against the grain, the bit won't cut as cleanly. Increase the speed of the router to reduce tear out, and consider flipping the board around so it cuts with the grain.
Once you have the perfect setting, lock in the router bit height and run all the stile pieces through. You'll also need to cut a groove on one side of all the rail pieces.

You might end up with this little flap of wood left on the rail pieces. Just cut it away with a utility knife and lightly sand it smooth.

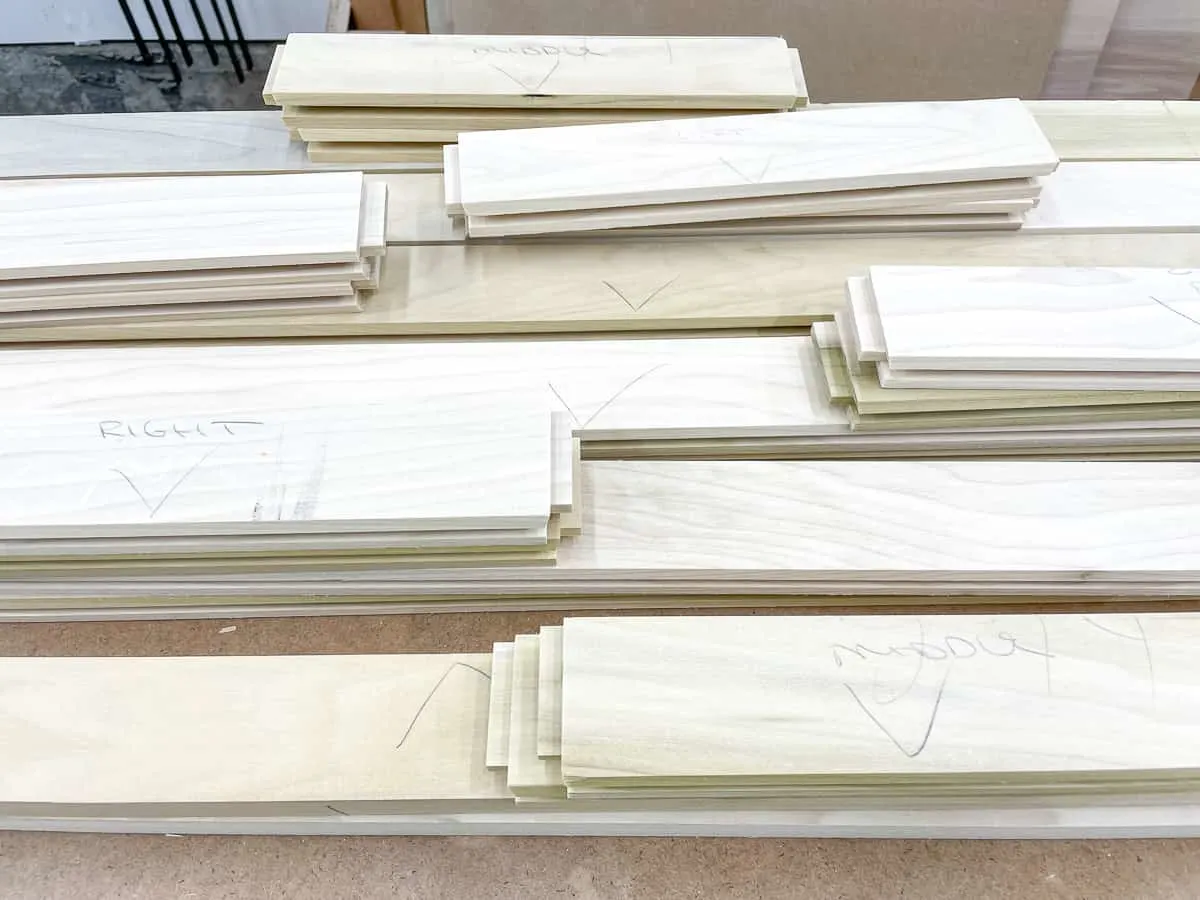
I recommend labeling all your pieces so you don't get them mixed up. Consider your space and how many clamps you have available for glue up. I'm limited to making six doors at a time because I don't have room for more than that in my small workshop!

Now you're ready to start assembling your cabinet doors! I'll have a separate tutorial for this process soon!
Frequently Asked Questions
What is the best wood for rails and stiles?
The frame of a door gets the most abuse, so you should choose a hard wood that can stand up to wear and tear. Pine and other soft woods will dent and scratch too easily in a high traffic area.
For painted doors, I prefer to use poplar. Its smooth surface and closed grain paints beautifully, and is fairly inexpensive. For natural or stained woods, you should use a hardwood that matches the center panel, such as maple, cherry or oak.
What speed should I set my router?
The ideal router speed depends on the type of rail and stile bits you're using and how much material they remove in each pass. Make a few test cuts at a lower speed and inspect the results. If you're getting burning or tear out, raise the speed and try again. You'll want to use the lowest speed that produces the best results.
Can I use a handheld router with rail and stile bits?
No, rail and stile bits should only be used in a router table. They're too large to safely use with a handheld router, and you won't get consistent results.
Check out these other woodworking tutorials!